Thursday 30 December 2021

FH Dry Build - Exhausts

Well, it turned out that five years in a damp loft by the seaside wasn't the best thing for the old siamese pipes the bike kit arrived with, so as the pipes they supplied for the SQ4 were so nice I bought a new set from Feked. Feked make nice stuff which they pack very securely and deliver promptly. A good outfit:


...and they fit, too. The silencer construction is a perforated tube with glass wool around it, juts like the Burgess original on my W/NG. Should sound throaty! 

Nice deep socket fits the cylinder head stub:


Bracket is in the right place:


Two things here - the pipe bend is a little tight but will spring down to the right position with a little force, and the silencer end of the pipe needs about 2" trimming off it:


I'm not sure this bend is in the right place, but it does clear all the bits it needs to:


Someone else's bike, much the same:


Looks pretty good.


Monday 6 December 2021

FH Dry Build - fixing the side stand

The kit of parts came with a side stand that fitted the frame lug but otherwise is unlike any side stand I have seen on an Ariel - from a bit of Googling, it appears to be Triumph. I chose to modify it to fit the FH - in fact I would use it to make a replica of an Ariel one.


You can always get help with your Ariel - from fellow members of the AOMCC, or perhaps members of other Ariel clubs around the world. There are a few. This next picture came from such a source and shows the business end of an Ariel side stand:


The donor stand had a small hole for the spring. Since the first bit to get right was the fitting of the stand to the frame and the ability for it to hold itself safely in both positions (Ariel side stands stay down until you flick them back with your foot), I needed to make a peg for the spring. Another job for the mini-lathe:


Unfortunately, the first attempt revealed that I didn't have enough stretch in the spring - the stand would go down and come up but the spring would fall off before the stand was in the parking position.


I had to cut the peg off and re-weld it 3/4" further down the leg. I need a few more bits:

Side stand kit

Here's some more AOMCC help. Those feet belong to Lee Mallabone, and that's his side stand - he's showing me what shape the foot needs to be:


Using my hacksaw and the linisher, I trimmed the foot I'd made to match the original that Lee showed me. It's close enough - it's actually a bit bigger, which can only help out in the field:


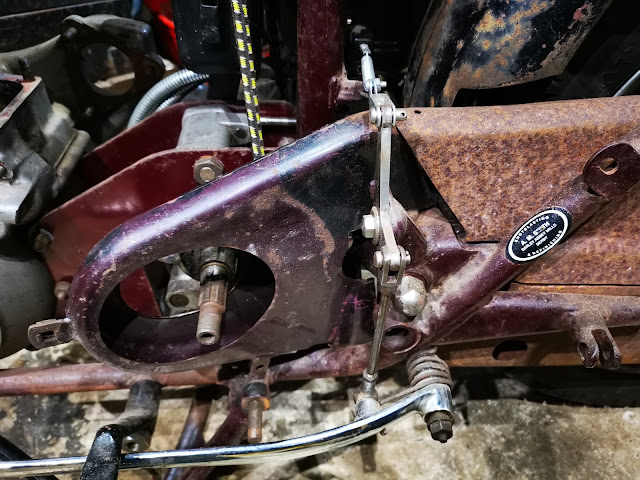
Here it is back on the bike. I've relieved the inside of the clevis a little such that it comes around the lug a bit more, but to be honest I am not sure I want it to stay down - which it doesn't:


However, at the other end of the travel, it doesn't come up as far as I think it should:


Have a look at this:


Either I need to modify the clevis so that it will move further in both positions (which will have the effect of making it stay down) or I have to change the frame lug to relieve the stop at the parked end.

The next job is to trial fit the exhaust - then I can work out where the 'foot finder' pedal needs to go. More on that later.

Sunday 21 November 2021

FH Dry Build - Barrel and Head

After completing the primary case installation, I moved on to the head and barrel. This was pretty straightforward, and I retained the head and barrel in place with a couple of bolts each, though the threads will need cleaning up when I rebuild the engine.


The main purpose of this step is to establish fixing points for the exhaust, carburetter and head steadies. The head steadies fit to two of the downward facing rocker box studs and its clear that the existing ones are fretted quite badly and will need replacing.

Secondly, the kit of parts I bought all those years ago included a brand new Amal Concentric Mk1 928 carburetter so it will be interesting to see how that performs - it will be a new experience for me. The FH was intended to have two bolts holding the carburetter in place, but unfortunately the large tickler fitted to the 928 prevents one of the bolts going in - it will need a couple of studs making up or I could use the 5/16" CEI x 1 1/16" stud specified by Ariel for the iron head singles under part number 0183. 


Tuesday 9 November 2021

FH Dry build - primary case

One of the problems you always come across when tinkering with unloved old bikes is broken screws. The Huntmaster hasn't had many, but while I am working on the dry build it is time to fix these kind of problems as we come across them.

This is a typical example - a broken 1/4" BSW screw in the primary chain case. Of course, it is too short to get hold of and Plus Gas has no effect on loosening it enough so that the little bit I can get hold of can help it come free.

The only sensible option is to drill it out and and re-tap the thread. I set the inner case up on the pillar drill and used a centre drill to start the hole, opening it progressively (0.5 mm increments) to tapping size, hoping to release the remains of the screw.


This didn't work out, and after attempting to chase the rest of the bolt out with a tap, for the first time in my life I managed to break a tap in the hole. I spent the rest of the evening laboriously grind it out with a diamond coated tool in the Dremel.

Once I had removed the tap, the next step was to drill out the mess for a Helicoil:


Then tap for the Helicoil:


Then screw in the insert. You break off the tang used to put the insert in when you are done:


Thursday 14 October 2021

FH dry build - one step forward...

 I spent a lot of time reshaping the FERC so that it would fit around the swinging arm, and I'm pleased with it now.

Trouble is, I didn't realise that to get the front section on, the rear has to be off:


And, as if to rub it in, you can't get the rear off with the shock absorber in position... 


So, its all got to come apart again but that's what dry builds are for. It's helped by the removal of the rear end of the mudguard, which looks good. I'm pleased with the work I put in to that. 


When it's back together I can trial fit the inner primary chain case. 


The front section of the FERC has a captive nut to attach to the inner primary case. 


A small job coming up - remove the broken case screw:


While I was poking around the rear end (and wearing working clothes) I used a crayon to make a mark on the swinging arm, with the mudguard, centre stand and oil filter in place. This was where the swinging arm grease nipple would go. 


Thursday 2 September 2021

Model A - Exhaust

Well, that's a job off the list. Thanks to fellow Ariel enthusiast Mark, I have this splendid genuine Ariel tailpipe for the Model A, delivered to me at Holt Station on the North Norfolk Railway. The trouble people will go to to help a fellow motorcyclist leaves me speechless sometimes:

This is a terrible picture but the Model A is sheeted up behind the SQ4 and the W/NG while I am doing the FH dry build:

This might be better:

It looks marvellous.

Thanks Mark.

Thursday 12 August 2021

FH - Dry Build for the cameras

The Huntmaster has made it off the bench!


The plan is to put all the major assemblies together and have a clear up, and then take the pictures for the dating certificate. After that, it will be time to strip and paint.


Charlie's Shed - Re-corking Cutch Plates

 For no good reason, other than the fact that the Square Four cork clutch is excellent, I decided to replace the part-worn Ferodo lined clutch plates. The W/NG clutch had always felt more severe by comparison and while the Ferodo clutch is correct for the W/NG, sometimes I do stuff because I feel like it!

The plates and corks come from AOMCC Gearbox Spares, and very good they are too.


The first step is to warm the corks in boiling water to make them soft and pliable. They were in the soup for about 15 minutes.


I fished the corks out in small batches with a draining spoon.


These are the plates - they look like they have been laser cut. The edges are very crisp and clean - the holes are perfectly shaped and there are no burrs. Oh - and they are perfectly flat!


You push the corks in from the wide end of the slot, trying to keep an equal amount of cork protruding from the plate on each side.


Push the cork down, and manoeuvre the wide end in until it is sitting evenly all around the slot.


Repeat the process until you have done all the corks in all the plates!


As it turned out, after drying overnight the stack of plates was too thick for the basket.


What you do now is to work each side of each plate against a large flat board covered with sandpaper. This is 120 grit - I rubbed each plate over a couple of times to make sure the corks were level and to take a fraction off each one. Very soon, the stack fitted in the basket.


At the same time, I renewed the clutch springs - also from AOMCC Gearbox Spares. On the left is the old spring; on the right, the new spring. Whilst the old spring is clearly collapsed, the odd thing is that it is the same wire diameter as the new one - springs for a Ferodo clutch should be heavier.

Tuesday 10 August 2021

FH Forks

 The next step for the FH is to investigate the forks

With the legs off, you can feel the wobble in the bushes. The seal carriers are in a pretty poor state cosmetically and look like they have been shortened:

The stanchions aren't too pretty either:

Next is the inevitable struggle with the three screws that retain the top shrouds:


With those off, I put the forks back together to deal with later.