Friday, 23 September 2022

FH Dry Build - Centre Stand

First published February 2022

 One of the dry build jobs that I had to deal with was the centre stand. Some years ago - 2014 actually - I had repaired the feet which were completely worn out and recorded the experience here.

I put it back on the bike once the exhausts were in place to have a look. I knew the stand would fit the frame, but it's all the other parts that it has to fit around that are the problem. Here you can see two issues - one, that the stand leg is bent - in fact they are both bent, a common problem and two, that the foot fouls the exhaust: 


With the stand off, you can see that the stops are a bit worn - maybe worth building up, maybe not.


To deal with the bent leg, I have put an old sidestand in the pivot eye, and heated the leg up - it has bent back quite easily.


Next problem - the feet. Do they look uneven?


I've got 30 mm from leg to inside the foot on one side:


And I've got 25 mm on the other! I think that's why it fouls the exhaust.

Maybe I'll have to remove that foot and extend the tube a few millimetres.

September 2022 Update

Months later, coming round to this job at last I turned the bike around in the garage to have a look at the stand foot. The first thing I realised was that the exhaust bracket in front of the engine was not touching the frame; the second was that the silencer was considerably further outboard than the other. The footrest was not fully home on it's spline! I took this picture with the footrest off:

Hey presto, no fouling problem!

Wednesday, 14 September 2022

W/NG - Number Plate and Rear Lamp

 For a while I've felt that I wanted to impart a more traditional English look to the back of the W/NG, which for years has worn its Italian number plate and lamp:


I chose the 5647-35 number plate which I found on eBay. It's designed for the flat 'D' mudguard with no rib, so I have cut a notch in it for the rib.


It's got a replica MT110, which would have been a standard fit for civilian machines in-period:

Sunday, 4 September 2022

Charlie's Shed - repairing hexagons

Some while back I made a set of new chain adjusters for the Model A - the post is here. It took a while and wasn't particularly tidy - I made the screws on the lathe, built the heads up with weld and milled the small hexagons. 

This post is about fixing a similar issue. 

I was adjusting the rear chain on the W/NG one day, puzzling for the umpteenth time about the hex size which didn't fit anything other than an 8 mm spanner, when I realised the hex heads had been filed to suit  spanners that would have been available in Italy where the bike had spent most of it's life.

I resolved to fix them, and came up with a better way of doing it than the last time. Here's the problem:

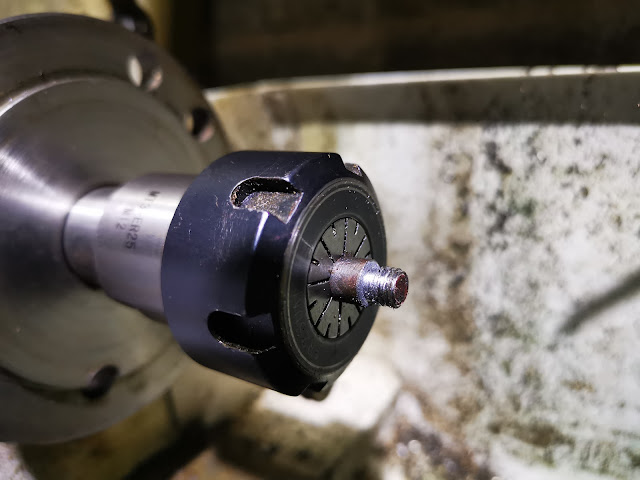
I took the adjusters off and removed the paint so that I could hold them in a 8 mm collet.


I turned off the remains of the hexagon, leaving a diameter of 1/4":


I put a 1/4" BSF thread on the end, to suit some reduced hex nuts I found on eBay:


I added an undercut, so the nut, chamfered on one side only, would snug down to a square shoulder:


I brazed the nuts in place, not wishing to risk damaging the small hex with weld:


I cleaned them up on the wire wheel, and they look as though they have been there for years:


That took about an hour, with a much simpler set up than last time.

The only difficulty I found was obtaining nuts with that size hex - I can't find bar stock in that size - the smallest I can get is 0.445", which is for 1/4" BSF or CEI, or 3/16" BSW. It occurred to me that a simple way to machine a small hexagon bar to make nuts in the future would be to start with a larger one (could be metric or anything), hold it in a milling vice and reduce it with an end mill, using the larger hexagon to orient each face while I machined it smaller.

Thursday, 1 September 2022

W/NG - fixing the dribbling

 Over the past couple of weeks, I've noticed the W/NG float bowl has been overflowing - but only before I start the engine. When it's running, the leak stops - presumably the needle seats a bit better with the movement, or perhaps the engine uses what little fuel is leaking. This probably contributed to the starting problems my son was having a few weeks back.

Anyhow, I resolved to sort this out, initially by having a look and cleaning any debris from the bowl or from the fuel pipe, but this had no effect. The bike has a new fuel filter so there wasn't much in there anyway.

At the suggestion of a couple of guys in the AOMCC, I lapped the needle into it's seat usng Brasso. I dropped a slug of Brasso down the fuel connection:


Followed by the needle, which looked like new:

I held the needle in the chuck of my pillar drill and ran it for a few seconds, allowing the weight of the float bowl to hang on the needle.

The needle now has a thin, continuous ring around it, showing where the Brasso has worn the seat a little. It now seals perfectly, and reseats when I operate the tickler.