Thursday 29 October 2020

W/NG - last bits before she goes back on the road

I mentioned in the last post that there were a couple of things I wanted to sort out before the W/NG goes back on the road. When I refitted the clutch cable I found it was mysteriously too long - strange in that apart from replacing the missing thrust bearing everything is the same as when it came apart. Investigating, I found the clutch adjuster was missing, having been replaced by this homemade one:


AOMCC member Lee Mallabone saved the day and sent me this one, with it's adjustment bolt and ball, which incidentally is peened in place:


That was an easy fix. I took the opportunity to lubricate the cables, and the ones on the SQ4, with WD40 and my favourite cable oiler:


Tuesday 27 October 2020

W/NG - first start after engine rebuild

 And there she goes:


Just a few bits left - the decompressor is not adjusted correctly and the clutch adjuster is a home made one I'd like to replace. 

Friday 23 October 2020

W/NG - Oil pressure

One of the more hair-raising aspects of rebuilding an engine is making sure the lubrication system is working before you go out on it. You fire it up, and then hold your heart in your mouth waiting for the spurts of returning oil coming into the tank to tell you that all is well.


When I built the SQ4, I ran the engine up on a big power drill, as I wrote in this post. I should maybe have done that this time, but I have sealed up the primary case now and anyway the drill might undo the shock absorber nuts - you cannot get to the timing side of the crankshaft on a single, with the oil pump in place.

You are reduced to some right leg exercise on the kick starter. Waiting for oil to come back in the return will take a long time, but you can see it much sooner either here, at the blanked oil pressure gauge take off:


or here, at the rocker oil line connection to the timing chest. Slackening either fastener should see oil dripping out if all is well with the pressure side of the pump. 


Of course, oil at these two points does not mean it is getting to the big end - you will have to wait for it to drip out of the sump plate (if that is still off) or return to the tank.

You'll have to cope with living on adrenaline and biting your nails for a bit longer.


Thursday 22 October 2020

Charlie's shed - Making bolts

Pulling the rocker box off the exhaust side of the W/NG engine revealed that the bolt I had planned to copy, to replace the missing one, was too short. Since that came from the same position on the inlet side, I now had two new longer bolts to make. According to the parts list, the rocker box bolts are 2 5/8" and 2 7/8", both 5/16" CEI of course.


To make a couple of bolts I cut two pieces of 5/16" bar stock and a piece of 0.515" hexagon bar.


I drilled a 20 mm length of hex bar 5/16", to make the bolt heads and parted them off to a thickness of 6 mm.


Setting them up in the vice, I joined the heads to the bolt with an autogenous weld - the welder was set to 30 A.


With the heads in place, I parted the bolts to length. With the same setting, I threaded the first 3/8" of the bolt using a tailstock die holder to ensure the threads were parallel:


Like this:


I use this Molyslip cutting compound for thread cutting:


Since the bolts were slipping in the chuck, I cut the remainder of the thread in the vice:


With the thread done, I put a small chamfer on the bolt head.


The two finished bolts are shown in the centre, with two short ones top and bottom:


Whilst we have the Whitworth hexagon bar out and the tailstock die holder in the lathe, we'll take the opportunity to replace the missing tank bolt. The W/NG has always had M8 tank bolts, replaced some years ago by me, after I found and temporarily repaired the holed tank - the previous owner had replaced the original bolts with M8 screws and had managed to puncture the tank in four places - the story is here. I made some new tank bolts from very long, standard M8 bolts cut down and threaded for a very short length, so they could be done up tight and not puncture the tank again. Because I'd used standard bolts, there isn't much room to drill the heads and at some point in time one of them had gone missing. Again because I'd used standard bolts, they had 13mm  AF heads and none of the on-board spanners would fit, which was a nuisance - I had to use the adjustable which the W/NG carries in it's tool kit.

So, I resolved to make a new one, using this 1 7/16" tank bolt from the Model A as a prototype:


I have a bit of 0.515" hexagon bar in the lathe, and I have reduced a length to 8mm diameter, cutting the thread to a suitable length using the tailstock die holder to ensure the thread is concentric with the bolt axis.


I parted the head off to a length that matched the one from the Model A, and set it up in the pillar drill to drill a wire locking hole. I started the hole with a centre drill and used a 2 mm drill to go through.


I put a small chamfer on the head of the bolt, to remove the corners, and that's it.


I need one more of these for the W/NG, and two at 1 5/8" long to replace all the modern ones - then I will chemically black them. I also need one for the Model A, though this will use the original 5/16" BSW thread.

Tuesday 20 October 2020

W/NG - Primary drive & clutch assembly

Now that the engine is essentially finished, we can turn the whole bike round and reassemble the primary drive. There's not enough room in the workshop to get to both sides - there are five bikes, four of them Ariels, in here at the moment.


First job is to look at the inner case and to clean up the joint face. This is a close fit, but it does contain the primary chain oil so we will fit it with a dose of Threebond.


With the inner case fitted, we will add the single internal retaining screw with some Loctite 243. You don't want this coming out in service.


You'll note that the spacer behind the shock absorber is already fitted, so we can grease the mainshaft ready for the shock absorber:


Next comes the sprocket and the splined half of the shock absorber. These look odd and confuse people because the outer half of the cam is much bigger than the inner half, and it looks like you have a mismatch of parts. Don't worry, it is supposed to look like that on an Ariel single.


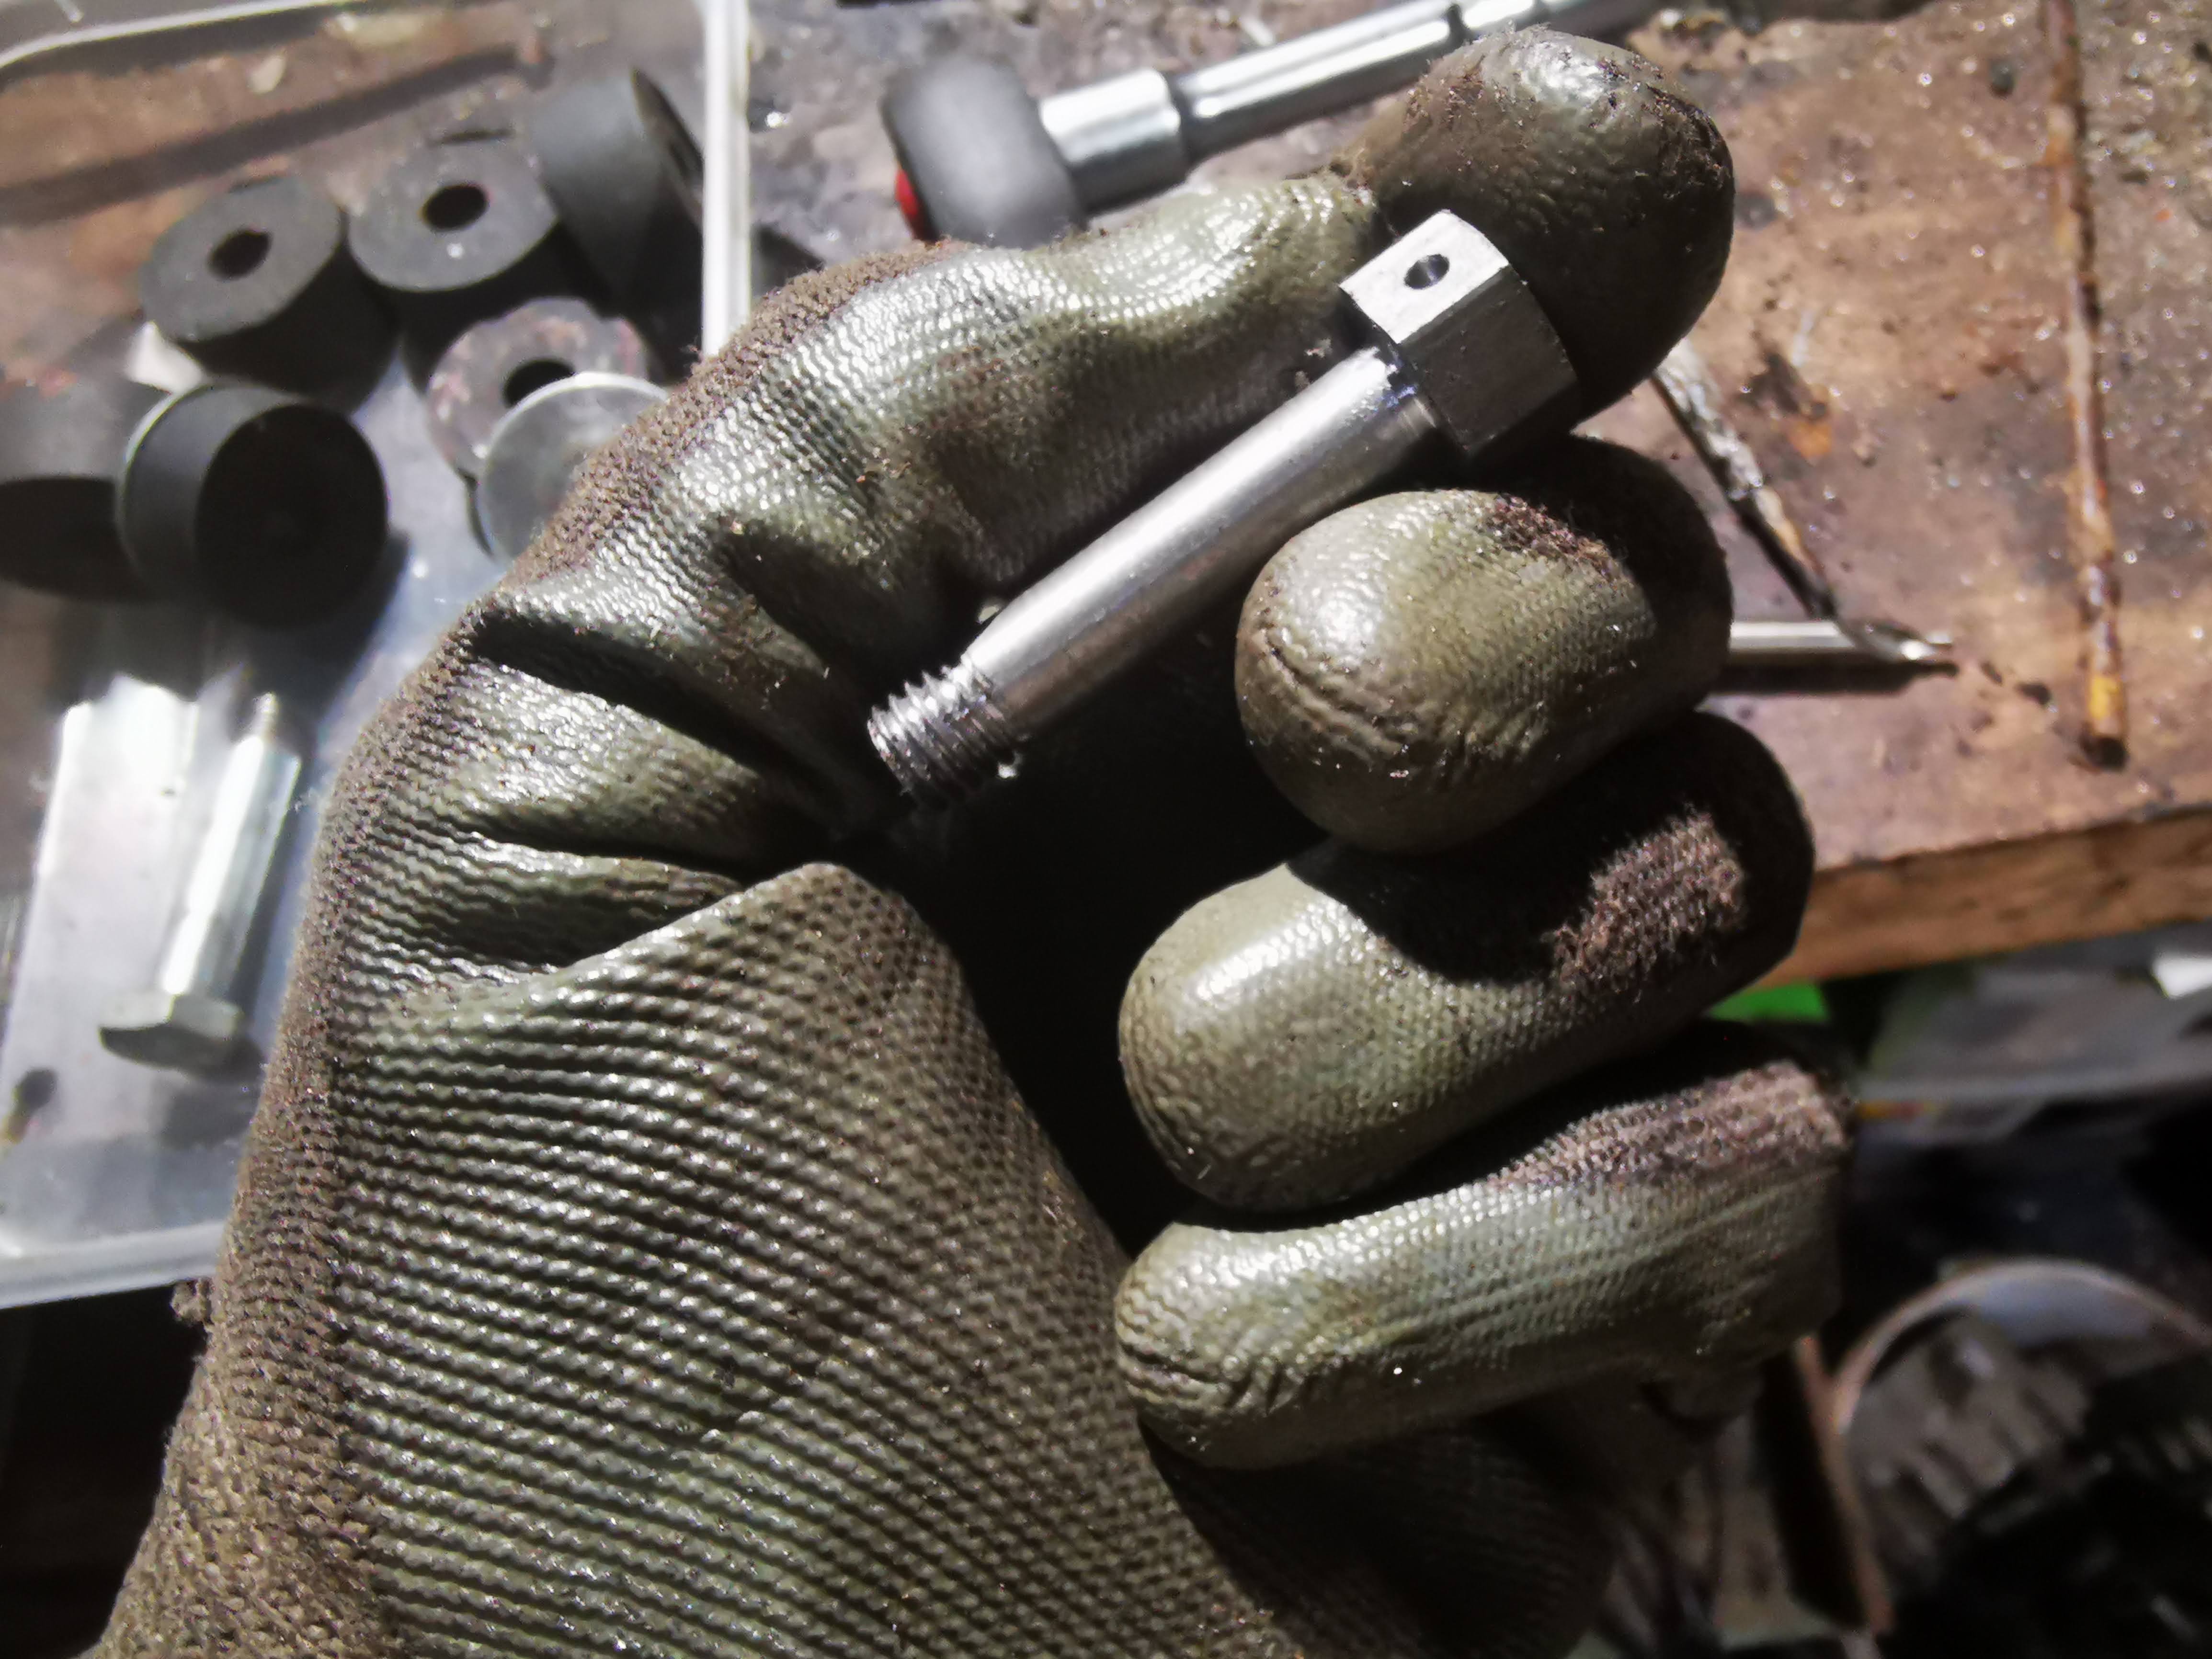
Next comes the spring, cap and the first nut, followed by the special lock washer:


Then comes the second nut. The tabs on the lock washer bend alternately over the inner and outer nuts.


In the previous picture I had test fitted the clutch sprocket only to find that it was making a rubbing sound. That turned out to be this homemade oil trap and the rivets holding it in place:


You can see the witness marks on the back of the sprocket. I pushed the offending part of the aluminium ring towards the gearbox a little, and relieved the rivet heads somewhat with a riffler, which seemed to do the trick.


I've never been troubled with a leaking primary case on this bike, so this trap seems to be working.

I have some new Renold primary chain, and I need 80 pitches. I've cut it to 81 pitches just to make it easier to check - avoiding the rest of the 10' length that I bought. I couldn't get it to fit, so I checked the teeth on the sprockets - 20 on the engine and 44 on the clutch, standard for the W/NG.


I'd loosened the rear chain and moved the gearbox forward as far as it would go, but it still wasn't going to go on with 80 pitches. Eventually I walked away and took the dog for a walk, which always clears the mind. Coming back later, I found the rear wheel spindle was stuck in the frame lug and the chain wasn't as loose as I'd thought - with that free, everything fitted as it should.

When cutting chains, you can use the chain splitter from the bike's toolkit - these military bikes are very well equipped. However, if you are on the workshop, it's much better to grind the staked end of the pin off. Whilst the splitter tool will happily push a pin through, it will also separate the roller from the side plate on the inner link which you will have to fix.


Before you finally fit the chain, make sure the inner primary case joint faces have been scraped free of old gasket. do it now, or it will end up in the chain. Scrape the outer half too, and clean out the screw holes with drills or taps, whatever you need.


I use Threebond 1215 on these cases. Way over specified, but it is what I have and it's a good colour.


Did you spot this earlier? The chain is out of alignment and the outer case won't fit. I have the clutch sprocket on backwards.


That's better. Fitted and screwed down; clutch next.


This is the later tab washer for the clutch basket screws. Here, I've bent the corner of each tab up a little, which is very difficult to do when they are in situ:


And here is the clutch centre with a new nut and tab washer. I have done these up tight but I will not lock any of the tab washers until I am sure that I have fixed the rubbing problem.


I'll fit the pressure plate, cups, springs and nuts and we can use the kickstart to get some oil pressure.

Thursday 15 October 2020

W/NG - Assembling and fitting the head

I finished the last post with the cylinder head paint drying, and I went and had a day on the railway which I recorded in this blog post so that now, the paint has been curing for a couple of days.


It's dry but not very hard. I scrape the paint off the gasket faces with a Stanley knife blade, and set about cleaning the bolt holes with a 5/16" plug tap. Apart from this damaged one, they are all in pretty good shape.


Next stop, put the valves in. We know that these fit, because in the last episode we ground them in so this time it is a matter of fitting the valves, Halite washers, spring seats, springs, spring tops and collets. Collets are a bit fiddly to get in, so the best thing to do is put a lump of grease on the stem and then introduce your spring compressor. When you have the spring compressed, fit the collets with a small pair of pliers, tweezers or a chopstick with a bit of grease on the end:


Push them into place with the stick and slowly, gradually, gently release the spring compressor. Tradition tells us to tap the valve stem with a hammer to make sure the collets are seated and the valve/spring assembly is secure.

Next, check the head seal to the barrel. These engines have no head gasket, but the barrel is machined with a spigot which is ground into the head with grinding paste; the area around the spigot is machine a few thousandths deeper so the pressure from the head bolts is born by the spigot alone, sealing the joint. When you are happy that you have a clean joint all the way around the spigot, you can think about putting the head on - but before you do, you need to sort out the pushrod tubes and there seals.

This is the bottom seal - the old, compressed black one and a new one from AOMCC Singles Spares:


Here's the top seal. You see there is a shorter spigot here, which fits around the spigot pointing downwards in the head. I've assembled these dry, with no sealant:


With the pushrod tubes standing in the crankcase, you can drop the head in place, watching the pushrod tubes settle onto the spigots at the top. Next you can drop the 3/8" CEI head bolts in - which I have previously cleaned on the wire wheel. Tighten these down firmly - there is no recommended torque figure. when that's done, the pushrods can go in. When I dismantled the bike, I stored the inlet and exhaust valve gear separately, so I could ensure they all went back in the same place.


Next I took the opportunity to refit the exhaust, with Threebond 1215, and the carburetter - again with Threebond and a new gasket.


Don't forget to put the little caps back on the valve stems:


Next, you can seal the new gaskets (I'm using Draganfly's new aluminium gaskets) and fit the rocker boxes. Be careful with the bolts - three are the same length (about 2 5/8") but one, the one above the pushrod, is longer - 2 7/8". The one shown in this picture is wrong - it's a short one. The danger of this is that you will pull the thread if you overtighten it.


This looks easy doesn't it! What you can't see in this picture is that I had refitted the exhaust rocker box without aligning the rocker in the top of the pushrod. Later, when fitting the decompressor I found it wouldn't work, and I had no compression. What was happening was that the misplaced rocker was holding the valve open, and preventing the eccentric pin on the decompressor reaching the pad on the rocker. Secondly, one of the long rocker box bolts is missing from the exhaust rocker box, so that's two I have to find.

I've now managed to fit both rocker boxes without missing anything out! I've added the rocker oil line, and this time I have fitted a cable tie as shown in the parts book for this bike - it's very unusual to see these fitted.

There is still a rocker box bolt missing (two actually), which I will have to make. I've used the opportunity to introduce some oil into the rocker box through this hole - this is not normally possible, but recall that this hole has a chunk broken out of the head and so provides a passage from the bolt hole into the head and down into the pushrod tube. The objective is to get some oil onto the camshaft.

Tuesday 13 October 2020

W/NG - Interlude to engine assembly: fitting the bash plate

I've had the bash plate for the W/NG sitting around for over two years. I bought it on eBay, but I have never fitted it because they are an absolute pain to get on. Here it is, in original paint:


The sump guard mounts to the front lower engine mounts like this, and this is the reason it is a bit of a pain to fit. That stud retains the engine to the engine plates and the lower frame rails, and of course the engine plates tie the upper and lower frame tubes together. Secondly, the stud has to come right out to get the sump guard on. The problem comes because the frame will spring open when you take the stud out and therefore to get the stud in you need to lift the frame rails using the bike lift.


The rear fits in a single 5/16" CEI hole in this cross member, between the engine and gearbox. This hole has been peppered with road debris for years, so it needs cleaning out with a tap.


Once it's clean, you can retain the rear of the sump guard with a single hex screw and washer: