Monday 23 October 2023

FH - a bit more assembly

 A few more bits fitted today - the prop stand is on:


…and having received the correct dome head bolts for the front mudguard, the wheel is back in. Obviously this still needs a lot of work, but once the back wheel is on (more work required on the FERC) it will let me move the chassis about and tidy up the workshop.


Saturday 21 October 2023

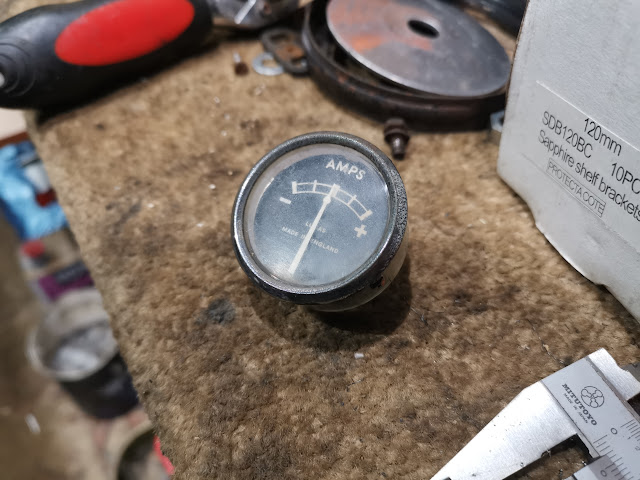
FH - Ammeter identification

 Despite concerns to the contrary, the 1957 Lucas Parts Catalogue confirms that the ammeter should be a Lucas model CZU27, PN 36084:

It looks like this:


And here's the one from the FH:


Friday 20 October 2023

FH - Chain oiler

 A couple of days ago we fitted the FERC with the front chain oiler pipe, which dribbles oil from the top of the oil tank. There's a felt restrictor up there which catches some of the oil from the return, and below the restrictor it's piped out of the bottom of the tank.

We left the pipe pointing vaguely at the tank:


It needs a bit more bending, fitting and fiddling:


It also needs a bit of trimming, and now it fits!

We just need some 4 mm fuel line to connect it to the bottom of the oil tank.

FH - nacelle & handlebars

 I'm working on several fronts here, aiming to find problems and clear space so that I can start on the bottom end of the engine. Once that's in, there's polishing and plating, cables and wiring.

The nacelle went on relatively easily, though the trim on the front doesn't fit too well. That will need sorting out:


I planned to fit the instrument panel, mainly to avoid losing the trip reset cable but I found a few problems:
  • the speedo bracket only fits one way, basically because it's too wide. I fitted it by elongating the holes but it would be nicer if I made a new one.
  • the ammeter is one of those - - 0 - + ones, with no numbers. I'm not sure that's correct.
  • the Lucas U39 headlamp switch is damaged where the clip fits - people prise these out and the Bakelite breaks.
On the up side, both the light switch and the speedometer have PVC cables - maybe the whole bike was wired using that stuff.


Next - working through the little bags of screws, I find the grub screw for the steering lock, so that's fitted:


I treated the bike to a nice set of stainless steel handlebars from Draganfly - made in Bungay. The SQ4 has these too and they are very nice.

There's a lot of work to bring the levers up to scratch though!

FH - Looking at the gearbox

 The gearbox will be fitted shortly. Experience has taught me that with a couple of exceptions you can rebuild the gearbox while the casing is still in the bike, and in some respects it's easier to do it like that.

I've not touched this gearbox yet, other than to ascertain that all the gears select and there is no play apparent in the mainshaft or sleeve gear. The shafts rotate very smoothly and quietly, but we'll need to check that in all gears.

We'll start by taking a few pictures:


Next we will give it a bit of a clean up.

FH - thinking about wiring

 This is the wiring diagram we will use for the FH. It comes from Pitman - Waller doesn't show a diagram for Ariel's of this period for some reason.


We’ll need some additions to that harness of course:
  • An earth cable from the rear light to a central earth point, including a connector to allow us to remove the rear part of the mudguard 
  • An earth cable from the magneto to the cutout button, including a connector to allow the cutout button to be removed
  • An earth cable for the headlamp
  • Wires for the indicators
  • A fuse
We will also rethink the 5 way connector block - it makes no sense to take the headlamp cables through it other than the main feed from the lighting switch. It’s the interface between the main harness and the instrument panel, so we can run the battery cables through it, the earths and possibly the yellow charging cable. 

Lucas started to adopt a standard approach to vehicle wiring in the 1930s, on the Austin 7. We can see that Ariel (supplied of course by Lucas ) followed this to some extent:
  • Black: Anything connected to the chassis earth;
  • Brown: Main battery distribution circuits, containing no fuses and no switches;
  • Red: Side, tail and instrument lighting; number plate illumination;
  • Blue: Headlamps;
  • White: An unfused feed, live only with ignition switch on;
  • Green: A fused feed, live only when the ignition switch is on;
  • Yellow: Circuits involved in or related to battery charging: dynamo, voltage regulator.
Lower level identification could be done by the use of coloured sleeves, as witnessed by the original looms with my 1951 Mk1 Square Four. The standard wasn't formalised until the late 1960's released of BS AU7.

It wasn't until the 1950s that PVC began to appear in wiring looms; hitherto, cables were covered in braided cotton.

This is the original loom from my 1954 BSA Bantam, setting the scene for the FH harness. We’ll do that in PVC.


Thursday 19 October 2023

FH - first badge

 I sometimes think Ariel must have employed a Production Engineer in the mid 1950's, as there are several locations where his cost-reducing influence shows - think about the Spire fasteners in the nacelle, seat base and rear mudguard, or here, on the mudguard tailpiece. There's still a nice little Ariel badge, as there had been since 1952 or 1953, but this one is no longer enamelled and screwed on - it's die cast, and retained in place with Starlock washers.


They push on over a couple of 3/16" legs cast into the back of the badge:


Looks good doesn't it!


The pretty rib on the nacelle fits in a similar way, after polishing:


FH - getting the FERC fitted

 Next jobs are to secure the mudguards prior to temporarily fitting the wheels. First though, we have a few more bits from Draganfly - the fork top nut washers and the steering damper knob spring:

Then we need to fit the FERC, or Fully Enclosed Rear Chaincase in Ariel speak. It's a big floppy tin thing and is a bit of a struggle, but it goes on. You have to fit the rear sprocket and it's stub axle first:


That nut will get plated in the coming months, but I am not so sure if those washers are the correct outside diameter.

I'm hovering around fitting the gearbox but I need to clean it first. Before that can go in we can fit the oil filter on it's bracket - it's nut is a candidate for plating too:

The FERC looks tidy when it goes in; the smaller bolt in the outside of the lower half is a pig though, as it is hidden by the pillion footrest support.

You can most definitely get the oil filter out with the FERC in place!

The front part of the FERC must go in before the gearbox, and that needs the chain oil line:

The front half is retained by two screws to the frame above the swinging arm:

The oil line will need adjusting for length and some bends changing:


First I have to figure out which line to connect it to!

Wednesday 18 October 2023

FH - no progress except for COVID

 Well, there's not much happening at the moment. After a few fun packed days babysitting the grandchildren, I have finally caught COVID - fortunately in it's latest rather benign variant.


In other news, the missing big end bolts have arrived from Draganfly. 


With some detailed advice on some crankcase questions, I'll start building the engine when I'm back on my feet. 

Monday 16 October 2023

FH - Forks and mudguard

 With the arrival of the excellent seal holders from Draganfly Motorcycles, I can assemble the forks:

This is followed rapidly by the front mudguard stay, front stand and finally the mudguard blade itself. 

I had to check the parts book to be sure, but I now know I'm missing the damper spring and the washers for the fork top nuts:

Saturday 14 October 2023

FH - Another painting update

 I’ve now collected the remaining painted bits, which are all the more complex parts with more preparation, transfers and a gloss coat. They look great.

Painter Damon has explained that I mustn’t leave the parts covered while the epoxy cures, so when I get it home I arrange the parts around the workshop or on the bike, as best I can:


The colour is Opel/Vauxhall Monza Red, as recommended by the club, and the tank is painted to a template provided by the Danish Ariel club.

To help assembly, I’ve ordered the shocks from NJB.

You get a flavour for what it’s going to look like:

FH - Building the forks: a false start

As you might have read, after a prompt from the guys on the AOMCC FB page I bought some new stanchions, and very nice they are too:


Build it right, build it once I say. Here are some pits in the old ones and they will destroy the seals very quickly:


These are the original seal holders - they are supposed to be shiny chrome, and someone has cut them shorter for some reason. They are junk now.


I bought these seal holders on eBay - they are plated steel, and are very solid. They came with a set of springs (not the nice progressive springs in the background) for £65, so I thought I had a bargain; the seals themselves are standard lip seals, about £5 a pair.


I put them together with a new set of Draganfly bushes.


During that build I found the first stumbling block: the seal holder tool didn’t fit in the holder.


I needed to turn the tool down by around 2 mm on the diameter. To get it in the lathe, I had to make a plug so I could steady the end with a centre. The tool is too big to go in the fixed steady.


So now I could put the forks together…


End plug and bottom bush:


Here’s the next problem, and it’s Game Over. One of the seal holders is fine, but this one has the thread out of square with the stanchion axis:


So, they were returned to the seller, and replaced with these from Draganfly. They are beautiful.