Monday, 15 April 2013

Wheels


Sample spokes
Amid engine machining and gearbox rebuilds, I decided it would be good to actually ride Amelia at some stage. Standing in the way of this was a set of very rusty spokes on both wheels. I'd hoped to get away with commissioning the bike on it's own wheels, without any form of rebuild (continuing my 'Phase 1' rebuild with no chroming or painting) but it was not to be. Both wheels had at least one broken spoke, and the remaining spokes were very thin in places.
So, a rebuild it had to be.

Amelia has half-width cast iron hubs, front and rear. The front is the 'Qualcast' half width hub fitted to all telescopic-fork Ariels prior to the appearance of the full-width alloy hub in 1956, and the rear is the 5-stud QD hub. Tyres are 3.25-19 front on a WM2 rim & 4.00-18 rear on a WM3 rim.

Max has found some tyres
So, gathering parts. I used Central Wheel Services for spokes & tyres, since they give outstanding service and their prices for tyres were very good. I bought traditional Avon Speedmaster & SM MkII tyres, still made today in a modern soft compound.

Close inspection of the spokes revealed plain spokes on both sides of the wheel at the front, with butted spokes on the drive side at the rear, plain on the other side. This matches the description in the parts book perfectly. However, it didn't match the records at Central Wheel, so I had to provide sample spokes for them to manufacture against. I chose stainless spokes and plated brass nipples this time, since I was not at all happy with the nickel plated steel nipples I bought for the Bantam which, 2 years on, are rusty.

The first thing you must do when rebuilding a wheel is to remove the old tyre. Don't think about using an old tyre for a second - even if it has tread and sound sidewalls, the rubber will be hard as nails and will have you sliding down the road. 

Interesting paint under the original rim tape
Removing tough old tyres can be a challenge, and I often dispense with the traditional levers in favour of a set of bolt cutters, which I use to cut the wires in the bead. On an older tyre, I'll cut the rubber with a Stanley knife to ease the passage of the bolt cutter. Don't bother trying this technique with a modern tyre though, there's wire everywhere!
Rear rim offset
Next, find yourself a nice stiff flat board. A piece of 3/4" ply would be good. We need to measure and record the offset of the rim to some datum on the original wheel - the brake drum is very convenient. Place the brake drum face down on the board, and measure the distance from the edge of the rim to the board

Amelia's front wheel offset is 1 1/4" to the rim on the brake side;

On the rear, it is 9/16" to the rim on the brake side. On the rear, the offset is measured with the brake drum removed.

The next step is to photograph the spoke patterns. Make sure you have pictures of which spokes overlay others, which holes the go into on the rim and please also look at the dimpling on the rim holes and makes sure you know which way round the rim goes. 

Those of you who have read my Bantam pages will know I have rebuilt at least one wheel with the rim the wrong way round - the result is not pretty as all the spokes will be bent.

My reference photos are shown further down the page.

The next step is a real turning point in the rebuild: take your best bolt cutter, and cut the all the spokes. Do it within an inch or two of the hub. If you cut near the rim, it will be much more laborious to feed all the rusty spokes through the dirt encrusted holes on the hub.

Bolt cutters - did I really do that?
The next step is to get the rims off to the platers. This takes a while, so don't hang about! While they are gone you can clean up the hubs, get them painted, recondition the brake plates and replace the bearings.

Incidentally, I spoke to Tony at JD Wyatt Contract Polishing, who told me that it would reduce the cost of the polishing if I were to leave the painted rim centres in the blasted condition. Since this would provide a key for the paint, this is what I decided to do.

Spoke Patterns

Spoke patterns for the rear wheel:


Spoke patterns for the front wheel:


Saturday, 16 March 2013

'Puzzled' of Norwich writes on the subject of Brake Rods...

Out here in the hinterlands of East Anglia, the winter has been hard & long & devoid of much motorcycling weather, so we have had to content ourselves with small jobs we can do inside, or snatch brief interludes of inner (shed) calm amidst the fun & excitement of family life.

Brian Challinor mailed with a question about the straightness of my brake rod, which had to wait for such an interlude. My brake rod is as straight as the day it was drawn through the die, since it is brand new and has never been fitted.

However, since that interlude came today, I have had it fitted to the bike. Here are several shots showing it in place:


As you see, it doesn't fit - due to the aforementioned 'straightness'

Here's a shot from a 1989 copy of 'The Classic Motorcycle' of a supposedly 1952 Square Four - I say 'supposedly' because there are a few elements that are more 1950 than 1952. Here's the brake rod:


Careful study will show you that it is bent as the proverbial 9 bob note.

Here's another one, a 1951 bike sold at Andy Tiernan's a few years ago:


Again, bent. The case rests m'lud.

So, another day. another interlude... I have taken that most useful of tools, the wire coat hanger, and bent it to form a dummy brake rod, for the purpose of determining the routing the real thing should take and the bends that would be necessary to accommodate that routing. Having satisfied myself, I bent the real thing. Here it is:

Side view, see how long it is, and the poor (low) position of the brake lever?

Here is a top view, which gives an idea of the two bends:


And here is a view of the brake rod and it's proximity to the brake plate and Anstey stirrup:


Looks like the brake arm might be the wrong way around, and the rod needs to be shorter. I'll leave that until I have relined the shoes and positioned the pedal properly - once it's cut shorter, it can't be lengthened again!

Here's a view from Brenton Roy's original '51 Square, suggesting that my installation is along the right lines:


Proving yet again that the AOMCC forum is a wonderful resource for us! I'm thinking that my brake arm is a little more bent than Brenton's:

Wednesday, 13 March 2013

Yet another Iron Curtain relic...

My dear son Thomas has a habit of bringing home examples of the finest Eastern Bloc motorcycle engineering available for under a tenner, mostly from eBay.

This was the first one:

It's a Minsk 125 marketed in the '70's under the Neval banner, and is one of those myriads of DKW RT125 copies of which my Bantam is a fine example.

He painted it, serviced it and we spent months fiddling around with a peculiar electrical system with no battery that was never going to drive those indicators without flashing all the other lights at the same time. It went OK though. 

He sold it for a profit, financing the purchase of whatever students drink these days.

It was followed by an MZ TS125, courtesy of eBay, it was the Luxus model (the one with the real hair?) with the rev counter. This was a bit more adventurous as when it arrived it had no wheels, tank or seat. He collected from somewhere in Hertfordshire, on the way to my Dad's funeral. He turned up behind the hearse with this MZ stuffed into the back of our Morris 1000, which was never the same again. And no, it wasn't an estate, or a van, or a pick up - just a regular two-door saloon.

Here it is:


He did a great job with it, collecting all the missing parts, repainting & rebuilding. This is how it ended up:

Strangely enough, it looks just like any other TS125 doesn't it! It ran pretty well once we got it going, which in itself was an adventure because some numbnuts had fitted a home made base gasket without cutting the transfer ports in the gasket. Puzzling - the carburettor had fuel in it, the jets were all clear, but the plug was dry...

He now has this one as well, which like all true enthusiasts he has in his dining room - along with cats & rabbits. His girlfriend, bless her, is just as enthusiastic! It quite brings a tear to my eye, reminds me of the 250 Matchless that used to occupy our living room:

So this is the latest addition, another eBay find. We bought this one together - I paid, he went & collected it - as a kind of joint project & a 'congratulations' for getting a promotion at work:


This is how the advert was worded:

1981 MZ TS250/1 Supa 5 restoration project or for spares.
Both tyres are useless and have punctures, the silencer has the usual case of MZ Rust Scabies, both tank panels have quite good chrome for an MZ but aren't perfect. The grey colour is primer and the general gunky condition is old Waxoyl put on years ago to try and help preserve it.
Engine kicks over freely and seems to have quite good compression, all gears seem to select - but it's not a runner and there's no Tax or MoT so please don't think you can ride it away. (It's happened!).
It has the correct front indicator lenses, sound speedo and tacho brackets and the rare-ish side stand plus a Rear lens and tool-box cover (no lock) come with it.
Originally bought by me (in this state) as a source of spares for my other Supa 5 back in 1994......and there it's sat ever since; and as my ride to work Supa 5 has long since gone this may as well follow it.
Interesting number plate? TEX 6**W
All in all a nice little project that just needs a little T.L.C........you could have it running by the weekend (lol)!
Just to re-iterate this is a non-running project, with no Tax or MoT so you will need a van or trailer to take it away (I'm unable to deliver). We are near Bury St. Edmunds in Suffolk.
Having said that, there is a possibility I could take to Beverley (near Hull) for collection from there on 23rd February - but it is only a possibility, so PLEASE contact me first before assuming it's going to happen!
Any queries, please email before bidding.


And here is another view:


Now that is it at home in my garage (another thing he has learnt - why put stuff in your own house when you could leave it at your Dad's?), I have to say it is a fine machine. The Waxoyl the previous owner (I don't know his name) smeared all over it has made a great job of preserving the alloy and some of the chrome. It has apparently been standing in a garage for the past 20 years.

The rubber is shot to bits though. I was tempted to put some tyre sealant in the tyres just to move it around more easily, but on screwing the can onto the valve I found the valve completely detached from the tube!

So there it is. Waiting a bit of time, for #1 son to buy a battery and for me to take a trip to Leeds, where I understand Wyldes have some tyres at a good price...

Wednesday, 6 March 2013

A Good Thing

Aside from motorcycles (and we have yet another MZ in the family) we have a fabulous event to announce, helping to fill the hole left by the dear departed Ruby, our Cocker Spaniel.

This is Max. He is a 6 month old chocolate Sprocker (Springer Spaniel x Cocker Spaniel):

Isn't he great!

Hack & Slash

Spurred on by idleness, I have done a drastic thing to my original mudguard at the rear - I have sliced it almost in twain with a hacksaw.

The issue is that to get the L-stays into their studs at the top of the spring housings, I had to put a lot of pressure on the mudguard.

The reason is that I have, whilst reinforcing the mudguard, inadvertently straightened it out too much.

First I made one saw cut in each side, than I flexed the guard so that the L stays fitted into their lugs.

I found that my saw cuts had closed up completely. I then made a second cut, which partially closed up. Now I had no tension in the guard and I had a gap in which to re-weld.

Now all I have to do is weld it up again.

Brake Light Switch

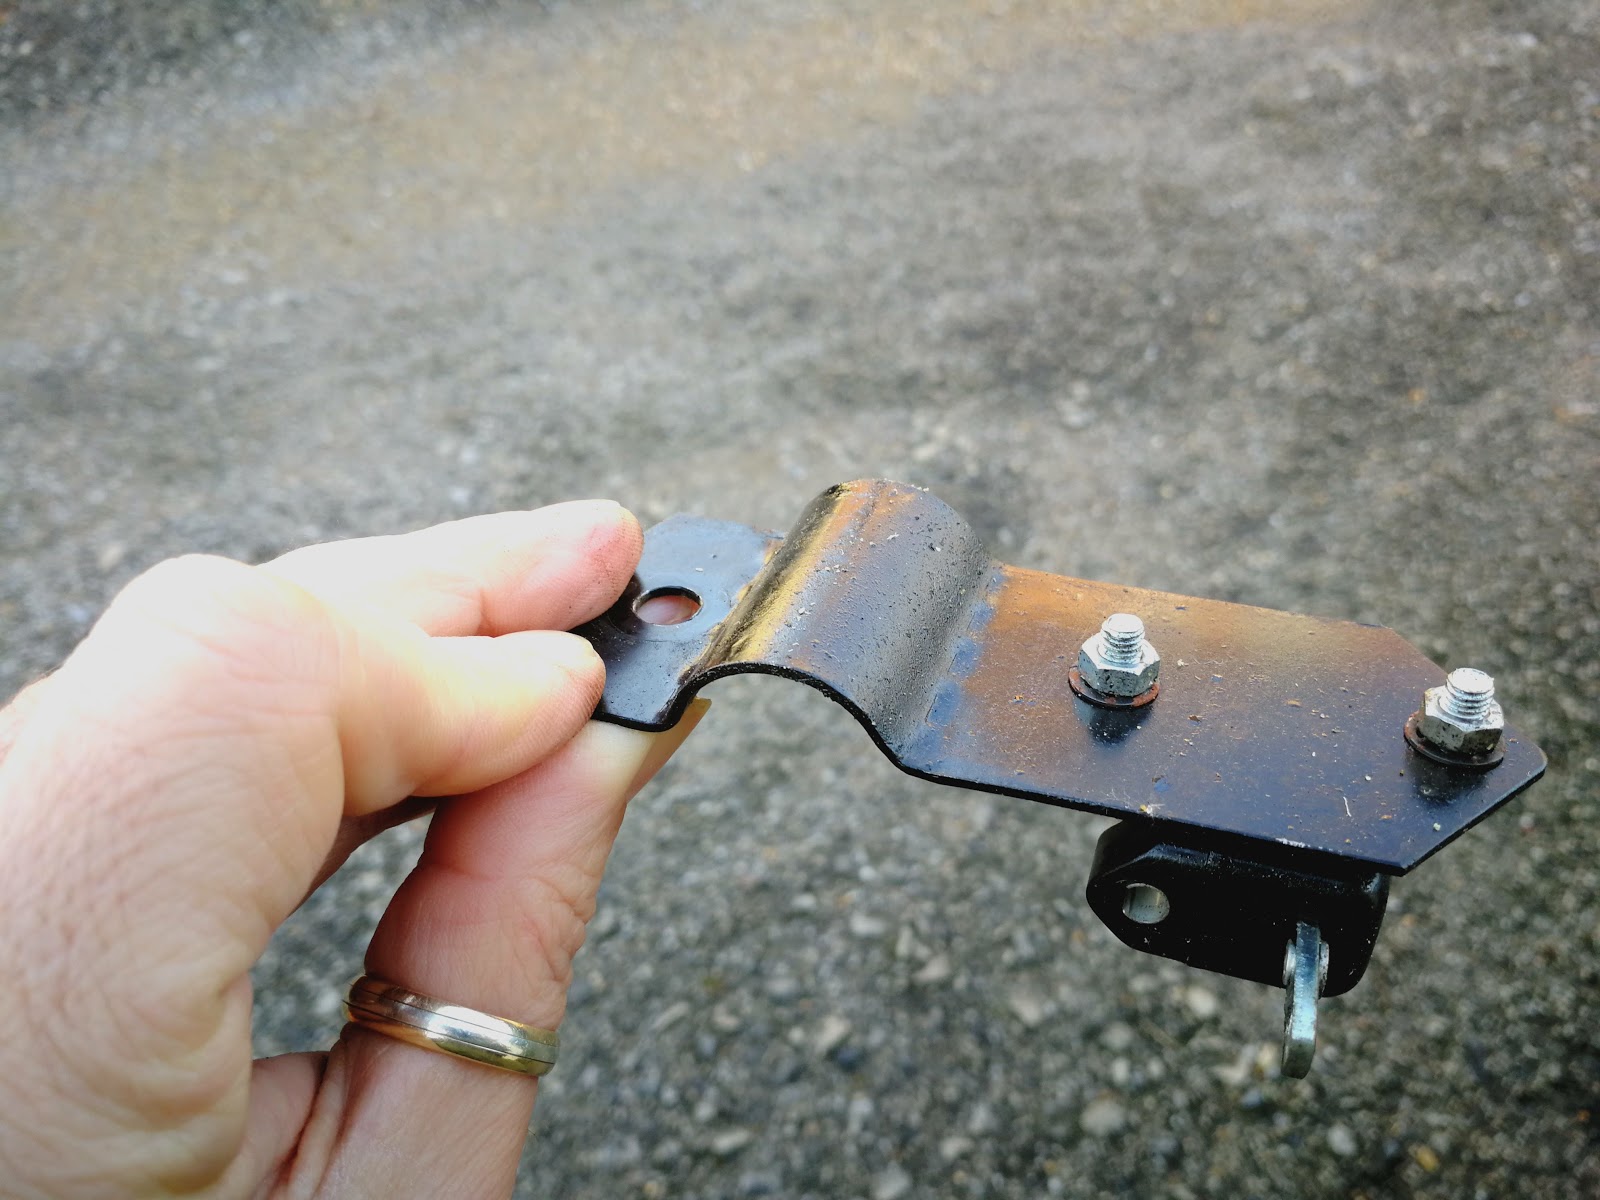
The devil is in the detail, they say. Casting around for small jobs, I realised that I had nowhere to mount the brake light switch. I knew from studying the wiring diagrams that Ariel began fitting brake lights to Square Fours around 1953, so that early Mk 2s would have factory fitted switches.

A plea on the AOMCC forum yielded this picture, from Greg Snyder in Pennsylvania, USA:


Greg also posted this, of the bracket in situ on his bike:


So, with guidance like that it was easy to make a new one:


Here are some details. Sorry about the sawdust:


And some more views:


Gearbox - a stroke of luck

You may or may not have noiced, but Amelia's non-original gearbox end cover has a broken clutch cable abutment bracket:

You can just about see it here if you know what you are looking for. This is a picture of the gearbox as it came out of Grace's van.

I had planned to get Matchless Engineering to weld this up and then cut a new slot & hole, which I probably should have done, but then this came up on eBay:

An hour with some white spirit and a small brush cleaned it up nicely:

I will try and repair the old one and then sell it, when I have a minute!

Shiny things!

Well, several small jobs going on at the moment. I'm filling in while waiting for the engine to come back. I've been looking at cables, brake light switches, the gearbox, the mudguards and the wheels.

I guess that is quite a bit really.

I've finished polishing up the brake bake plate. This is now assembled with the help of some lithium grease - not suitable for high-temperature disc brakes, but perfectly adequate for sparing use on the moving parts of a drum brake. It has a new brake arm spring and adjuster, both courtesy of Draganfly.

The plate eventually came up nicely, after an hour or two on the abrasive wheels and the polishing mops:

You will see that I have left the brake anchor slot free of that nasty little aluminium closing plate, and I have sprayed the brake arm black. There was no evidence of any plating on this original part, and i have seen them black painted in my reference pictures, so black it is.

This is now back on the bike, looking a bit better than it did a few months ago:


Friday, 15 February 2013

Brakes, cams, springs & other mechanical merriment.

Back from Norway, I find a handy bit of tube on my desk.

So here is a nice new bush:


It is made from 5/8" x 16 SWG seamless tube, pressed into the brake plate. I may put an oil hole in it if I decide there is enough access.

So, now I am assembling the brake I find something I didn't expect.

I replaced the brake lever return spring, because the arm makes an angle of more than 90 degrees with the brake rod - i.e. it leans forwards (the arm is upward on the brake cam)


You can see the old spring is quite weak and would put the arm in the wrong place. So now I have a new spring, the arm points backwards and makes an acute angle with the brake rod and can be moved to near 90 degrees, as the brake comes on.

The thing is, I didn't expect the spring to operate the brake with the brake rod disconnected. Because the lever return spring is quite strong, it turns the cam, overcoming the shoe springs and the brake comes on. It's obviously designed that way.

I guess all my previous biking experience has had the brake lever return spring on the foot pedal, not the brake arm on the cam.

Anyhow, some more pics for Chaz: