

Thursday, 29 October 2015


Saturday, 24 October 2015
Happy Anniversary!
Well, its four years to the day since Amelia came to stay.
Here she is on the day she arrived:

And here's a recent picture:

Here she is on the day she arrived:

And here's a recent picture:

Tool Bench
Another day, another bench... This time, for some power tools - a bandsaw and a pillar drill, and maybe a bench grinder. Oh, and a big ol' vice... and... and...

4" x 2" battens (roof joists, out of a skip) secured with 6 off 8 mm frame fixes...

Top added - two pieces of thick beech-edged MDF (salvaged from my dad's garage), screwed to the battens. Legs also added, 3" x 2" pine, salvaged from an old door. Nothing actually paid for yet!
For future reference, the new tool bench is 1500 mm x 500 mm.

The ladies waited outside.

4" x 2" battens (roof joists, out of a skip) secured with 6 off 8 mm frame fixes...

Top added - two pieces of thick beech-edged MDF (salvaged from my dad's garage), screwed to the battens. Legs also added, 3" x 2" pine, salvaged from an old door. Nothing actually paid for yet!
For future reference, the new tool bench is 1500 mm x 500 mm.

The ladies waited outside.
Wednesday, 21 October 2015
Badges again
Today the new badges are dry, so we can put them on. Here they are against the old ones:

And now one on the machine:

Lovely!
Looks great doesn't it. Thanks for giving us a lovely bike Mr. Page!


And now one on the machine:

Lovely!
Looks great doesn't it. Thanks for giving us a lovely bike Mr. Page!

New Badges
Amelia's original badges and the chrome flashes which live behind them have looked very tired since she arrived nearly four years ago, and I was lucky enough to find a better condition set, genuine Ariel parts still with the patina of age, but less of it... Here they are:

The paint is all missing, so we will need to do a little job on that. First clean them up with some Farecla G10 rubbing compound, then mask them up:

Now, trim the masking back:

Paint with some etch primer:

and some top coat:

remove the mask while the paint is still wet:

And leave it to dry.
Monday, 19 October 2015
Dusky Jaunt
Well, a little jaunt around North Norfolk yesterday evening left me thinking about my lights, as the nights are drawing ever inward.
The Lucas C35SD dynamo, in standard condition and running 6V into a modern V-Reg regulator rectifier charges the batteries at anything over idling. However, put the main beam on and you have to get to about 40 mph to get it to balance, and this is only running a 35W/35W BPF headlamp as it would have been in 1951, with a 5/21W stop tail - all old-fashioned tungsten bulbs.

In addition to this it has the 3W BA9 pilot light and the 2.4W BA9 light in the speedo.
I think some upgrades are in order. Here's my list:
The Lucas C35SD dynamo, in standard condition and running 6V into a modern V-Reg regulator rectifier charges the batteries at anything over idling. However, put the main beam on and you have to get to about 40 mph to get it to balance, and this is only running a 35W/35W BPF headlamp as it would have been in 1951, with a 5/21W stop tail - all old-fashioned tungsten bulbs.

In addition to this it has the 3W BA9 pilot light and the 2.4W BA9 light in the speedo.
I think some upgrades are in order. Here's my list:
- 35W/35W QH BPF headlamp - B635BPFQH is the one I have in mind, from Paul Goff
- LED tail lamp - I'll use the LD6RST
- LED pilot lamp - Paul's LDBA9DWneg is the one here, drawing 1.5W, or LDT10DWH6V depending on which is brighter
- LED speedo lamp - again LDBA9DWneg is the one
as a minimum. And then maybe, because this is getting expensive, I will add:
- LED indicators
- LED indicator relay
I'm toying with the idea of replacing the cheapo repro Lucas 529 rear light, which I fitted as it is much larger and more visible than the original Lucas 480, with a better one from Paul Goff.
I have to make sure that the bike is (if I recall correctly) wired negative earth (which it is - I went and looked at the battery) - the regulator certainly is - because LEDs are polarity sensitive. I'll maybe look into the bright daytime running lights Paul sells as well, since I have two positions for pilot lights.
I also discovered, by the way, that you can ground the side stand on cornering!

I also discovered, by the way, that you can ground the side stand on cornering!

Thursday, 15 October 2015
The Square Four in Racing
I can't quite believe that I have never come across Kees' site before, but I'm looking forward to reading about the various racing Square Fours that have been built. Here's the link:
http://keesknegt.doodlekit.com/home/index
http://keesknegt.doodlekit.com/home/index
Wednesday, 7 October 2015
Black bin bags
I just fitted a tyre to my MZ TS250, without tyre irons, using only a bin bag like this:
I did use my feet, since a modern 350-16 tyre is a lot stiffer than the tyre he is fitting but it is brilliant. I’m never going back to the old way.
Saturday, 3 October 2015
Norfolk Coast Bimble
A nice little run (after filling up with Super unleaded for the first time) to Overstrand this morning in milky sunlight found this rather splendid Commando special at a local garage:

I've been looking for a local MOT station to get the MZ TS250/1 on the road for the winter, and this is just the spot, with a very friendly and knowledgeable tester who owned also the Commando - which to me is recommendation in itself. All I have to do now is fit the tyres to the MZ and we'll be ready for it to become the hack!

Amelia seems very happy, in her element on these single carriageway, twisty relatively quiet open roads; but pulling away from the garage, noisily to show off to an interested pedestrian left me limping along beside the pavement wishing I'd turned the fuel tap on...
Returning to a more mundane setting (Homebase Cromer) shows her domestic side as well, running errands. A small oil leak has appeared which coats the frame rails, oil filter and sump. the chain oiler is open but the chain is dry; I have closed it now. We'll have to do a bit of investigation.

At least the rocker shafts are no longer leaking!


I've been looking for a local MOT station to get the MZ TS250/1 on the road for the winter, and this is just the spot, with a very friendly and knowledgeable tester who owned also the Commando - which to me is recommendation in itself. All I have to do now is fit the tyres to the MZ and we'll be ready for it to become the hack!

Amelia seems very happy, in her element on these single carriageway, twisty relatively quiet open roads; but pulling away from the garage, noisily to show off to an interested pedestrian left me limping along beside the pavement wishing I'd turned the fuel tap on...
Returning to a more mundane setting (Homebase Cromer) shows her domestic side as well, running errands. A small oil leak has appeared which coats the frame rails, oil filter and sump. the chain oiler is open but the chain is dry; I have closed it now. We'll have to do a bit of investigation.

At least the rocker shafts are no longer leaking!

Tuesday, 22 September 2015
Loctite 577
Remember the weep at the end of the rocker shafts? I've applied Loctite 577 thread sealer here, which should fix that problem.
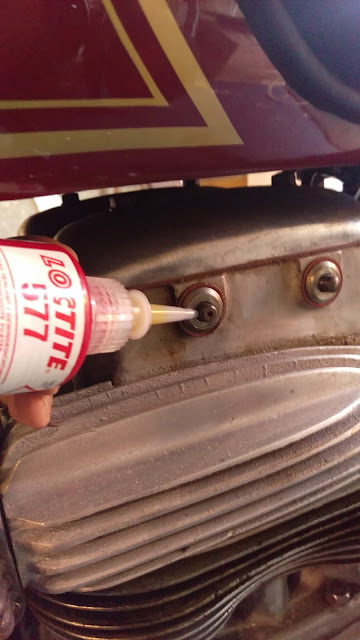
Once we fix that leak, we can look for others...

Once we fix that leak, we can look for others...
Saturday, 12 September 2015
Classic Bike Hire Norfolk
So, opinions please! There doesn't seem to be a classic bike hire outfit here in Norfolk, so what if I start one? We have some great biking country around here, big open skies, small country lanes - no motorways in Norfolk!
I'd maybe offer a few bikes:
What else would you suggest? Charges would be something like 85-95 GBP per day, maybe 150-175 GBP for a weekend, including insurance.
So what do you think? Drop me a line on simon@pisl.co.uk and let me know what you think.
I'd maybe offer a few bikes:
- Ariel Huntmaster
- BSA A10
- BSA Bantam
- BSA B31
- Royal Enfield Bullet
What else would you suggest? Charges would be something like 85-95 GBP per day, maybe 150-175 GBP for a weekend, including insurance.
So what do you think? Drop me a line on simon@pisl.co.uk and let me know what you think.
Sunday, 6 September 2015
Retrieving broken studs & screws
I've been meaning to take a few hours to write up the removal of a couple of broken screws.
These two examples are both parts of my Huntmaster - One is a fork clamp bolt, in which the screw retaining the headlamp casquette has become seized in the past and broken by someone; the other is a engine mount spacer, which in these bikes is provided with a small 2 BA lug to retain a pressed metal cover, which enhances the appearance of the engine mount and prevents it getting full of road dirt. Of course, in this exposed position these little screws seize solid. I managed to get one out, aided by some prehistoric oil leak, but the other was dry as a bone and broke as I worked it.
So the process for fixing this kind of problem is this:
Put the part solidly in the vice, and file the broken bolt flat; then centre punch the broken fastener right in the centre.
Using a small drill, make a pilot hole right through the broken fastener. As you start it, make sure it's still on-centre
Using a larger drill, open the hole out until you are approaching the minor diameter of the thread
Try an Easy-Out in the hole, selecting the largest one possible that will bite in the hole. Turn it gently with a tap wrench. Don't force it - if you break it in the hole you are in real trouble.
If you don't have any success with an easy-out (and I can't remember when one worked for me), go to the next drill. You will be able to see if you are approaching the major diameter of the thread - if you have already cut into the thread, stop.
Using a small punch or a chisel, tap out as much of the old fastener as you can - you can often shift a lot of it from the top of the hole, tapping toward the centre. Removing a couple of threads from the top of the hole is sufficient to go to the next step:
Using a taper tap of the appropriate size, start the tap in the hole and attempt to recut the thread. Give it a few turns, and then disassemble everything and knock all the debris out of the bottom of the hole.
Clean it out will so there is room for the second and plug taps.
Move on to the second or intermediate tap and then the bottoming or plug tap, and complete the recutting of the hole. There will be a lot more debris in the hole and you will have to clean it all out again.
Test it with a new fastener and you are done.
These two examples are both parts of my Huntmaster - One is a fork clamp bolt, in which the screw retaining the headlamp casquette has become seized in the past and broken by someone; the other is a engine mount spacer, which in these bikes is provided with a small 2 BA lug to retain a pressed metal cover, which enhances the appearance of the engine mount and prevents it getting full of road dirt. Of course, in this exposed position these little screws seize solid. I managed to get one out, aided by some prehistoric oil leak, but the other was dry as a bone and broke as I worked it.
So the process for fixing this kind of problem is this:
Put the part solidly in the vice, and file the broken bolt flat; then centre punch the broken fastener right in the centre.
 |
| File the broken screw flat |
Using a small drill, make a pilot hole right through the broken fastener. As you start it, make sure it's still on-centre
 |
| Pilot hole in the old 2 BA engine mount screw |
Using a larger drill, open the hole out until you are approaching the minor diameter of the thread
 |
| Small pilot drill hole in the old screw |
 |
| Continue drilling out the old screw |
 |
| Small Easy-Out |
Using a small punch or a chisel, tap out as much of the old fastener as you can - you can often shift a lot of it from the top of the hole, tapping toward the centre. Removing a couple of threads from the top of the hole is sufficient to go to the next step:
 |
| Finished drilling - only the old thread remains |
 |
| Peeling the top threads away |
Using a taper tap of the appropriate size, start the tap in the hole and attempt to recut the thread. Give it a few turns, and then disassemble everything and knock all the debris out of the bottom of the hole.
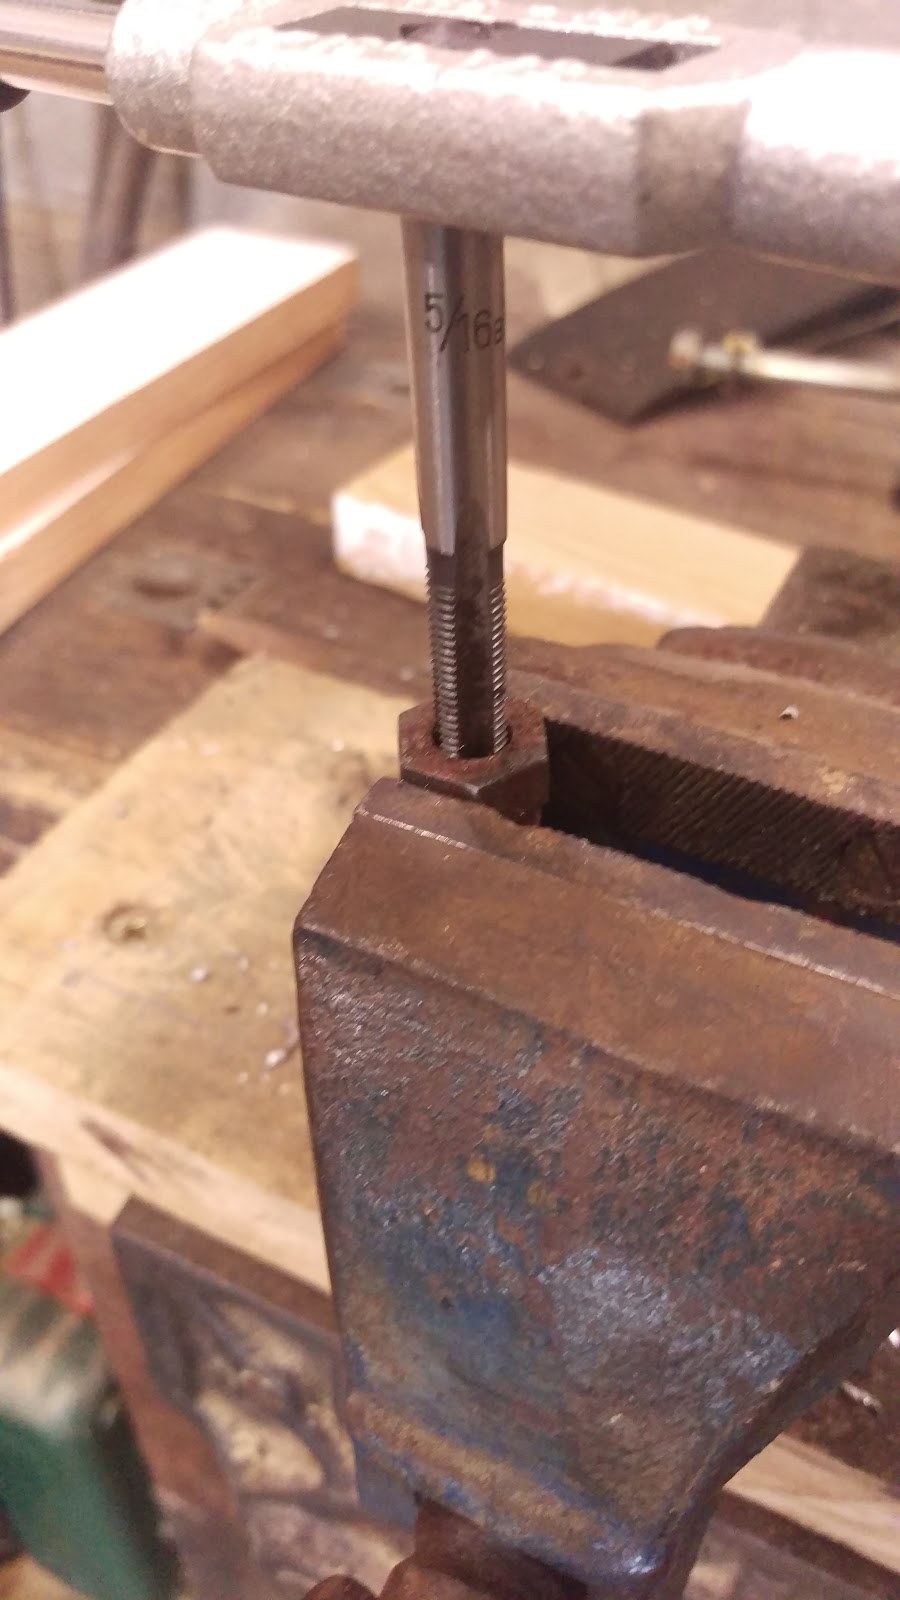 |
| Starting the thread with the taper tap |
 |
| All that remains of a 5/16" BSC screw |
 |
| 5/16" BSC Plug tap |
 |
| Ariel Huntmaster engine mount repaired |
 |
| Ariel fork bolt repaired |
Saturday, 5 September 2015
Sheringham Model T Ford Day
Sunday saw a visit from members of the Model T Ford Register of Great Britain who cam to Sheringham for the sun, sea, sand & ice cream of which we are justly proud! Many of those elements were provided with the notable exception of the one which keeps us warm & tans our skin.


Some more pictures of the cars are shown on the Model T Ford register facebook page here, and thanks are due to Graham Deans of our favourite pub, The Lobster, for organising the event.


Some more pictures of the cars are shown on the Model T Ford register facebook page here, and thanks are due to Graham Deans of our favourite pub, The Lobster, for organising the event.
Wednesday, 2 September 2015
Charlie's Shed - Engine Stand
I bought this engine stand from www.newvu.co.uk, via eBay. NewVu make parts for Harleys and other stainless bike parts, and they sell this through their eBay shop, trading as 'Uniwolves':

It's made of welded sheet and square hollow section, and features an L shaped frame with two wide feet, which can fit anywhere on the frame. The engine is held on two yokes which can be positioned anywhere on the frame. Yokes and feet are clamped in their chosen position with M10 hex head screws.
It's fully adjustable for different engine mount configuration, and goes to a maximum length of 350mm, maximum height of 230mm, and can accommodate a maximum lug width of 135mm .

Each yoke includes two machined screws which pass into the engine mounts, and are reduced and tapered to allow them to fit into smaller engine mount holes. You can screw them in independantly to suit offset mounts:

Here's the screw that fits into the engine mount.

Now, observant readers will have noticed that most of these pictures show a large crankcase from my Ariel Huntmaster.
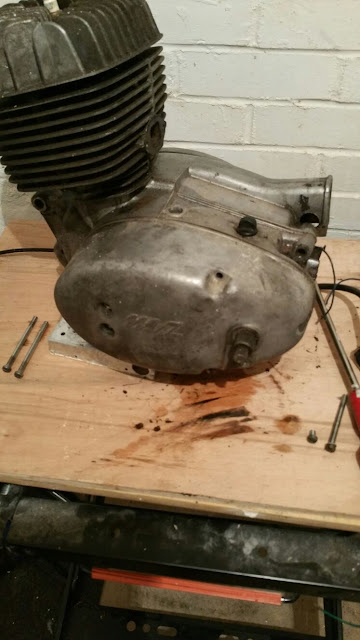
Now, if you are building a smaller engine with no bottom mounts, such as this MZ125 engine or a Bantam engine, we have this nifty device which connects to the mounts at either end of the engine:

The jaws of this one are much less wide, but provide all the adjustment you will need:


It's made of welded sheet and square hollow section, and features an L shaped frame with two wide feet, which can fit anywhere on the frame. The engine is held on two yokes which can be positioned anywhere on the frame. Yokes and feet are clamped in their chosen position with M10 hex head screws.
It's fully adjustable for different engine mount configuration, and goes to a maximum length of 350mm, maximum height of 230mm, and can accommodate a maximum lug width of 135mm .

Each yoke includes two machined screws which pass into the engine mounts, and are reduced and tapered to allow them to fit into smaller engine mount holes. You can screw them in independantly to suit offset mounts:

Here's the screw that fits into the engine mount.


Now, if you are building a smaller engine with no bottom mounts, such as this MZ125 engine or a Bantam engine, we have this nifty device which connects to the mounts at either end of the engine:

The jaws of this one are much less wide, but provide all the adjustment you will need:

Of course, there is nothing to stop you putting a gearbox in it, though the adjustment slot on the top of many Burman boxes means they are not held as rigidly as an engine:


Looks like a very nice piece of kit. I can't wait to start using it!
Subscribe to:
Posts (Atom)