Sunday, 20 November 2022

W/NG - Panniers

 Here are the panniers I'm fitting - replica WD panniers from eBay, probably made in India. They are rather nice:

The frames are powder coated steel and fold up and down, just like the originals, though the pannier bags themselves are identical - originally they were handed to the extent that one was provided with a buckle to receive that central strap on the back, so you could sling them over the luggage carrier like a pair of modern throw-over panniers:

I made this little strap to allow them to be tied together. It's a new bit of 2" webbing stitched to a pair of original buckles:

I've got this set of brackets from Draganfly - very nicely made too, though I had to clear the threads of scale, open the holes to clear 1/4" CEI and replicate the slots shown in the Ariel parts list:


Position 'B; shows the rear mounting, with the end of the mudguard bracket just visible. There's a 5/16" CEI bolt at 'B', which you use when you want to lift the tail of the mudguard or remove the pannier frame:

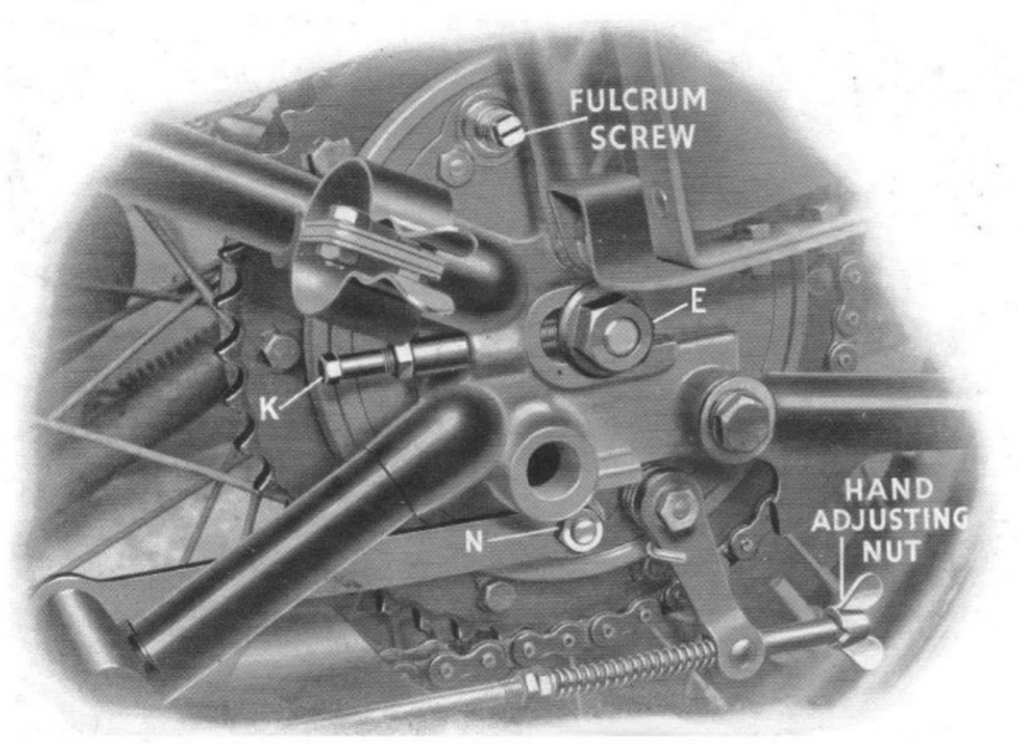
The other end shows the pannier frame and the front bracket above the axle nut 'E'. It's retained behind the mudguard stay bolt:

More later, when I have finished the luggage carrier!

Friday, 18 November 2022

Pillar Drill Spindle Bearings

My cheapo pillar drill is a project in itself also I've had it for quite a few years now and it's had a few modifications to improve its performance .

I probably should have bought a better one in the first place!

This blog post was useful guide to what to expect when pulling the drill apart:

It's got a bit of run-out on the spindle and in this picture the run-out doesn't look like much. However the main problem is the quill itself which wobbles around in its bearings.


The pulleys are a bit loose too, but this is down to burrs and a loose grub screw


This is the return spring - simple, but appears to work adequately:


The three handles on the quill pinion constantly come loose and are now held in with Loctite:


I made this bracket to support the end of the depth stop and as a place to hold the chuck key. The bracket replaces a crappy plastic one that came with the drill and broke quite quickly:


Here's the top spindle bearing in the quill. There's no play here.


The play is here, in the body of the drill. There's not a great deal I can do to improve this...


What I've done is to put a screw into the body which pushes on the quill, taking out some of the play.


Another area of weakness is in the table which bends as it is only made of rather flexible sheet metal.


It can be stiffened up quite easily with the welder:


The next thing we might do is stiffen up the base of the drill as well, as again this is quite flexible. However this is only affecting accuracy if your work is standing on the base.

Thursday, 17 November 2022

W/NG - Pillion Seat

 In my quest to bring the W/NG back to the condition in which it left the factory - but only in terms of equipment - I'm adding a pillion seat and panniers. The seat is going to take a bit of fitting:


This is a civilian one.....The ones fitted to military bikes are usually less wide than this:

A footnote: this approach has been abandoned for the moment. There is no way a conventional Lycett spring pillion will fit with the military carrier - the military bikes use an 'Acumen' pillion which is much less wide. More on this in a future episode, hopefully!

Friday, 11 November 2022

W/NG - Luggage Rack

 As you will know, the W/NG has worn a small non-standard luggage rack for many years - probably since the 1950's and while I am sorry to depart from the modifications the previous owner made all those years ago, I have recently lost my Chilly coffee flask and today my Rothenburger Surefire blow torch off the back of it, through not having big enough bags.

What I've decided to do is splash out on a set of reproduction military panniers and frames, which are readily available and probably come from India. You can't buy the rack, so I'll make that myself as many others have done before me. These dimensions were recorded by fellow Arielist Vincent van Ginneke of the Dutch branch of the AOMCC and posted on the forum:


And this one:


Since I don't have a tube bender, and most commercial benders don't have the right size dies anyway, I am going to use round bar for the carrier - like the one in Vincent's pictures. Others you see are made from tube which is lighter and easier to swage for the ends but would need a bender to form the corners without flattening.
The trusty bit of scaffold tube comes to the fore again for the bends at the rear end. I make the bends in both the two main members - I plan to put a weld in the middle, rather than try to form it up from one piece. I've actually bought four 1 metre lengths of round bar.


This next picture shows the two main members clamped in a bit of angle to keep them aligned while I make the 40° bend, so that I can match the two sides:


The ends of the main members fit between the frame and the mudguard stay, here:


Swaging the ends is a bit tricky. They would have been made hot with a power hammer, giving them that neat 'one hit' appearance in Vincent's pictures - I can get them hot enough, but trying to make that shape with a big ball pein hammer just doesn't work. Time to try something else.


What I'm doing is building the sides up with weld, after cutting the flats with a hacksaw. It's a bit time consuming and rather obsessive, but a session with the angle grinder will make them look the part:


Soon I have all the bits I need ready for tacking up. I've welded the two halves of the main carrier together with the welder set to 100 A - higher than required as it turned out but the off grid system managed it easily in daytime:


With the front drilled and fitted, I use a cardboard box and an electronic level to set it in the right place. I'm putting one of the cross bars in here to make sure the spindly legs are lined up properly and the bends are in the right plane:


The two short side legs go in next, with the angle of the flattened tab adjusted to sit flat on the mudguard stay:


Next, I fit the long legs up from the rear wheel spindle, wire them in place and tack:


Here it is, with all the elements tacked together bar the small frame brackets which I will make next. Unfortunately, I've run out of Argon...

Tuesday, 1 November 2022

Model A - Horn

The Model A has no horn. It has the £5 10s electric lighting option, which doesn’t show in the despatch record so perhaps I shouldn’t be surprised that the horn is not mentioned either.

That being said, Ariel offered both bulb and electric horns in the 1930 catalogue, both from Lucas


I found this Lucas Spartan horn on eBay. It's a 6 volt horn, but I've no idea if it's the right one.

It sounds awesome!


Monday, 24 October 2022

W/NG - fixing oil leaks

 Blatting about at the weekend used a bit of oil, some of it coming from the top end.

I suspect some is coming down the exhaust guide, but some is coming from the rocker shaft end covers. 

I've only recently learnt how to tighten these properly, and I'd damaged one of the fibre washers.

It's all done properly now, with a special screwdriver I made. I've added a small dose of Threebond to the fibre washers as well. 

Monday, 17 October 2022

VMCC Letheringsett Run

With not much railway stuff going on and the events calendar rapidly diminishing, son Thomas and I took the opportunity to attend the Norwich & District section VMCC run to Letheringsett. We'd wanted to do another trip out together this year, and I'd wanted to do a VMCC run, so it was the perfect opportunity as it's the last run (but one) for the 2022 season.

The start was at Spooner Row, so I needed to get to Tom's and then to Spooner Row in time for a 10:30 start. 


This would have been fine, had I not done 60 miles on a partially full tank the day before, getting my hair cut.

I ran out of fuel.


We stopped just outside Wymondham, and despite pulling the reserve tap on I couldn't get the W/NG restarted. I checked the carburetter drain plug and there appeared to be fuel, so out came the tools. The points were opening, and judging by Tom's yelp there was a spark at the plug, so what could it be?


Well, turns out, having removed the float bowl top to find no fuel, the reserve tap doesn't pass liquids. Sloshing some over from the timing side had us going again, back to the nearest petrol station and onto the run.


I'd not used Tulip sheets much, and the route roller was on the SQ4, but we made it to the end with only two or three mistakes - not all of them while I was in the lead. One time, I was convinced I was lost on a lonely road; I stopped to confess to Tom that I was lost, only to find 4-5 old bikes behind him...

Still, we made it in the end, stopping at the water mill which was grinding flour and selling tea and cake.


When we were all there, there was probably 25 bikes including this 1952 SQ4 Mk1 we had followed, and been followed by, on the run:


We stopped for more food in Holt, on the way home.


Friday, 23 September 2022

FH Dry Build - Centre Stand

First published February 2022

 One of the dry build jobs that I had to deal with was the centre stand. Some years ago - 2014 actually - I had repaired the feet which were completely worn out and recorded the experience here.

I put it back on the bike once the exhausts were in place to have a look. I knew the stand would fit the frame, but it's all the other parts that it has to fit around that are the problem. Here you can see two issues - one, that the stand leg is bent - in fact they are both bent, a common problem and two, that the foot fouls the exhaust: 


With the stand off, you can see that the stops are a bit worn - maybe worth building up, maybe not.


To deal with the bent leg, I have put an old sidestand in the pivot eye, and heated the leg up - it has bent back quite easily.


Next problem - the feet. Do they look uneven?


I've got 30 mm from leg to inside the foot on one side:


And I've got 25 mm on the other! I think that's why it fouls the exhaust.

Maybe I'll have to remove that foot and extend the tube a few millimetres.

September 2022 Update

Months later, coming round to this job at last I turned the bike around in the garage to have a look at the stand foot. The first thing I realised was that the exhaust bracket in front of the engine was not touching the frame; the second was that the silencer was considerably further outboard than the other. The footrest was not fully home on it's spline! I took this picture with the footrest off:

Hey presto, no fouling problem!