Thursday, 20 June 2013

Bond of Brothers

Hermetite... Hylomar... Yamabond... Wellseal... Hondabond... B&Q Bathroom sealant????

So many choices - but which one?

In the old days, in these situations I used to use traditional Red Hermetite or more recently Wellseal. I've also use blue Hylomar in the past. Usually the selection is made on the grounds of availability - what I had in the toolbox at the time.

I've no real engineering information for any of these products, and have never made a proper assessment of them.

However, for the SQ4 I wanted to look at a modern sealant. I hope to avoid tearing the engine down again anytime soon and with the legendary folk tales of excessive engine temperature (300 F at the plugs) I wanted to make sure I had something which was:
  • suitably rated for temperature 
  • compatible with engine oil 
  • compatible with aluminium 
  • a suitable colour (i.e. not red & smeared all over the cases!)
Several books and web forums I have read, both bike & car related (& even stationary engines!) mentioned Threebond products, Yamabond & Hondabond. Now, a quick Google reveals that Yamabond & Hondabond are both rebranded Threebond products.

Threebond describes itself as a fine chemical technology company with its roots in the automotive industry. Apparently, more than 90% of the world's motorcycles are assembled using Threebond products. Probably worth a look then!

Threebond say:

1200 Series silicone-based liquid gasket fills gaps on a flange surface and thus completely prevent leaks. When cured, it forms an excellent rubber-like elastic body offering excellent resistance to vibration and shock. Also it has an excellent resistance to heat, and effectively seals joints that are subjected to high temperature.

Here's the specification for Threebond 1207B:
  • Excellent chemical resistance against coolants and engine oil 
  • Outstanding mechanical and thermal resistance 
  • Excellent adhesion even to slightly contaminated surfaces 
  • Extremely fast curing 
  • Instantaneous impermeability for pressure- and fire test. 
  • Acceleration of the curing process by heat and contact with the medium 
  • No shrinkage and no generation of corrosive gases 
  • No corrosion of metal and only very slight reaction on plastics 
  • Normal disassembly
Here are the material properties:

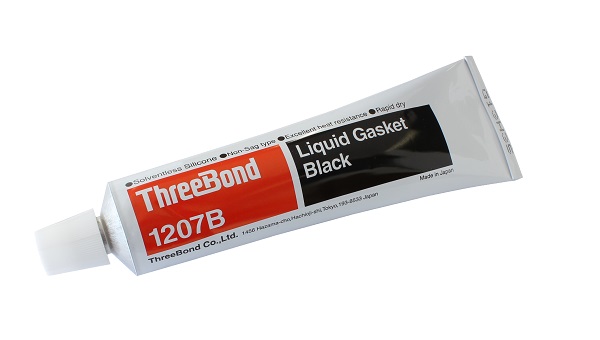
 I now have a tube of this. It has a Honda label & part number!


Tuesday, 18 June 2013

Bottom End Assembly

Thanks to the ever-helpful Brenton Roy, I have the torque figures for the connecting rods:


This is from the excellent AOMCC Knowledgebase.

Oil Selection

I read this article. And this article

And I decided...

To be continued!

Build Lubricant

One of the things I need to do in order to proceed with engine build is decide on what build lubricant to use. There are a number of things we ought to consider:
  • Different parts of the engine see different service parameters – e.g., the pistons & rings service temperature is very different to that of the main bearings
  • Loading is very different in different parts of the engine – e.g. the cams and tappets experience load through a sliding interface; the cam bearings load is experienced through rolling ball bearings with a much higher point load
  • Build lubricant ought to be selected according to the length of time between build and initial running – the lubricant needs to stay in place prior to star-up
  • Build lubricant ought to be selected according to the ambient conditions 
Casting around various personal & web sources, I came up with the following principles:
  • Pistons and rings need a special lubricant to avoid the lubricant clogging the honing marks on the cylinder walls and carbon deposits in the ring grooves. Something that burns away quickly is appropriate, like Two stroke oil or WD40
  • Consider pre-lubricating the engine prior to lighting up. This gets most of the crap from break in out because it has not had time to settle and is still suspended in the oil. 
  • Do not forget to pre-lube both ends of the pushrods too
  • Everything must be CLEAN or nothing will work properly. 
So, condensing all that experience down:
  • Engine oil for valve rockers, guides & stems 
  • WD40 for cylinders & rings 
  • Engine oil for crankshaft main & big end bearings 
  • Lithium grease for cams, tappets & pushrods 
  • Turn the engine over on a power drill prior to start up.  
  • Oil and filter are changed immediately after 20 minute initial run while engine is hot

Saturday, 15 June 2013

Just to assimilate thoughts on the bottom end...

An empty but patient crankcase
Not a very exciting blog post, but it will help me to figure out where I am on the engine rebuild...

So, the state of play this morning:
  1. The cases are fully machined, clean and partially polished.
  2. The connecting rods have new bushes and shells and have been polished. New nuts are available.
  3. The crankshafts are machined and cleaned, and I have the new oil way plugs available
  4. The camshaft has been machined & cleaned
  5. I have the coupling gear cover polished, the coupling gears and their seals & bearings ready and I have a new gasket and a set of studs and nuts from Acme Stainless. I also have a coupling gear 'pusher' to help me pull the crankshafts through the coupling gears.
Front crankshaft during stripdown
So I need to do these things next:
  1. Finish polishing the cases
  2. Assemble the crankshafts & connecting rods
  3. Assemble the crankshafts & camshaft into the cases
  4. Fit the bottom end into the bike
  5. Assemble the coupling gears and fit the cover - filling it with oil through the overflow hole
And I need to make these decisions:
  1. Decide what building lubricant to use
  2. Decide how to torque up the big end nuts
  3. Decide what sealant I am going to use on the crankcases
  4. Decide what oil I am going to use
I'm sure there is more...

Wednesday, 12 June 2013

Starting on the engine!

Well, summer's here and the bike is coming together. I've finished my welding work, the wheels are still away, and most importantly I have some time away from work to get to grips with things at home.

So, in a break from repainting the kitchen we will start work on the bottom end.
 
I'm dithering around polishing the crankcases which is a noisy & messy job & which stops me rebuilding the engine. Someone also suggested that polish would hinder cooling - but equally it is obvious that the engine was once polished - it is deeply tarnished now, but you can see it is still very smooth - you can also where it wasn't polished!


But, I have all the parts and can get moving with the rods & cranks.
 
You'll recall from previous posts that the rods have been cleaned and polished and have spent the winter protected by some pipe insulation in their own box. I have small end bushes and big end shells from Drags along with new big end nuts, also from Drags.
 
These are shown in the adjacent picture and will have to be pressed into place and reamed to the finished size.

 
The sizes are shown in the table below and are around 11/16" - but will have to be sized to fit the factory specification using a suitable adjustable reamer. In this case we will use a 21/32" - 23/32" reamer, which are readily available but are of highly variable quality. Beg, steal or borrow a decent one if you can! If you must buy an internet cheapie, take a look at a few things before you use it and if it is no good, send it back!

Take the reamer to pieces. Measure the length of each blade, and make sure they are equal.
  1. Look at the retaining nuts, make sure they are not too loose and clean the threads
  2. Clean out the grooves in the reamer body and make sure the blades can sit snuggly down in the grooves. You don't want any swarf in there.
  3. Put the reamer back together, and measure the diameter across two opposite cutting edges (this only works on six blade reamers) at each end of the blade. The dimensions should be the same! They are not supposed to be tapered. Repeat the operation for the two other pairs of blades.
So, to fit the bushes. You can use a press for this, if you have access to one, but a bench vice comes a close second. You could also use the draw-bolt method, but I suggest the loads are probably too high for that approach. These bushes are quite tight.

  1. Find a socket or a piece of tube which is small enough to support the small end eye, but large enough, both in length and internal diameter, to receive the old bush.
  2. Open the vice enough to receive the rod, the socket and the new bush plus a couple of millimeters.
  3. Find a piece of soft sheet (brass for example) to protect the end of the new bush.
  4. Align the socket, the rod eye and the bush. You might benefit by putting a short rod of about 1/2" OD inside the assembly, just until you have the new bush a couple of millimeters into the rod, just to keep things lined up.
  5. Nip the whole lot up in the vice with your protective sheet on the jaw pressing on the new bush.
  6. Operate the vice to push in the new bush, pushing the old one out into the socket. You will probably find the initial force required is much higher - and you might get a bit of a bang as the bush starts to move. This is normal. Don't be afraid to apply a bit of heat to the small end eye to get it moving - but go easy, this is aluminium. No Oxy-acetylene here!
  7. Carry on pushing until the new bush is more or less flush with the face of the rod. My bushes are about 0.5 mm over length at the moment.

The next job is to drill the oil hole. Do this before reaming and you don't need to worry about deburring later. The Square Four has 3/16" holes in the small end eye.

Next - reaming to size. Get ready with your gudgeon pin, your internal micrometer or bore gauge & a 1" micrometer.
 
Now, adjustable reamers are really scraping devices. They are designed to scrape out small quantities of metal from holes and as you have seen (from when you inspected your new reamer) they are not as rigid as solid reamers and can only be used to take small cuts.

When you set the reamer up for the first cut, back off the adjustment collars (i.e. screw them away from the square end of the reamer) to reduce the diameter of the reamer until you can put the reamer into the bush. Now adjust it larger until it just begins to touch the inside of the bush. Turn it using a tap wrench a couple of times with some oil.

Be careful to twist the reamer such that it is concentric with the bush; make sure the blades pass right through the bush. That way you will minimise the potential to cut a tapered hole.

You want to increase the size of the hole in very small steps, testing with the gudgeon pin at each stage -  DON'T SKIMP ON THE CHECKING!! Small end bushes are relatively cheap, but replacing them repetitively is tiresome. Increase the size of the cut by turning the collars by 1/8 of a turn each time, and turning the reamer in the hole 3 or 4 times. Always make sure that the top collar is tightened down.


A few more thoughts:
  • NEVER turn the reamer BACKWARDS – can You could break or chip a blade.
  • Never put more than ¼ turn on the collars
  • If the reamer jams, loosen the blades and pull the reamer out and start again. Remember a jam will leave a number of ridges and these have to be cut away or it will happen again.
  • Make certain that the collars are tight.
  • Clean the reamer after each pass.
  • Do not push down on the reamer too hard or it will jam. Take it slow and easy - this is supposed to be a hobby remember? You don't need to hurry, you are enjoying yourself right?
  • On each turn try to stop in a different place.
  • Use oodles of cutting oil.
So, now we have our reconditioned connecting rod:


So, repeat the operation for the other rods and you will end up with a little heap of scrap like this:

So here is a table showing the dimensions I have ended up with:

Small End Bush
Big End
Factory Specification
0.6868”
0.6863”

0.003" wear allowable
1.375” min (journal)
Cylinder 1
0.686”
1.3765”
Cylinder 2
0.6869”
1.3745”
Cylinder 3
0.6863”
1.377”
Cylinder 4
0.686”
1.3775”

I had to order a couple more bushes from Drag's since I wasn't happy with No. 2 & No. 3. The table above shows the new dimensions.

And now, over the last couple of days I have polished the cases. I made sure that I polished only the areas that were polished in the factory all those years ago:

Next stop, bottom end assembly!

Tuesday, 11 June 2013

Oseberg Viking Ship

I’ve been in and out of Norway almost weekly just lately – it’s a beautiful country, though it does rain a lot.


Recently we were in Tonsberg, and outside the hotel along the quayside we met a lady who showed us around a boatyard where volunteers were building replica Viking ships using original techniques & tools – no saws, only axes, chisels etc. They had a forge on site where they were making rivets & nails… She spent about an hour walking us around the site one evening – it was fabulous – right up my street.


Friday, 7 June 2013

Biker Chicks...


A friend from Houston, Texas sent me this picture this week. An interesting shot from the 1920's presumably from Holland.

Is this an Ariel publicity shot perhaps? the bikes are both from 1929 I think, one a side valve and one overhead valve, both new touring models?

And look at their faces - noses, smiles - are they related? Mother & daughter perhaps?

Saturday, 1 June 2013

Pussy Galore

Since the summer is here, it is time to take the Bantam to Sheringham for the annual Classic Car & Bike Show.

This is a Sheringham Carnival event organised by the The Lobster pub and every year the town centre is closed off and filled with old cars & bikes for a sunny Sunday at the beginning of June. From The Lobster website:

Our previous three shows were a massive success with over 200 cars attending each year, and each year it has grown; from a 1929 Austin Swallow to a Ferrari 308 GTS. So whether an enthusiast, owner or just on a family day out, a great day is to be had by all.

The main high street and sea front will be closed for the day in order to best display the vehicles. We can accommodate larger groups as well as individual cars and last year had representations from Bentley, Ferrari, Porsche and members of the North Norfolk Classic Vehicle Club. Also on display were MG, Mini, Jaguar, Rover, Triumph Stag, Trojan and Austin A7.

Promoted and organised by the Lobster Pub and raising money for the Sheringham Carnival, the aim of the weekend is to involve people who live and work here, helping foster a real sense of community and fun. Hopefully benefiting local businesses by attracting more visitors who will have such a great time they’ll want to come again and tell all their friends too!

It will be a truly enjoyable event for all ages. Our programme is hoping to include music, dancing, a real ale festival and of course the classic car and bike show.


It's on Sunday 9th June this year, and when the time comes I'll post some pictures. It's a great little show, and followed six weeks or so later by a Harley Owners Group meet, when 400 or so Hogs fill the town - and if you don't go for the bikes, go to the Lobster. It's a great pub and you can take your dog!
Nice Shooting Star at the 2012 Sheringham Classic Car & Bike Show

However, having taken the Bantam up this weekend, I was pottering around town when I stumbled across a couple of lost Panthers, lost in the back streets of Sheringham.

These friendly chaps were on a ride out from their rally meet in North Elmham, Naturally I took a few pictures:

Friendly Panthers on a rather too cool June morning...

More Panthers & nice Goldie

Nice to meet you guys!