Showing posts with label slider. Show all posts

Monday, 27 January 2025

FH - fork oil

Changing or replacing the fork oil on these later Ariels should be a breeze with their neat drain plugs and filler caps and I was approaching this job with all the confidence of the naïve...

The stainless filler caps came (I think) from Acme and need a bit of a polish - I have given this a few minutes on a 150 grit wheel and you can still see some machining marks, so we will need something more aggressive. These are 1/2" CEI and fit with a fibre washer underneath:

For some reason that I don't currently understand, there is a further 1/2" CEI plug underneath these top screws, which closes onto a seat on the fork top nut, leaving a hole of around 1/4" diameter:

This plug is very short - it's easiest to lift it out with a magnet on a stick:


You need 7.5 fl oz of SAE 30 fork oil for each leg - that's about 215 cc. Fork oil is designed to avoid foaming and to protect the inside of the sliders and stanchions from corrosion. I'm going to use the 250 cc syringe that I use for gearbox filling for this job.

Should take seconds.


Here we go. One good push will have it done.

Or not. It's cold, the oil is thick. The hole is small and the oil ends up on the lift table.

I'll stick a tiny tube into the hole to let the air out...


That works, but it takes a ridiculous amount of time.

Contemplating a special nozzle or a tin funnel, I spent a while gazing around the workshop looking for inspiration which I found in the drawer of goop tubes - silicone sealant, caulk, no more nails (other glues are available) and other stuff like that. This is part of a decorators caulk cartridge - the nozzle is long and thin enough to go right through the top nut of the fork stanchion, so the oil is introduced to the full bore of the stanchion and is already past the restriction. 

Of course, there is precious little room for the air to come out, but it does, slowly. You have to fill the funnel twice to get all the oil in, but at least you can sit down and pick your nose while it dribbles in.

Happy days.

Saturday, 25 January 2025

FH - it pays to choose the right thread

It looks like a detail, maybe even a sign of obsession, but choosing the right thread is actually really important.

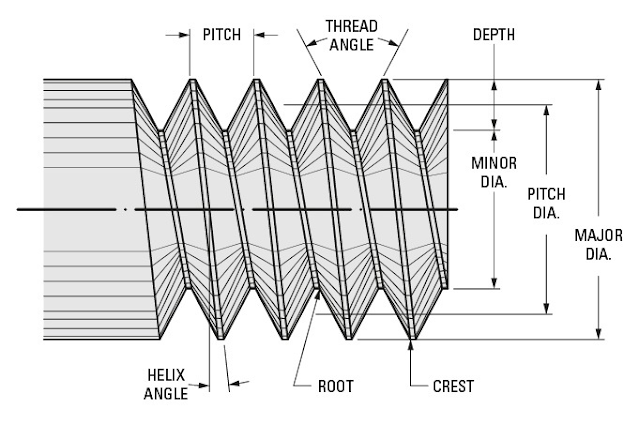
I've been working on the forks this week - you may have noticed - and one of the bolts I removed was conspicuously coarse - it was a 3/8" BSW bolt, 1 3/4" long: the front wheel spindle clamp bolt. British Standard Whitworth threads are coarse (20 threads per inch) and consequently strong for their size. What they are not good at is staying tight when subject to vibration. You use them in alloy, but you will find that virtually all the other threads on a bike of this vintage are British Standard Cycle, which in this size is 26 threads per inch. The helix angle in a 26 tpi thread is much smaller than that in a 20 tpi thread, and consequently the thread is much less likely to work loose under vibration.

It also pays to choose the right length - this application needs a 1 1/2" bolt, so that most of the threads are hidden in the nut and don't get filled up with debris from the road.


Saturday, 14 October 2023

FH - Building the forks: a false start

As you might have read, after a prompt from the guys on the AOMCC FB page I bought some new stanchions, and very nice they are too:


Build it right, build it once I say. Here are some pits in the old ones and they will destroy the seals very quickly:


These are the original seal holders - they are supposed to be shiny chrome, and someone has cut them shorter for some reason. They are junk now.


I bought these seal holders on eBay - they are plated steel, and are very solid. They came with a set of springs (not the nice progressive springs in the background) for £65, so I thought I had a bargain; the seals themselves are standard lip seals, about £5 a pair.


I put them together with a new set of Draganfly bushes.


During that build I found the first stumbling block: the seal holder tool didn’t fit in the holder.


I needed to turn the tool down by around 2 mm on the diameter. To get it in the lathe, I had to make a plug so I could steady the end with a centre. The tool is too big to go in the fixed steady.


So now I could put the forks together…


End plug and bottom bush:


Here’s the next problem, and it’s Game Over. One of the seal holders is fine, but this one has the thread out of square with the stanchion axis:


So, they were returned to the seller, and replaced with these from Draganfly. They are beautiful.

Friday, 29 September 2023

FH - Forks, Steering Damper & Swinging Arm

 A few spare minutes found me progressing the build a bit further. Last night I ordered the engine parts from Draganfly; the pistons and big end shells have already arrived from the AOMCC Twin Spares chap. They look excellent:

You'll recall the swinging arm has solid bronze bushes in place of the standard metalastik bushes, so the first job is to fit an angled grease nipple pointed away from the FERC:


The swinging arm goes in easily and is bolted very loosely. It's held up with an old shock.


I've put the steering damper back in; the pin tapped in easily.


Now, I was careful to ask the painter to avoid grit blasting the oil tank, and he has indeed prepared that by hand. However, the fork sliders would have benefitted from blanking off as they are full of grit; I made this swab to clean them out:


Running paraffin down the slider in the cleaning bath I swabbed the grit out:


There's quite a bit - that was worth doing:


I cleaned the fork legs with 180 grit Scotchbrite - they are not very good:


I ordered a set of seals and new seal holders yesterday. At £115 a pair, it's worth buying a new set of hard-chromed stanchions as well.

Wednesday, 11 March 2020

QR50 - Fork Bushes

As you know, I have decided to make a new set of telescopic forks for the QR50 since I can't find a new pair locally, or anywhere else for that matter, for a reasonable price. You've seen how I recovered the sliders and stanchions with new tube, and replaced the missing dust caps with machined parts.

Now it's time to machine the bushes and assemble the bits. I bought a 30 cm length of 30 mm white acetal, and cut off two 80 mm lengths, planning to make a complete leg-set of bushes in one setting. I wanted to make sure the set-up for the 22 mm bore was done without removing the material from the chuck.

I made a drawing to set my bush lengths against the existing design and the springs I had bought:


I set one of the 80 mm lengths up in the 3-jaw and centre drilled it, opening it up through 6, 10, 13  and 19 mm for the boring bar.


Here's the boring bar in action, taking out a 40-45 mm length to 22 mm or so to give a sliding fit on the stanchion.


From this bored part, I finished the top bush OD to 29 mm and parted off.


The top bushes fit in a 29 mm ID register in the slider, which is made from 32 mm OD seamless tube of 2 mm WT. The bush has a 0.5 x 0.5 mm register in one end to let it sit just below a circlip groove in the slider.

The circlips are wire type - I bought the sheet metal type initially before I realised there wasn't sufficient space in the leg to house them. Wire types are harder to get out but occupy much less space. The nominal 30 mm circlips need the ends trimming:


The clips fit in the end of the slider nicely - there is a 0.5 mm deep groove about 8 mm in, to let the clip retain the top bush:


The slider has a ground channel to allow you to get a scriber under the circlip:


It's very hard to see, but the circlip ends are ground flat to allow you to lift the ends out of the grooves:


The bottom bush is essentially a blind tube - bored 22 mm for the stanchion and finished to 28 mm OD for the slider, it has a 5 mm thick closed end to seat the spring. It's loosely retained to the stanchion with a small roll pin.

This shows the complete assembly, with the dust cap, main compression spring and the rebound spring. The springs were bought from ebay, selected for wire diameter and OD.


Here's the stanchion in paint:


The frame is also almost finished:


By the way. This interesting effect is called fisheye, and is what happens if you don't degrease the parts prior to painting...


Sunday, 23 February 2020

QR50 - Stanchions & Yokes

I might have mentioned a few times that the stanchions, which in this design have integral bottom bushes, were absolutely trashed through rust - so much so that I needed a new pair.

These are pretty hard to come by, and expensive. I decided to make a pair.

The originals are chromed steel tube, finished diameter 21.5 mm. After much deliberation I decided to use 22 mm OD 304 stainless tube, which meant the holes in the yokes needed to be eased open. I did this using 60 grit emery tape and a hone, which I made from a scrap bit of tube with a slot to carry the tape; the tube OD was reduced to allow for the thickness of the tape. I ran this slowly in the lathe:


Here's the hone. It took a couple of hours and a metre of tape to open those holes out to 22 mm.


Since I don't have a M10 x 1.25 mm tap set, I elected to rescue the old top nuts from the original yokes. I cut these out using a parting tool and a corner turning tool. I removed all traces of chrome in the process, to avoid contaminating the weld.


I used the TIG set at 50 A to put an autogenous peripheral weld down:


Two new fork legs!


The yokes come up nicely. They have been stripped and cleaned using various wire wheels; the paint is UPol Satin Matt Black over UPol etching primer:


Saturday, 15 February 2020

QR50 - Brake plate stop

Last major job on the fork sliders is to weld on the stop for the front brake plate. For convenience, I have retrieved this from the old slider:


I've set up the whole assembly in the vice to ensure that it is welded to the new slider in the right place:


With it set up like this I can tack it in place. I can then remove the brake plate, and set the welder up for a fillet; the key element is to make sure I can access the weld:


With sufficient stick out and the gas pressure raised enough to keep the electrode cool, I can use some filler to complete the weld. Any excess is cleaned up with a round file. It fits beautifully: