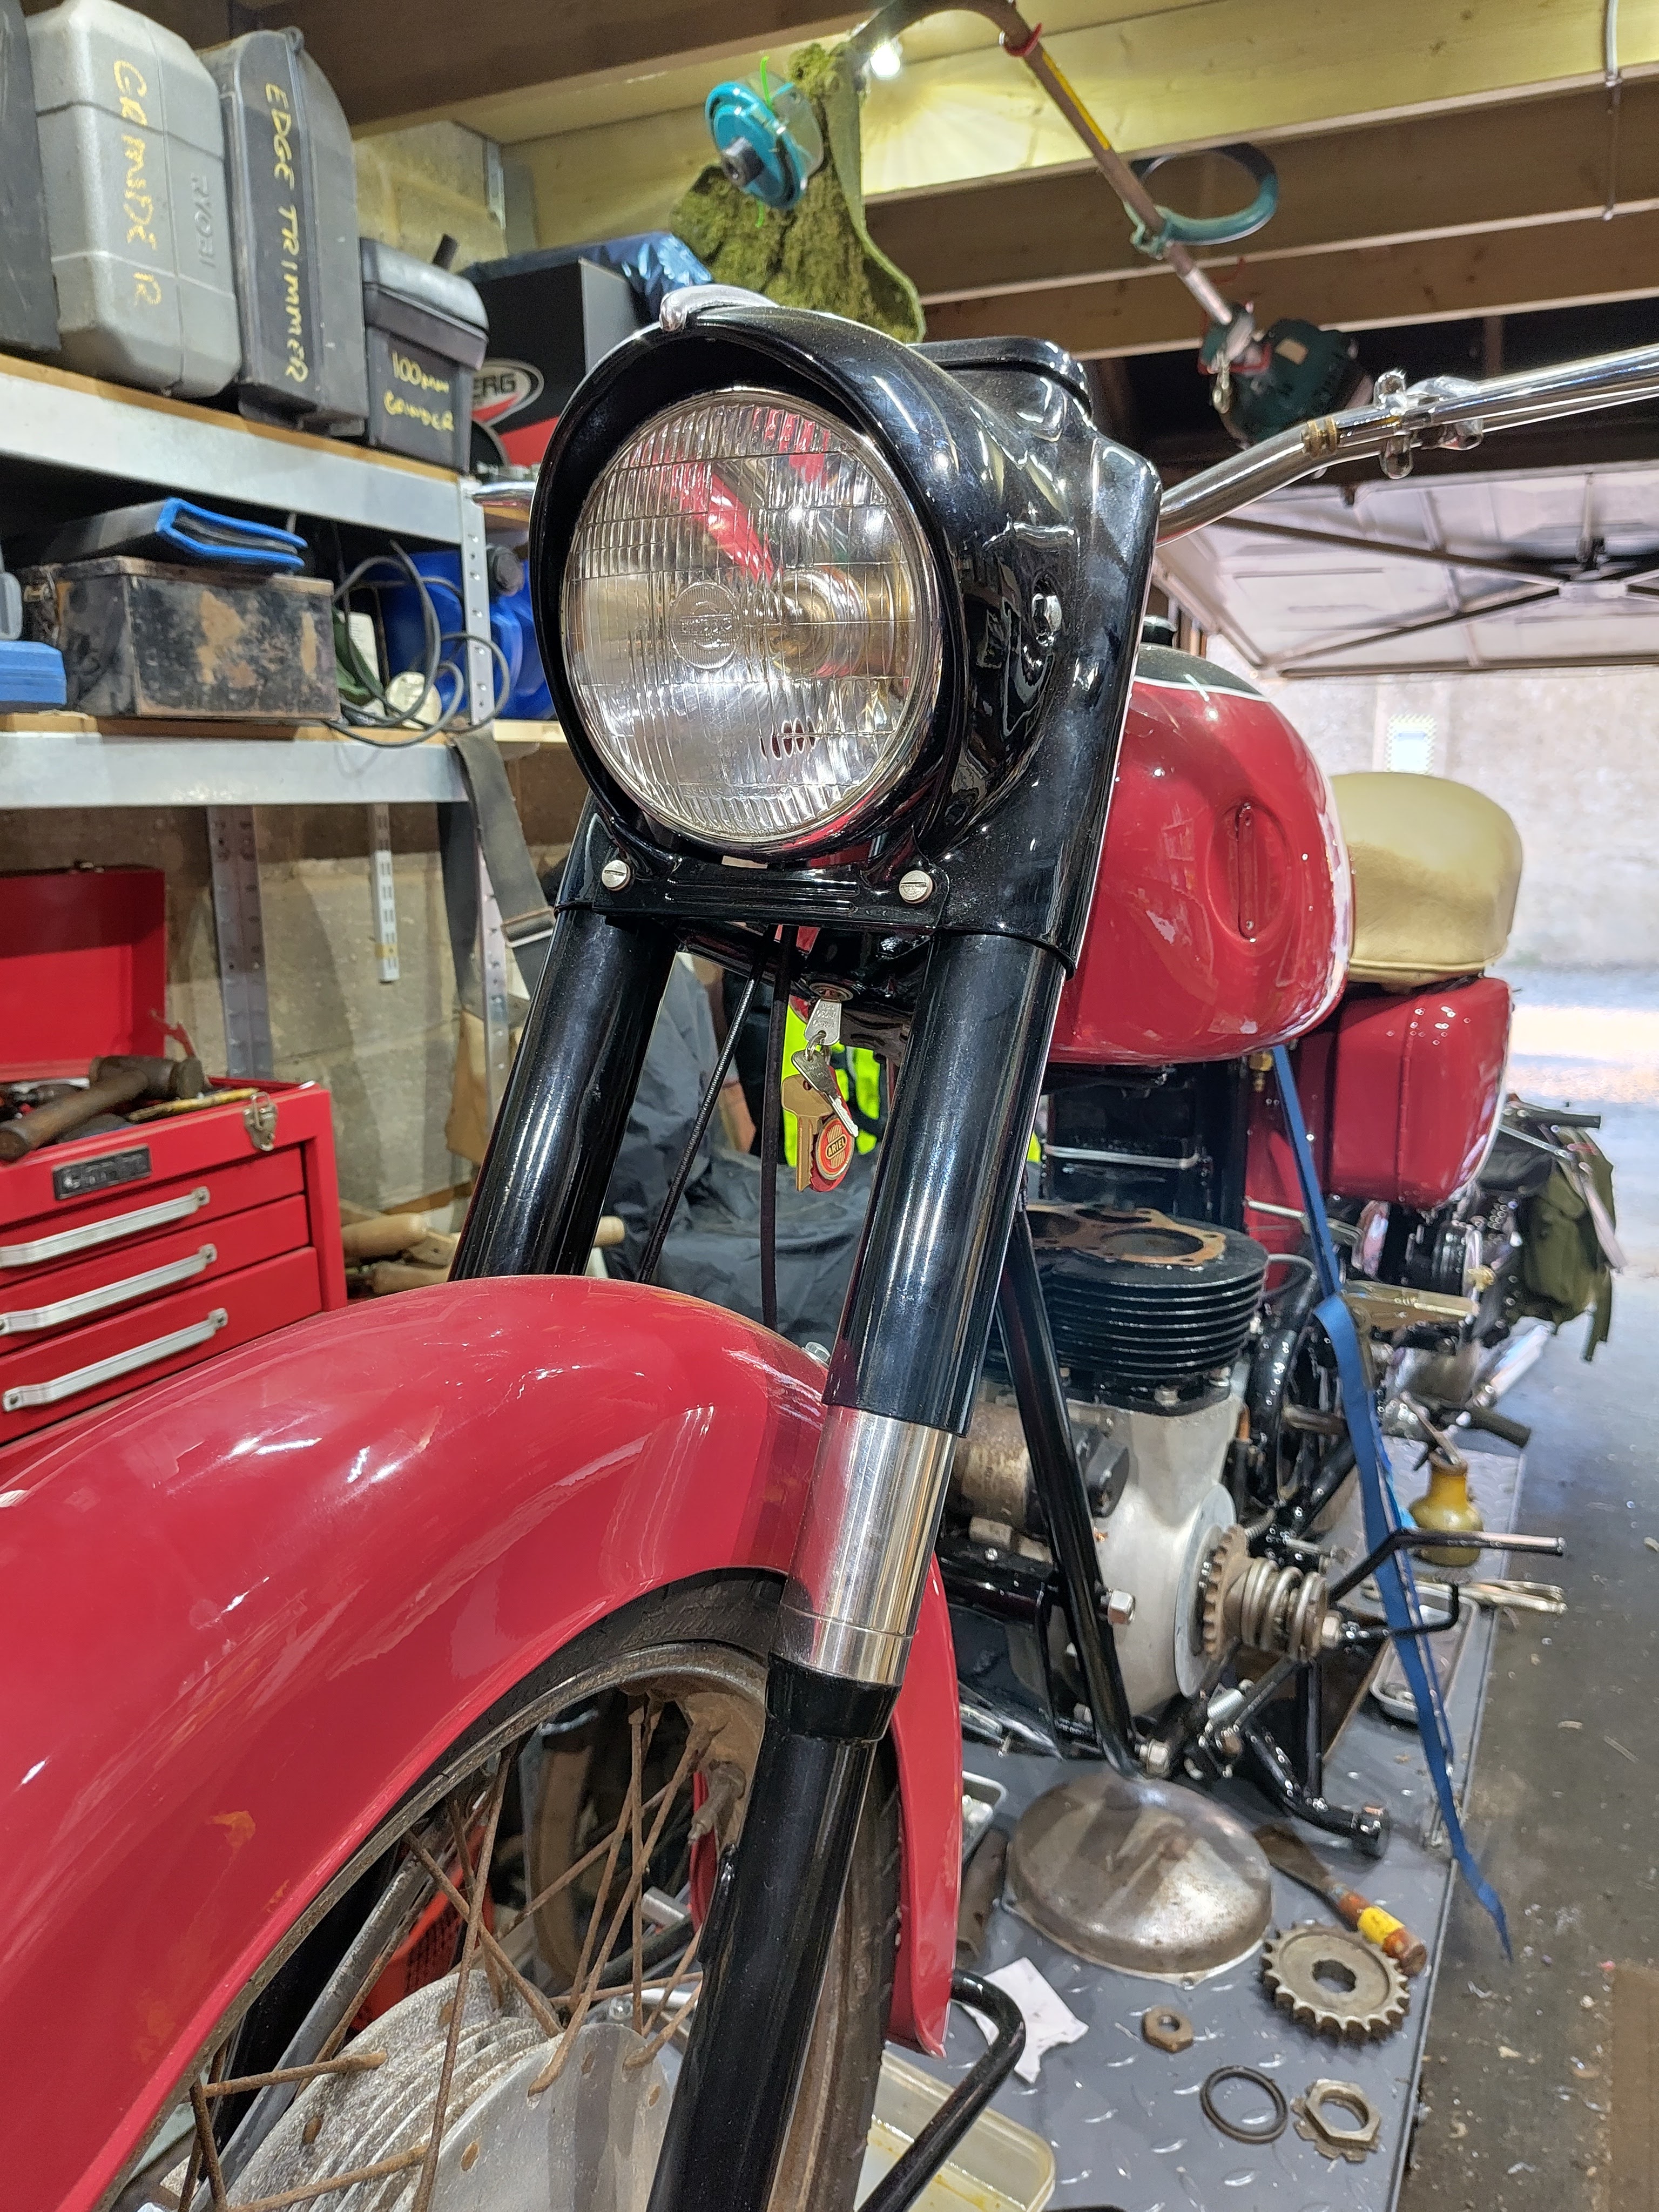
With an hour or so to spare, I went to the workshop to finish putting the tank on the Huntmaster. Bolting it down was no problem but I noticed a drip from the tap. The plunger was very loose and I imagined the cork might have dried out since it had been empty for quite a long time. I was wrong about that - the cork was just knackered.
Fortunately I have quite a lot of spare plungers knocking about and I found one with a good cork that I could plug the tap with whilst I repaired the original. It's the usual drill here with these post-war taps - you knock out the brass centre using a punch, replace the cork with a new one, and put the centre back in. In taps where you have to twist the plunger, the centre is actually formed as a square at the outer end and there wasn't sufficient material left here to re-peen the brass end into the chrome handle. I filed the end back a little bit to give me more length and used to centre punch to peen it into place:
The next job had been coming for a while. The chrome strip which hides the welds on the top of the tank broke at the hook holding it onto the end of the tank. I toyed with the idea of buying a new one for a while and then realised as it was brass I could probably make new hook, soldering it in place of the old one.
I made a new one and used some solder paste to tin both the strip and the new hook adding some extra solder to it once tinned.
I held it in place with some clamps whilst I sweated the joint together.
That worked really well, and is more secure than it has ever been.
Now that I've finished installing the electronic ignition and the FH is doing sterling service as the daily rider, it's time for the grubby old Mk1 to get some attention. Looking at the maintenance schedule shown here, there's a few bits that need attention not least an oil & filter change with a tank washout.
My U-Pol degreaser works wonders on the back wheel:
The next step is to lift the fuel tank and clean the cylinder head.
Well, the mild spitting and reluctant starting returned with a vengeance today. After the tank pinhole repair, the washer around the speedo cable and some general bolt tightening I fueled up and took the bike for a short commute of about 4 miles.
It was certainly reluctant to start, and was also lumpy as hell but it got me there and restarted when it was time to come home.
The journey back got progressively worse, and by the time I turned into town I had only one cylinder.
That cut out as I turned into the yard.
The engine sounded flat and 'hard' on the way out, just like the W/NG when it's retarded. The blue exhaust pipe in the picture screams 'retarded' too - the bike went straight on the ramp when I got home.
With the plugs out, I engaged top gear to use the back wheel to turn the engine with the magneto end cover off - the points had virtually closed up. Setting that back to 0.012" had the engine bursting into life at the merest tickle of the kickstart!
I greased the point cam, but I must check the gap on both cylinders.
Shame about the blue exhaust. That won't polish out but at least the tank isn't leaking!
Spring is here and I'm away using the Square Four for some little house renovation jobs in a nearby town. There's a little bit of time in the workshop to do a few bits on the Huntmaster.
We'll start with blocking that hole in the primary case that used to be used for the chain oiler before the fully Enclosed Rear Chain Case arrived. It's lost its blanking plug so I've made a new one up from a cheese head 3/16" BSW screw with a fibre washer:
The next one is a bit more serious. This is the pinhole in the fuel tank - I've taken the tank off for better access which is quite easy with these single centre bolt tanks. I've opened the hole up a little bit to clear the paint with a scriber and I've cleaned the area with acetone.
I've put a blob of Seal-All in that hole - just a tiny blob. After deliberating for a while over the approach I would take to this repair I realised that Seal-All had been sealing several holes in the W/NG tank for many years, and is still good. We'll see how this turns out tomorrow.
Well, I expected to do a few modifications or repairs after a bit of shakedown mileage - for example I now know that it needs a larger engine sprocket and I've got a couple of oil leaks - but I didn't expect to be taking it off the road quite so soon! I fully filled the tank for the first time yesterday having driven around with about a gallon sloshing about in the bottom for the last few miles and unfortunately it appears that the extra weight of fuel has revealed a pinhole. Now this tank has had a few weld repairs, it's been tested with air several times and filled with Slosh sealant - but there's still a pinhole.
You can just about see it here - there's a bit of a 'halo' around the hole. The tank is empty in this picture - with 4 gallons in there, it drips constantly.
Would something like Petro Patch work do we think? JB Weld perhaps?
In other news, fellow AOMCC member Stan has been in touch to tell me that BSA engine sprockets (A, B and M series) will fit and I have ordered one; I'll put a 3/16" BSW cheesehead screw in the open chain oiler hole in the outer primary case, because of course this hole is not used on FERC bikes and just provides a leak path. Stan suggested a couple of other things:
Use Morris AG90 gear oil in the box
Put an O ring under the speedo drive nut to stem the cable oil leaks
It's worth getting an aluminium gear for your auto-advance unit as a backfire can strip the fibre teeth
It's worth having a spare rocker shaft in your toolbox as these can break
You get great support in the AOMCC.
I did check where the idle screw had ended up after the hot adjustment yesterday - 1 1/2 turns out. However, starting today was a bit tricky - the bike was more reluctant to run. I had the choke fully on, perhaps the weather was too warm? It was spitting back a fair bit.
With the fuel cap fitting properly, we can fit the tank trim. This is a long strip of chromed brass which covers up two weld seams and the tank mounting. I have two - a very poor original one, and a shiny chrome one I bought cheaply on eBay which doesn't fit very well.
This is the dodgy one.
The strip is made with a simple fold at the rear; it hooks under a bar welded to the back of the tank:
Once you have it under there, it helps if you push the seat all the way forward in it's mounting lugs and bolt it up tight. This holds the shiny chrome strip in position and will stop it coming out while you fasten the front, with two screws into the Spire clips ahead of the filler cap:
You'll need to remove the damper knob to get at the screws.
The tank trims and rubbers were not a job I had been looking forward to. The trims were a bit mangled - they are thin aluminium, available new but very expensive and of course as I have said multiple times, I won't be a 'cheque book' restorer - and I knew they would have to be 'manipulated' to get them back on.
They fit around and underneath the welded plates that retain the rubbers, bending down into a depression on the tank (the bit I had cut out and rewelded) with a beaded edge laying flat (!) on the tank, around the knee rubber. Like this:
It doesn't look too bad does it! I removed a lot of dents with some purpose ground punches and a simple hardwood dolly, with grooves to suit the beaded edge:
The next bit is a job I don't enjoy very much - I am always afraid of tearing the rubber or scratching the tank. A smear of silicone grease helps, as does remembering (eventually) that you start fitting these at the rear, narrow end and move forwards.
If you start at the back, the bottom edge will go in easily and you can work along the top edge; you can then slip the front over, as there is quite a lot of length to stretch and it will move, leaving you with a bit in the middle of the top edge which is a bit of an effort. Very rewarding when it pops in though, and made much easier by the fact that the tank, on the bike lift, is at shoulder level.
A couple of other points - I polished the trim up on the wheel before it went on, and secondly it's much easier to fit the rubbers when the tank is bolted in place on the bike.
Talking of which, as a 1958 bike this tank has the single centre fixing beloved of BSA. I wonder whose idea it was? A Val Page idea or a BSA idea? The easiest way to fit this is to assemble the bolt, washer, nut and the rubber with it's tube and insert it into the hole in the tank. With the seat pushed to the rear, you can lift the tank and wiggle the head of the bolt into it's slot on the frame - then you lower the tank.
You'll be able to feel that the bolt head is still engaged as you do up the nut.
We'll fit the chrome strip in the next episode!
Coming around to filling the tank, experience has shown that a petrol tap cork that has not had a tank of fuel sitting above it will dry out, shrink, and leak profusely. I've removed this one and it is spending the night soaking in fuel.
The tap itself is fitted with a Dowty washer which will make a far better job of sealing than the fibre washer originally specified. I've sanded the paint off the sealing face in order that the seal works properly, and a miracle has occurred:
The tap is positioned perfectly and it is fully tightened!
Some years ago the Square Four got a new fuel tank in original paint from Yeoman’s Motorcycles. It was pretty shabby but it still had the coach lines picked out in gold paint to show where the Ariel craftsmen put them all those years ago.
As you can see the paint is very faded. The Square Four wore this tank for several years but eventually I decided that it was really too far gone. I didn’t really want to repaint the whole tank and lose all the patina, so inspired by Graham Ham’s book about his Speed Twin ‘Daisy’ I resolved to clean up the paint as best I could and enhance the gold lines a little bit.
The areas that were worse affected were around two weld repairs where the tank badge carriers had been refitted. The paint here was burnt and discoloured and no amount of rubbing down was going to bring that back. I used a matching spray paint (from stock I had accumulated years ago) to blend these areas in to the rest of the paint. Rubbing all the paint back with various grades of wet and dry from 240 to 2000 brought the tank back to life enough.
I then used some old jet black gold lacquer and some 3 mm PVC masking tape to put the lines back in. When these were mostly dry I rubbed over them with a dirty glove to dull them down. This works reasonably well when I timed it correctly but if the paint was too dry it didn't pick up the dirt from my gloves.
It needs more work of course, but it's getting there for sure.
A few minutes in the workshop yesterday allowed a bit more progress on the Huntmaster. The headlamp is now fitted, with the grommet at the top. This seems to be the only way I can fit it and still allow access to the rim clamp:
Next, the tank badges. All this needed was to clear the paint out of the threads with a 3BA tap and fit the badges with some short countersunk stainless screws from stock:
Finally, I've refitted the toolbox knob using a plain washer on the outside, Thackeray washer on the inside, another plain washer and two nuts - curiously the knob appears to have a BSF thread?
Last thing for today, and this is a bit lazy, is to look at the dynamo. I've cleaned it, motored it and fitted it - it motors ok and in the right direction so it is working and polarised correctly:
It's smooth and quiet, so maybe I won't overhaul it just yet. The cork washer is missing though, so I will need to make one:
One thing I forgot - I've fitted the oil line unions to the engine, with new washers from the gasket set. The bottom one is the feed, the top is the return:
After three years in the field, the little beast is back. The boys are complaining the bike has no power after ten minutes running and with busy lives, my son and daughter in law have no time to check it out - so it’s back to Grandad’s workshop.
The Square Four is now off the bench to test the kickstart against the clutch, and then close up the clutch, refit the exhaust and test ride it. All went well with that, so the QR can go on the bench:
The first thing to attend to, and rather alarming, is the fact that the fork top threaded inserts are both loose. Now, these had a ring machined into them which allowed them to sit in the top of the fork leg, which I welded into the fork leg. Now, there is no evidence that the ring was anything other than an interference fit around the insert - indeed, there is no evidence that the insert was anything other than an interference fit in the fork leg.
Now, the inserts are retained in the fork leg by two strong plug welds on each side of the leg:
Next job, the tank. The wrap hasn't survived very well on the tank - the shape is small and complicated. I've pulled it off and treated it with some special plastic primer:
The primer is actually clear - ignore the grey bit, that was an experiment with the ordinary PlastiKote primer to test adhesion: it doesn't work very well, but the special stuff is excellent. This RS Paints Honda Helios Red doesn't come off:
The lack of power appears to be down to the choke - the choke cable goes into the carburetter through a plastic nut which has broken, allowing the choke cable to come out. When it comes out, it appears to operate the choke such that the mixture is rich all the time, even with the choke knob pushed in. That will certainly lead to a lack of power.
The part of the nut that was broken retains the boot, which in turn retains an elbow and the cable.
I turned a new part up from brass and pressed it into the old nut, which I had bored to suit. It starts very well:
As you can see at the end of the video, it dies if you fully open the throttle - the kids were complaining that it didn't have much power. The float height is bang on:
It appears after a lot of searching and cross checking Honda part numbers that a Keihin PA26 carburetter with a #78 main jet is correct for all years of QR50 production. This is the main jet out of mine, which is marked PA 28D but still has the 12.2 mm throat of the correct carburettor:
A #58 is not a #78! It looks like it gets very weak at full throttle, something born out by the colour of the plug. I've made a new carburettor spacer while I wait for the new jet:
A few days later, the new jet arrives as expected - but it's the wrong size. Some of these little carbs use a jet with an M7 x 0.75 mm thread, and these are available; unfortunately mine uses an M6 x 0.75 mm thread and these are not available. So what I did was measure the diameter of the new #78 jet using a range of small drills - I found that a 0.8 mm would not go in, but a 0.75 mm would; the #58 would accept a 0.55 mm, but not a 0.6 mm. I concluded these Keihin jets are identified by their diameter.
One option would be to put the new jet in the lathe and reduce the diameter, and I probably would have gone down this path had I possessed a M6 x 0.75 mm die (it's a fine pitch) but I didn't fancy buying a die or setting up for single point threading, so I did something that ideally you should never do and drilled the old #58 jet out to 0.75 mm, which might leave it a bit lean.
It doesn't run out of breath at high rpm any more:
I've written about the value of the specialist suppliers before, in various media. As you know and can read in this blog I make a lot of (unobtainable) parts myself but we really must keep the specialist suppliers in business, particularly the ones that are making high quality stuff. I was speaking to one only this morning and they are really not making massive profits so we must support them and not dilute their market.
Without people like Acme, Draganfly, the AOMCC and several others, we'd have a lot of unrideable museum pieces.
Here's another example - Jeff Hunter Engineering, a.k.a 'The Rubberman'. I've got all the rubber parts for the FH, the W/NG and the Model A from Jeff. Here's a couple of examples:
Sunday dawns and I'm up early to get to the start of the Norwich & District VMCC Castle Acre Run but first, it's a trip on the W/NG to deliver the TS125 tank:
With the tank back on the MZ, son Tom starts the freshly oiled & fuelled SQ4 that he will ride today. I'm on the modern Interceptor, just for a change.
First stop is at the start of the run, for tea, a chat and to sign on. Lovely barn conversion and outbuildings:
At 11:00, we depart for the 37 mile trip to Castle Acre, following the Tulip route sheets. I make the mistake of relaxing at the back of a line of two bikes who miss a turn and I have to double back, messing up my calculations. We arrive eventually, and I'm not last, though I expect to find Tom and the SQ4 there already. He's not, and it turns out he's stopped to wait for me, witnessed by the missed calls on my phone. He turns up a few minutes later and we have lunch.
Two portions of loaded fries and a chat later we wander out to look at the bikes, and do some more chatting...
The rest of the section will take another 37 mile run back to the start, but since that would be in totally the wrong direction for us we say our goodbyes and head back to North Norfolk.
Totals for the day - 130 miles for me aboard two different bikes; about 100 of those on the Interceptor. The SQ4 is going really well and uses negligible oil, and consumes fuel at 50 mpg!