Showing posts with label Dry Build. Show all posts

Tuesday, 10 May 2022

FH Dry Build - Speedometer Bracket

Today's little bit of progress is this - a speedometer bracket folded up from a scrap of flat bar. 


Wednesday, 19 January 2022

FH Dry Build - Timing Cases

 Assembling the timing side, for the purposes of this dry build is a simple matter of cleaning the cases and clearing the threads.


There's some damage to the inner timing cover around the ATD, which I have asked the FaceBook panel of experts about:


The inner goes in place once I have cleaned the locating dowels of surface rust.


With clean thread and clean clearance holes, the outer goes on easily:

Monday, 10 January 2022

FH Dry Build - tail light plinth

 The FH, along with other swinging arm Ariels of the period has an unusual feature used to mount the tail light vertically - a little pressed steel plinth, part number 5611-55. Drags do a very nice replica for about £15, but they have been out of stock for a while and it is an easy thing to make.

Starting with the Lucas 564 rear lamp, we need a caliper, some plastic holes, a piece of card and a scalpel.


I used the holes and the caliper to mark out three holes in the card - one for the bulb holder and two for the mounting bolts. Then I can fit the lamp to the card and draw around it:


Next, I can develop the part around the shape of the lamp: 


Cut it out with the scalpel, using a wad punch for the holes if you have one of a suitable size. In my case, I punched the smaller holes and used a swivelling scalpel for the larger one:


Next, make some nice sharp folds with a ruler and use staples or a glue gun to fix the edges which will eventually be welded:


Now, we can do a test fit and trim the pattern to allow the lamp to sit vertically above the number plate:

With the part to the shape we want, we can undo the staples and stick the pattern to a suitable steel sheet. It's that old bread bin again, that gave us the air filter for the QR50:


I used the bandsaw to cut it out, but you can use a hacksaw, shears or whatever you have. The edges are cleaned and deburred with a variety of files.


Folding is quite straightforward using just the vice and my trusty bit of copper bar. With folding completed, the next step is to weld up the joints - most of which came together to weld autogenously. The linisher springs into action to clean it up:


After a couple of trial fits and a bit more time on the linisher, I treated the plinth to a bit of UPol etch primer before fitting it to the bike - temporarily, with a few magnets:


I think it looks fine.

Sunday, 9 January 2022

FH Dry Build - Rear Brake Pedal Pivot

Assembling the FERC has revealed another little challenge - the brake pedal pivot will not fit without hitting the lower section of the FERC. This one, which came with the kit is identical to the one fitted to my 1951 Square Four and is 96.5 mm long:


AOMCC member Dean Waters provided this picture along with the information that his pivot was 92.5 mm long. Ariel did not change the part number of this component (which is 5412-51), but since it will function on non-FERC machines just as well in the shorter form, there was no need to change the part number.

You can see that Dean's is still very close to the FERC but does not touch it:


It's a simple matter to turn a few millimetres off in the lathe.


Friday, 7 January 2022

FH Dry Build - that sidestand again

With the exhaust in place, I can look again at the sidestand and see where the 'foot finder' pedal needs to be, before I weld it on. I start with the sidestand fitted and the pedal held in place with a tool makers clamp, so I had some idea of where to weld it such that it wouldn't hit the exhaust.

I had the TIG set to 45 A to weld it all around. It's quite a big weld for my set up, but as long as I didn't drag the arc out it was fine - of course, with a fillet, drawing the arc out is what I always do to keep the tungsten out of the weld pool!

I tweaked the pedal a bit once the weld was done to get it in the right place...

I haven't used the stand yet, but it looks like the pedal will clear the ground:


Wednesday, 5 January 2022

FH Dry Build - Carburetter

The FH kit arrived all those years ago with a brand new Amal Mk1 Concentric, a 928 and a carburetter that I have no experience with whatever, but I am not going to delve into that now. Today I am only concerned with mounting it to the head.

The standard carburetter for the FH is a Monobloc, retained with two 3/4" hexagon bolts with 5/16" CEI threads. All well and good, but the concentric has a rather large tickler button which prevents you getting the bolts in...


No matter, I can make a couple of studs on the lathe. These will be 5/16" CEI both ends, about 1 1/16" long with about 3/16" plain in the middle. Here they are, part way through manufacture:
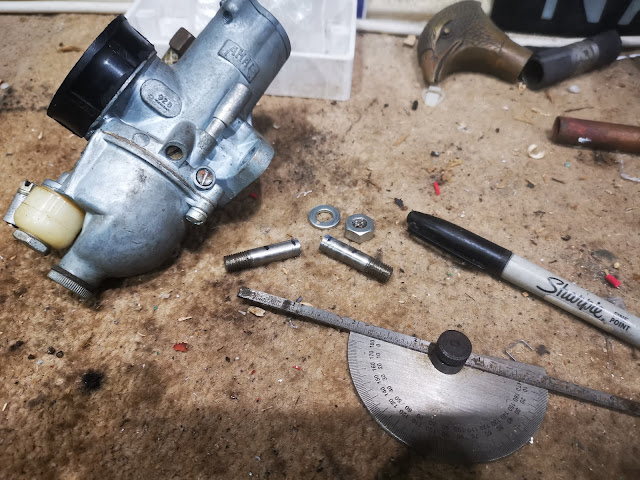

I bought a new alloy bell mouth, which is very nice. The rubber fits neatly inside it:


The next problem is that either the carb thread or the bell mouth thread is not to size, or is damaged. This is as far as it will screw on:

Thursday, 30 December 2021

FH Dry Build - Exhausts

Well, it turned out that five years in a damp loft by the seaside wasn't the best thing for the old siamese pipes the bike kit arrived with, so as the pipes they supplied for the SQ4 were so nice I bought a new set from Feked. Feked make nice stuff which they pack very securely and deliver promptly. A good outfit:


...and they fit, too. The silencer construction is a perforated tube with glass wool around it, juts like the Burgess original on my W/NG. Should sound throaty! 

Nice deep socket fits the cylinder head stub:


Bracket is in the right place:


Two things here - the pipe bend is a little tight but will spring down to the right position with a little force, and the silencer end of the pipe needs about 2" trimming off it:


I'm not sure this bend is in the right place, but it does clear all the bits it needs to:


Someone else's bike, much the same:


Looks pretty good.


Monday, 6 December 2021

FH Dry Build - fixing the side stand

The kit of parts came with a side stand that fitted the frame lug but otherwise is unlike any side stand I have seen on an Ariel - from a bit of Googling, it appears to be Triumph one. I chose to modify it to fit the FH - in fact I would use it to make a replica of an Ariel one.


You can always get help with your Ariel - from fellow members of the AOMCC, or perhaps members of other Ariel clubs around the world. There are a few. This next picture came from such a source and shows the business end of an Ariel side stand:


The donor stand had a small hole for the spring. Since the first bit to get right was the fitting of the stand to the frame and the ability for it to hold itself safely in both positions (Ariel side stands stay down until you flick them back with your foot), I needed to make a peg for the spring. Another job for the mini-lathe:


Unfortunately, the first attempt revealed that I didn't have enough stretch in the spring - the stand would go down and come up but the spring would fall off before the stand was in the parking position.


I had to cut the peg off and re-weld it 3/4" further down the leg. I need a few more bits:

Side stand kit

Here's some more AOMCC help. Those feet belong to Lee Mallabone, and that's his side stand - he's showing me what shape the foot needs to be:


Using my hacksaw and the linisher, I trimmed the foot I'd made to match the original that Lee showed me. It's close enough - it's actually a bit bigger, which can only help out in the field:


Here it is back on the bike. I've relieved the inside of the clevis a little such that it comes around the lug a bit more, but to be honest I am not sure I want it to stay down - which it doesn't:


However, at the other end of the travel, it doesn't come up as far as I think it should:


Have a look at this:


Either I need to modify the clevis so that it will move further in both positions (which will have the effect of making it stay down) or I have to change the frame lug to relieve the stop at the parked end.

The next job is to trial fit the exhaust - then I can work out where the 'foot finder' pedal needs to go. More on that later.

Sunday, 21 November 2021

FH Dry Build - Barrel and Head

After completing the primary case installation, I moved on to the head and barrel. This was pretty straightforward, and I retained the head and barrel in place with a couple of bolts each, though the threads will need cleaning up when I rebuild the engine.


The main purpose of this step is to establish fixing points for the exhaust, carburetter and head steadies. The head steadies fit to two of the downward facing rocker box studs and its clear that the existing ones are fretted quite badly and will need replacing.

Secondly, the kit of parts I bought all those years ago included a brand new Amal Concentric Mk1 928 carburetter so it will be interesting to see how that performs - it will be a new experience for me. The FH was intended to have two bolts holding the carburetter in place, but unfortunately the large tickler fitted to the 928 prevents one of the bolts going in - it will need a couple of studs making up or I could use the 5/16" CEI x 1 1/16" stud specified by Ariel for the iron head singles under part number 0183. 


Tuesday, 9 November 2021

FH Dry build - primary case

One of the problems you always come across when tinkering with unloved old bikes is broken screws. The Huntmaster hasn't had many, but while I am working on the dry build it is time to fix these kind of problems as we come across them.

This is a typical example - a broken 1/4" BSW screw in the primary chain case. Of course, it is too short to get hold of and Plus Gas has no effect on loosening it enough so that the little bit I can get hold of can help it come free.

The only sensible option is to drill it out and and re-tap the thread. I set the inner case up on the pillar drill and used a centre drill to start the hole, opening it progressively (0.5 mm increments) to tapping size, hoping to release the remains of the screw.


This didn't work out, and after attempting to chase the rest of the bolt out with a tap, for the first time in my life I managed to break a tap in the hole. I spent the rest of the evening laboriously grind it out with a diamond coated tool in the Dremel.

Once I had removed the tap, the next step was to drill out the mess for a Helicoil:


Then tap for the Helicoil:


Then screw in the insert. You break off the tang used to put the insert in when you are done:
