
The QR kit of parts came with a horrible green plastic filler cap that didn't fit properly and had a simple hole for a breather which would leak if the bike fell over. Contemplating how to fix this leakage problem, I looked at the availability of the original caps. They are available from EBay, but like the oil tank caps are not cheap at £22:

When I realised that the real filler cap was a rather nicely sculpted thing, I started to contemplate how to make one.

Of course, I had the tank and so I was able to design the internal parts of the cap, and the thread:

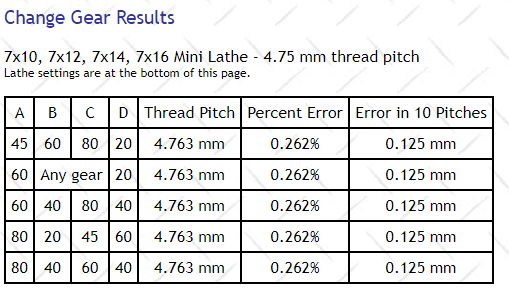
That's a very coarse thread, typical of what is used for plastic enclosures. For a lathe with a 16 tpi lead screw, you quickly realise that the lead screw runs at something like 2.85 x the speed of the chuck, which is supposedly outside the capability of the lathe - but we will see. Not being one to give up so easily, I found that LittleMachineShop has this handy calculator for change gears. You enter the pitch you want and it tells you what change gears to use. Click on the picture to go to the site:
The plan is to make the new cap out of this chunk of Acetal. Acetal has excellent resistance to gasoline, is strong, stiff and very good to machine:

Here's the inner cap ready. I machined this out of the scrap stub, left over from making the fork dust caps:

It's got a breather hole:

Next step is to start on the cap. I measured it up using masking tape to give the pencil something to draw on, and sawed the blank in half on the bandsaw. Then, having made sure it was square, I marked the centre:

I set it up in the 4 jaw chuck aligning the centre mark with the tailstock centre. I faced it off and turned the OD to the maximum the stock would allow using my new Glanze carbide tipped RH turning tool.

Next step was to bore the ID to clear the minor diameter of the male thread, to a depth which would swallow the male thread and provide sufficient clearance for the flange on the inner cap and a gasket.


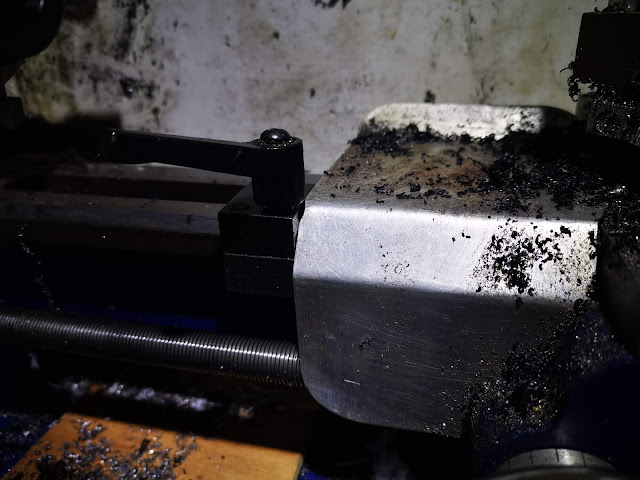
To test the settings, I set the carriage stop against the chip guard and turned the chuck one full turn. I was pleased to see the carriage had moved the required 4.75 mm.

I set the tool in place to have a look. In this picture, it's fouling the work - it doesn't have enough front clearance:

Cutting the thread:

I'm going to have to devise some way of toolpost mounting a light, for boring. I have a large LED floodlight over the lathe, but when boring it's often in shadow. I have this little torch in the workshop for these occasions - it's held on the toolpost with duct tape:


It fits!

With the thread complete, I could turn my attention to the inner cap and make sure that would fit. That done, I turned this taper feature on the top; next I will mill some finger-slots.

The fuel cap needs a breather, which is made from a bit of 8 mm aluminium round bar:

Here's the fuel cap with the finger grips milled in. I held the cap in the 3-jaw chuck, on the rotary table and cut these slots with a 3/8" end mill.


When I realised that the real filler cap was a rather nicely sculpted thing, I started to contemplate how to make one.

Of course, I had the tank and so I was able to design the internal parts of the cap, and the thread:

That's a very coarse thread, typical of what is used for plastic enclosures. For a lathe with a 16 tpi lead screw, you quickly realise that the lead screw runs at something like 2.85 x the speed of the chuck, which is supposedly outside the capability of the lathe - but we will see. Not being one to give up so easily, I found that LittleMachineShop has this handy calculator for change gears. You enter the pitch you want and it tells you what change gears to use. Click on the picture to go to the site:
The plan is to make the new cap out of this chunk of Acetal. Acetal has excellent resistance to gasoline, is strong, stiff and very good to machine:

Here's the inner cap ready. I machined this out of the scrap stub, left over from making the fork dust caps:

It's got a breather hole:

Next step is to start on the cap. I measured it up using masking tape to give the pencil something to draw on, and sawed the blank in half on the bandsaw. Then, having made sure it was square, I marked the centre:

I set it up in the 4 jaw chuck aligning the centre mark with the tailstock centre. I faced it off and turned the OD to the maximum the stock would allow using my new Glanze carbide tipped RH turning tool.

Next step was to bore the ID to clear the minor diameter of the male thread, to a depth which would swallow the male thread and provide sufficient clearance for the flange on the inner cap and a gasket.

There's no longer any excuse - I have to bite the bullet and cut the thread. I've set up the gearing according to the LittleMachineShop calculator, but since the lead screw will be turning at something 2 1/2 times the spindle speed we will be turning this by hand. It might be a good idea to get a handwheel that I can mount on an arbour to turn the spindle.

To test the settings, I set the carriage stop against the chip guard and turned the chuck one full turn. I was pleased to see the carriage had moved the required 4.75 mm.


Cutting the thread:

I'm going to have to devise some way of toolpost mounting a light, for boring. I have a large LED floodlight over the lathe, but when boring it's often in shadow. I have this little torch in the workshop for these occasions - it's held on the toolpost with duct tape:

And that's the thread cut. What I have omitted to show in this sequence is the step I cut in the cap to clear a taper feature on the fuel tank. Part way through threading I realised that I was going to have to test the thread at some point, and if it was still in the four jaw chuck it would be very difficult to get it back on centre. I stopped the threading process to turn this step, which allowed me to change to the three jaw chuck, reverse the work and while holding it on the step I could machine the rest of the outside diameter. I could then resume threading in the three jaw, which would give me a better chance of getting the work back on centre after each trial fit.

It fits!


The fuel cap needs a breather, which is made from a bit of 8 mm aluminium round bar:

Here's the fuel cap with the finger grips milled in. I held the cap in the 3-jaw chuck, on the rotary table and cut these slots with a 3/8" end mill.


