Showing posts with label clamp. Show all posts

Friday, 7 November 2025

Model A - dynamo clamp

 As I may have mentioned, one of the first parts I found missing was the dynamo clamp, shown here in this screenshot from the parts book. I have a couple of bits missing including the stud, bridge, and the clamp itself. I have no idea what they look like.

Or rather I didn't until I kind club member pointed me at this set built up some years ago by a Czech member Karol. None of this is available now unfortunately, these things tend to get built in small batches and then sold and remain unavailable until demand rises again.


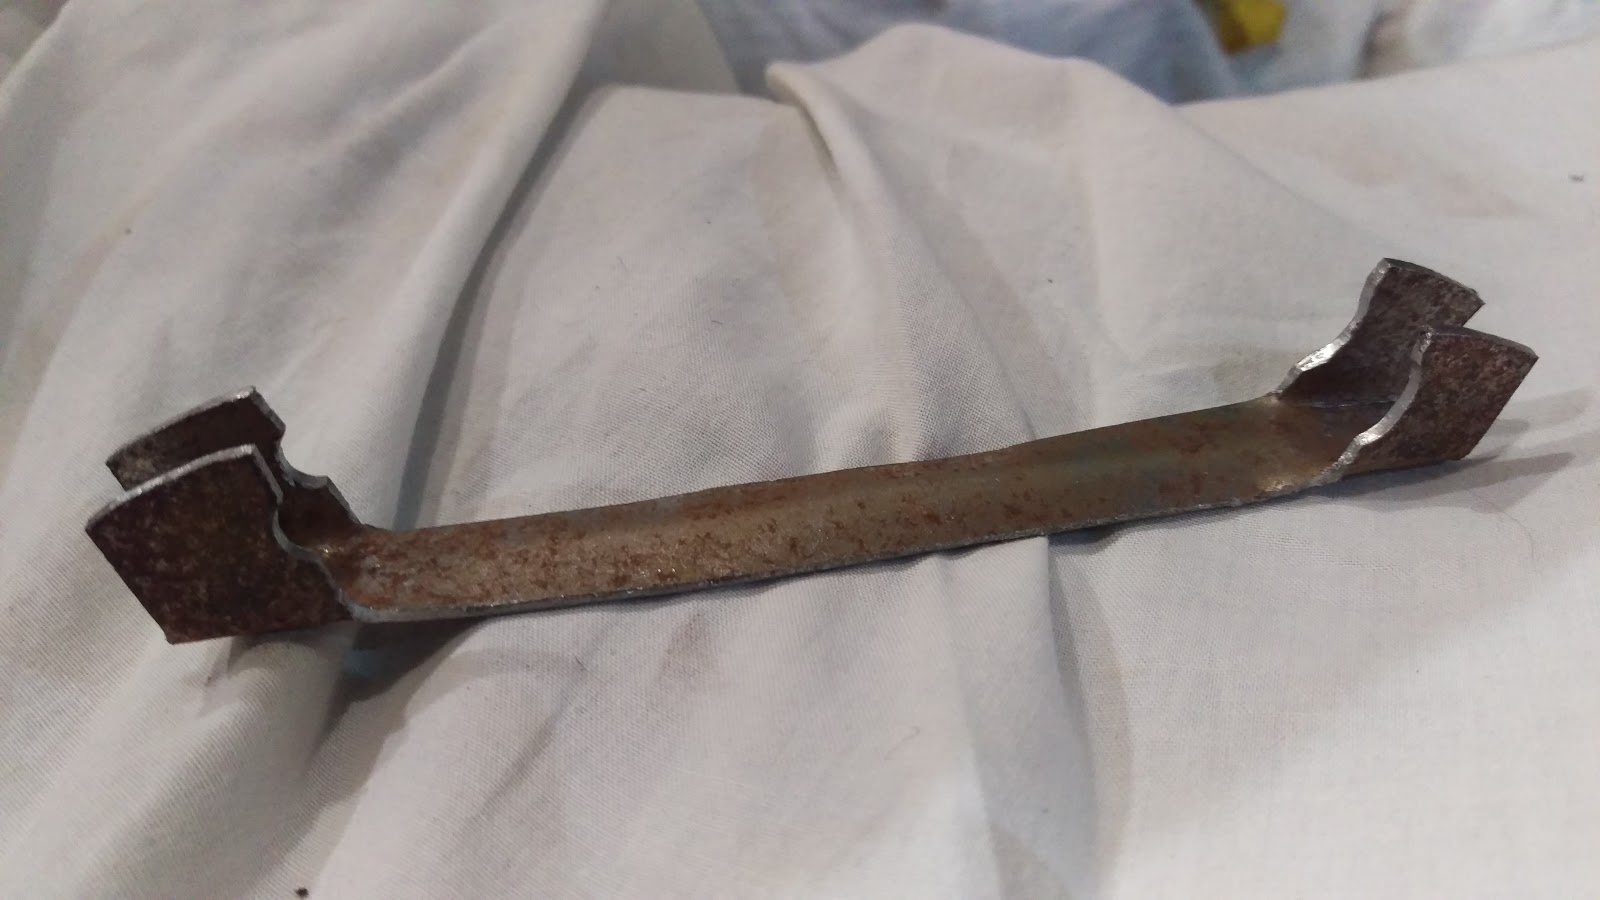
Another member sent me this picture - this is an original clamp I believe so I can use this as a pattern to make my own.


This is folded up from a piece of 3 mm thick 25 mm flat bar. It's supposed to emulate what I believe is a Mazak casting. I shall file it to shape.

Metalwork almost complete - just requires some form of finish, probably chemical blacking...

Like this:


Thursday, 12 December 2024

FH - a little more progress, and a big step...

 Well there's been a little bit more progress today. First off, I've finished the second of the finned exhaust clamp bolts:


Secondly I've been talking to people in the club about tyre sizes and whether I can get my desired tyre (Avon RoadRiders) in the size that I want. Having a look at the distance between the tyre and the chain guard reveals around 3/8" to 1/2" but also that this tyre, an Avon SM Mk11, is actually a 325-19. The front tyre, a Dunlop TT100 by the way is a 90/90-19 or 3.60-19. They are both from the 1980's.

I am hoping to buy Avon RoadRider tyres but unfortunately they are not available in the right sizes for this bike. The options appear to be to use a 100/90-19 for the rear (Avon's recommended replacement for a 350-19) and a 325-19 (original size) or a 90/90-19 for the front.


The next bit of progress is very small - it's just a P clip for the front brake cable. I've attempted to adjust both brakes but right now the front tyre is in the wheel clamp.


Lastly and very quietly and secretly I have hooked up the temporary fuel tank to the carburettor and started the bike. Unfortunately it will only start using Easy start, but at least it starts and runs. There may be some problem with the fuel supply or with the float bowl. It runs and returns oil and it runs nice and quietly so now I know that I have the HT leads the right way round, and the oil system is working properly, and the valve timing is correct and the ignition timing is more or less correct though it does spit back through the carburettor.

I think we'll have to wait 'til Monday to have another chance at it, but sleeping on it and looking at some of my pictures suggests that the float bowl gasket is missing. This will give you an air leak in the pilot fuelling circuit...

Tuesday, 10 December 2024

FH - exhaust clamps

You might remember that I brought some exhaust clamp screws from Draganfly that were the wrong size - my fault not theirs. One of the jobs I have on the list is to make some new ones and that's what we're going to do today.

The clamps are 5/16" CEI and have this 45 degree feature on the plain side:

I bought some 0.445" 303 stainless steel hex bar to make some new screws. The picture below shows the first one, prior to parting off:


I put the prototype screw in place to determine how long the hexagon needed to be in order to get access for the spanner, marking it with a Sharpie:


Here's the finished screw, parted off, faced off and provided with a tidy chamfer:


Lovely. Fitted with a dose of Copaslip.

I just need to make another one!

Thursday, 5 December 2024

FH - inching closer...

 The day seems to have disappeared again without too much workshop time but at least I've got a little bit done. 

The choke cable is now terminated to the right length, with a new nipple at the carburettor end. I didn't have the flat nipple that goes into the lever unfortunately and I didn't fancy making one on the lathe but I did have a little tiny one that goes in the choke slide.

There's not much to see here but at least we have a throttle slide and a choke slide that move independently of each other and don't have any slack in the cables.


The next little job is to make a couple of 5/16 CEI bolts to retain the finned exhaust clamps. Here I'm reducing some 0.445" stainless hex bar to the appropriate diameter for the bolts I need.


They're going to have a chamfer feature where they mate with the clamp - here is the chamfer on the clamp itself. When I have cut the thread on the bolt I will work out what the height of the bolt head above the clamp face needs to be:

That's all for a bit. I've got a 10-hour turn on the railway tomorrow which won't finish until after 11:00 at night, and then my grandchildren are coming for the weekend. Hopefully we will get the speedometer in the post either tomorrow or Saturday, so they'll be plenty to play with next week. I'll order the V-Reg2b voltage regulator as well, so we can convert the RB108.

Thursday, 23 November 2017

Exhausted by all the noise

Blatting about North Norfolk I've become aware of quite how loud the W/NG is, partly due to its original silencer and partly due to the poor fit of the exhaust pipe, which is well and truly battered, to the cylinder head.

I've no intention of doing anything about the silencer, or the battered nature of the pipe since they are irreplaceable original parts, but I must fix the joint to the head as it is leaking fire and smoke with every other piston stroke. You might recall I made a new exhaust pipe clamp which has done well but it cannot deal with the fact that the pipe does not fit...


I looked at various ready made mild steel exhaust pipe bends available at a well known internet auction site, before I twigged that I had an old exhaust header in the loft, the perfect diameter:


And the perfect shape:


I cleaned it ferociously with emery tape:


I need about 45 mm of this tube to reach the head, using the full length of the cast stub. The exhaust has had a repair in the past which was not aligned correctly, leading to the leakage problem, but leaving 5 mm of this old repair piece in place means I do not have to weld to 75 year old steel.


I've put a ring of masking tape around the old & new tubes, to show where I have to cut and to keep the cut square.


Clean the inside:


I've marked the outside of the bend with a Sharpie to make sure the pieces are aligned as I go to tack up.:


Now tacked in about 6 places, we go to trial fit. Not too bad the first time, but ideally needs more angle - I needed to cut a wedge out, to bring it closer to the head at the top.


Now fully welded & a first coat of paint applied:


Clamp added:


Just got to finish painting it now.


Tuesday, 22 November 2016

Exhaust Clamp

As I may have mentioned, when I ran the W/NG (for the second time in my care) a couple of weeks ago the exhaust detached itself at the cylinder head, due to the poor fit and inadequate clamp.You can see in this picture that the pipe is not quite aligned with the cylinder head stub - I am probably going to have to cut and shut the pipe to get it to fit. The rear stand also hits the silencer, so it may be that removing and refitting the exhaust will help but we have to start somewhere, and having the right bits is always a good place to start.


This is not the correct clamp, though it looks like some of the original brass parts are there. Here's the clamp illustrated in the 1940 parts book:


We can make one of these. First we will make a card template.

Clamped to a piece of 14 SWG cold rolled sheet ready for marking out


Cut & filed to shape


The clamp formed and ready for bending. The long centre section is now curved across it's width and the ends have been folded up


Bending the clamp - I'm doing this hot.


Fitting it for the first time reveals it is about 3/8" too short:


In principle the design is sound. I've run the bike with the clamp in place and the exhaust pipe joint doesn't leak.


We'll just have to make a longer one.

Here we go - use a similar pattern to mark out the clamp in 16 SWG cold rolled steel sheet, saw it out and file to shape. Bend up the lugs as before and dish the strap in the vice; this time I formed the curve around a short piece of scaffold pipe:


Final filing after bending up ensures the lugs are aligned and the slots are in the right places:


 For the bolt, I made a tee out of some 1/4" BDMS round bar, with a TIG fillet all round:


Cut to a suitable length, and cut a 1/4" BSC thread on the end. Excuse the wet paint!


Friday, 20 March 2015

Clamping Down

One of the many problems that have arisen so far during my shakedown period has been the inability to get my levers and twist grip to clamp onto the handlebars. The bars are polished stainless, and I guess that 19 mm OD stainless is of sufficiently less OD than chrome plated 3/4" tube, enough to allow the parts to move. They are not that loose, just enough to worry you. 

So, a few minutes with shears, a fine file and some 0.5 mm brass sheet produces a neat & tidy solution.

All is now rigidly clamped in place.