
Updated: first published 15th January 2019
Let's have a look at the brake pedal and crank arrangement next. Here's the crank in place - the rod is very rusty & I broke it trying to dismantle it...


Drilling that broken rod out is going to be straightforward. Here's how I did it:

I decided to use the lathe to ensure that I drilled the broken std out on-centre. Since it was tricky to hold the banjo shaped swivel in the chuck, I made a simple collet out of a bit of aluminium round bar. The larger part of the swivel would sit behind the collet, which grips the parallel part.

I used the collet to hold the swivel in the 3 jaw chuck, and drilled the bit of broken rod out with progressively larger drills. I cleaned up the thread with a tap.

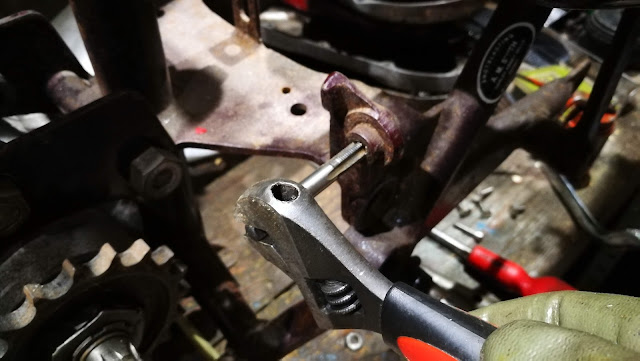
The rest of it cleaned up easily with the wire wheel. The bolt and washer used to retain the bell crank in the frame are missing - I understand (thanks to Mick D on the AOMCC Forum) that the bolt is 5/16" CEI, about 3/8" long. The thread needs cleaning up:
I've turned up a new washer from a bit of 25 mm 303 round bar:

Moving on, the brake pedal is all good and the spindle fits nicely into it's hole in the frame.

No idea why it is plated though. The spring, although it fits and is working, is very pitted and will need replacement:

I've made a new brake rod from a piece of 1/4" round bar. The collet chuck and tailstock die holder are very useful for jobs like this:

Here we go, new and old:

All fitted up. Next step is a new brake pedal spring and then the brake light switch.


The brake cable uses a clevis arrangement to connect to the bell crank. This one is a bit long, and needs a washer and a split pin:

Let's have a look at the brake pedal and crank arrangement next. Here's the crank in place - the rod is very rusty & I broke it trying to dismantle it...

The crank is held in place with a hex head screw (which I think is 5/16" CEI) and a large washer - both of which are missing. There's a clevis on the end of the brake cable.

I'd thought I might buy a new rod assembly from Acme, but having attacked the original with the wire wheel I see that much of it (rod aside) is in pretty good shape and would replate, so I have sat the broken bits in the vice with some Plus-Gas in them.

Drilling that broken rod out is going to be straightforward. Here's how I did it:

I decided to use the lathe to ensure that I drilled the broken std out on-centre. Since it was tricky to hold the banjo shaped swivel in the chuck, I made a simple collet out of a bit of aluminium round bar. The larger part of the swivel would sit behind the collet, which grips the parallel part.

I used the collet to hold the swivel in the 3 jaw chuck, and drilled the bit of broken rod out with progressively larger drills. I cleaned up the thread with a tap.

The rest of it cleaned up easily with the wire wheel. The bolt and washer used to retain the bell crank in the frame are missing - I understand (thanks to Mick D on the AOMCC Forum) that the bolt is 5/16" CEI, about 3/8" long. The thread needs cleaning up:

I've turned up a new washer from a bit of 25 mm 303 round bar:

Moving on, the brake pedal is all good and the spindle fits nicely into it's hole in the frame.

No idea why it is plated though. The spring, although it fits and is working, is very pitted and will need replacement:

I've made a new brake rod from a piece of 1/4" round bar. The collet chuck and tailstock die holder are very useful for jobs like this:

Here we go, new and old:

All fitted up. Next step is a new brake pedal spring and then the brake light switch.

Update:
The brake light switch fits onto a welded bracket on the frame down tube, right above the swinging arm, close to the abutment for the brake cable:

No comments:
Post a Comment