
If you find yourself short of plungers, or the shaft of your adjustable plunger is damaged, they are quite easily made if you have access to a lathe.
The brass centre of the adjustable plungers, which is often short from having the slotted end broken, can be made from a bit of 3/8" round bar. Chuck this in the lathe and turn a suitable length to 5/32" - the best way to do this is to turn an 1/8" or so to exactly the right diameter, then use this short length as a guide to turn the rest in one pass. With a sharp tool this shouldn't be too much of a problem and it avoids the tiny bar bending away from the tool, which will result in the outside diameter being over size.

Chamfer the end and cut the thread - it's 5/32" BSW. Make sure you use a tailstock die holder or back the die holder up with the tailstock to keep it square - you don't want that thread wandering off.

Give it a polish and part it off:

Assemble it into the plunger and you are done:

The shaft I have made here is a bit over-length compared to the old one - maybe I will adjust it a tad. Notice the diamond knurl. I don't have the cutters for that - straight and diagonal knurls yes, but not the 'inverted' diamond knurl. Rather nice, and easier on the hands...
Post war plungers, as I mentioned in my other post on the subject, are non-adjustable unlike their prewar forefathers, and because of this I think it makes sense to update them with an O-ring seal.
The hexagon reserve plungers are made from 0.600" 303 stainless steel hexagon bar. You'll need a decent length for chucking and for the milling operation. Chuck the bar with a couple of diameters showing beyond the jaws, to give you enough space to part off when you are done:

Turn the shank to the required diameter - a little over 5/16". This needs to be a loosish clearance fit in the tap body you just reamed.

Use a thin parting tool to form the O ring grooves. Space them so that they are at either end of the equivalent length of cork:

For those, like me, without a mill you can use the toolpost or a milling attachment to mill a 3/32" slot, about 1/16" deep in the tap shank. Since the loads involved in this operation are tiny, I didn't bother to set the lathe up for milling. I cut the slot at about 1500 rpm in two passes, with a 3/32" slot drill.

Once you have completed the milling, test the plunger in the body and make sure the plunger slides freely with the retaining screw in place. Next, put the bar back in the chuck and polish up the shank; then, before you part off, turn the shallow chamfer on the inside of the head. You can then part off.
Turn the plunger in the chuck, and skim the outside face of the head, cutting the shallow chamfer in the same setting. Polish the head and you are done.
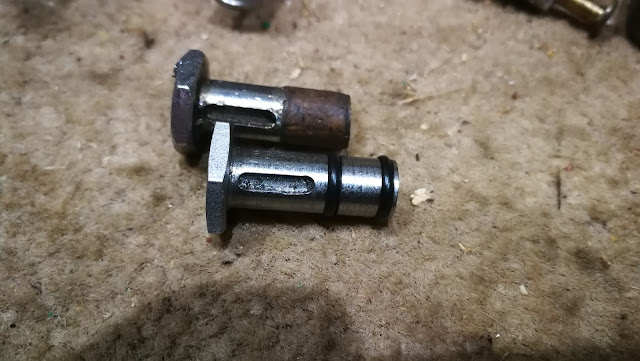
And watch out - the reason that slot looks slightly ragged is because I broke a cutter in it. Go easy.
Next thing - you will want to smooth the edge of the ports in the tap. look at this:

See the sharp edges? Remove that with a burr in the Dremel, or a tiny grinding tool. If you leave it, the O ring will be damaged. Look:

That nick will cause a leak. You are not really supposed to use O rings in dynamic applications like this.
Thanks for reading, and I hope you found it useful.
No comments:
Post a Comment