Wednesday, 20 November 2019

CX500 - almost there

As the CX edges closer to being rideable again, I have lost my daily ride - the SQ4 clutch is making a strange shrieking rattle that sounds like a loose centre so I am bikeless at the moment.

On the upside, the CX has its radiator filled - I have replaced the O rings I chewed up on the coolant pipe:


I've also discovered that Cillit Bang makes a great cleaner for the old Japanese Aluminium - look at the rear engine cover above the starter, and the coolant pipe clamps:


Coming back to the radiator, the captive nuts that Honda used to retain the front radiator grille to the shroud are knackered, rusty, and cost £4.50 each. I have these rubber M5 expanding nuts from eBay which fit the 9.5 mm holes beautifully (with a smear of silicone grease)


Here's one


I've discarded the original M5 screws and replaced them with stainless cap heads & washers. In this mock up, you can see how they expand the rubber nut to retain the front grille:


I've shined up the grille with a smear of silicone grease:


Moving forward, the calipers have been removed to have their Helicoils fitted:


I've also fitted the front wheel to get it out of the way while I wait for the Helicoils to come:


That's all for now - hopefully I can repair the calipers later this week.

Friday, 15 November 2019

Charlie's Shed - Let's fix those duff threads

Updated: First published January 2014

Well, I knew I shouldn't have looked too closely at those calipers. I replaced one nipple successfully:


The other one is too far gone and I am going to need to Helicoil it. Time to resurrect an old post that I published a long while ago:

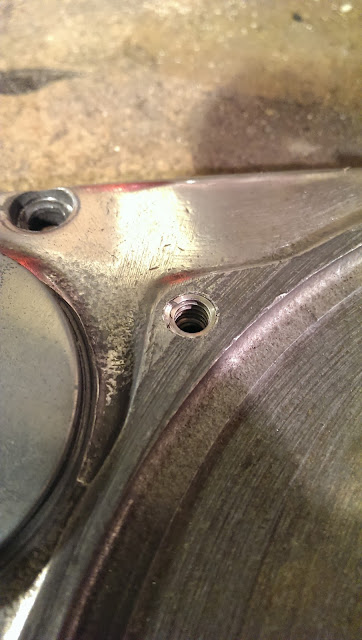
So you've all seen how the trial fit up of the primary cases revealed some duff threads that I really should have seen earlier - well now we have to fix them.
I bought this nice little set from Chronos:
It  comes in a nice little steel box with all the tools you need and 20 or so helicoils, for less than £15 delivered. These are 1/4" BSW.
Here are the drill, tap & a helicoil insert:
Here's the insert tool, which has a depth stop collar supplied with a hex key to adjust it, and the punch for knocking out the tang:


The first step is to drill out the hole to the correct tapping size for the outside diameter of the insert. It is vital to use the correct drill bit size, as the outer thread of the helicoil will match the newly tapped hole, and will dictate the size of the internal thread such that it matches your fastener.

You need the screw to ultimately go into the work at the proper angle, so if you can, set the work up in a drill press.


Next you have to cut the thread for the outside of the insert using the tap that is provided with the kit. The tap has a short taper (called a 'second' tap) to help get the thread started; use a tap wrench (90 degrees forward, 120 degrees back to clear the swarf) with some lubrication to cut the new thread. Cut the thread until you no longer feel any resistance as this means the hole is now completely tapped with the new thread. Gently wind out the tap with the wrench. Make sure you don't try to bend it at any time - you really don't want to have to deal with a broken tap.


Next take one of the helicoil inserts and put it over the end of the installation tool, with the tang of the inset in the slot and in what will become the bottom of the hole - so the tang goes in the hole first. Set the depth stop so the insert will end up 1/2 a pitch below the surface.


Wind it in. You shouldn’t feel any resistance as you do this but if you do you may just need to clean the thread up a little. Note that as you get near the bottom of the hole and the friction increases you will feel the insert start to wind up, spring like, against the tool.


One the coil is in place you use the little punch that should come with the kit to knock the little tang off the end of the helicoil that assisted with winding it in. If you are rethreading something relatively thin, as is the situation with this primary chaincase, you can grind off the spare length of insert with the Dremel:


Job done:


Monday, 11 November 2019

Plastic Nipples...

Way back in the '70's, Honda used these horrible plastic sleeves around their cable nipples to reduce friction as the nipple turned in the control levers. All well and good, I hear you say and it is so.


The sleeve slips around the nipple, and the nipple swivels nicely in your clutch lever without you developing that gorilla grip. All fine, unless you repeat the application on the other end of the cable in a claw arrangement like this:


Alright, I know someone has mangled it but it wasn't much better when it was new. Guess what that claw does to those nice plastic sleeves? Mangles them as well!

Here's my solution. The nipple is 6 mm OD x 10 mm long, and the sleeve is 8 mm OD. I've used the mini-lathe to turn these brass sleeves to fit, and added a little notch with a needle file to accommodate the cable:


Here's how they fit. This is just a test at the handlebar end - the plastic sleeve will be staying here.


Here's the engine end - the two halves are fixed with a high-viscosity cyanoacrylate:


Sitting neatly in the claw. I'll have to remove the clutch cover to straighten that out:


There's a lot more on cables and cable making here

Change of subject - a bit of painting. The chrome on this coolant pipe was past it's best and missing in a few places, so it has had a coat of UPol wheel silver:


As you might have gathered, I am aiming to get this bike roadworthy as a winter hack at minimal cost.

This is not how you fit O rings...


Thursday, 7 November 2019

CX500 - baby steps...

I like to go to the workshop every day if I can - it is good for my mental health, it walks the dog and it means that the bike restorations do move forward, despite the railway getting in the way these days.

Today was no exception, and despite an overnight stay away in the city I managed 20 minutes shop time before going to bed.

You might remember that I had removed the crash bars a while back and I have decided they are not going back on. The upper engine mount studs are very long, and I have noticed in the parts list that Honda superseded these studs and nuts with shorter bolts, presumably since to remove the cylinder head you have to get the stud out anyway, which is a bit silly.

Secondly, I remember from the '70's people fitting these crash bars to CX500s and removing part of the radiator shroud to do it. I've not yet been able to find an uncut radiator shroud at a decent price so for now I have fitted domed nut covers to tidy this area up a bit.


Honda used these peculiar hose clips, one of which needed bolt croppers to get it off - I cut the threaded part. Now, I could replace these with new ones but two things: I like to be careful with money, and I like a challenge.


They are easy to fix. Once I had got it off, I cleaned all the parts on the wire wheel; I then replaced the cut screw with a new A2 stainless M6 x 40, which I adjusted in the lathe to give me an 4mm OD x 8 plain section on the nose, for the washer to fit on. I'll paint it black or silver later.

Last one for the day was this inspection cover:


I bought this to replace a broken one:


Saturday, 2 November 2019

CX - a bit more assembly

A few short visits to the workshop sees the CX creeping forward. The fan cowling has a rubber seal where it touches the radiator - this came off with some careful pulling and goes back on the painted cowl with some glue:


The repainted engine hanger goes back into place on the studs we put in yesterday, though the excessive length of the top ones makes me wonder if they are in the wrong way around:


The fan cowling just sits on those studs:


The fan goes back onto the camshaft:


We've got some new stainless nuts on there.

Friday, 1 November 2019

Let's get the CX Moving

It's been a busy month on the railway, cramming in some turns as we approach the quiet season; we've had some family stuff and some parties, and there has not been much time for repairing motorcycles.

It's not all been quiet though. I try the 'little and often' approach, pass by the workshop every day and do something.

Here's the story so far, mostly in pictures:

Camshaft holder in the parts washer

Cleaned, with the old oil seal removed

New camshaft nose oil seal

New waterway O ring

And back in place. This was finally tightened using the small torque wrench

More degreasing

This access cover needs replacing
As I had the radiator off, it made sense to tidy up some of the rusty steel parts.

This is the engine hanger, as removed

And repainted

The fan cowling, degreased and repainted
Both of the calipers have broken bleed nipples. I'm never sure I should attempt this sort of thing - it is fraught with risk for little gain:


I've drilled this out in stages to 6.6, jsut under tapping size for M8 which is 6.9. The remains of the thread come out easily though it has more clearance than I would like and the nipple does not seal at first - I have to improve the sealing surface at the bottom of the hole:


The radiator gets a repaint after cleaning as well:


Bleeding the brakes with a Visi-bleed:


Replacing the brake discs after painting the wheels:


Low strength thread lock will prevent these studs coming out next time. The nuts will be stainless.