Saturday, 30 January 2016

Fork Bushes

Due to my phased approach to building my SQ4, I put the forks back together without re-bushing them, many moons ago. They weren't too bad at the time and since Amelia had arrived in a number of boxes, and I had no Ariel experience at the time, I needed to get it assembled to understand what I was dealing with.

Dashing about Norfolk's roads last year showed re-bushing was going to be necessary this winter, so off we go.

The first step was to truss her up with a bungee to stop her shaking her head about. I planned to leave the yokes in place to avoid unnecessary disruption to a running bike.


Then, we need to get the front wheel off the ground without the ever-useful front stand. A scissor jack comes into play here:


Next step is to remove the front wheel, mudguard stays on one side and remove the fork top bolt and clamping cap screw in the bottom yoke. Next, we use the fork puller tool to knock the stanchion out of the taper in the top yoke:


With the leg out, we can start disassembling. We put the leg in the vice using the cast lug on the bottom - we don't want to clamp around the thin slider. Having lifted off the spring, we can use the special tool to remove the seal holder.


With the seal holder undone, we can think about the next step. Lift the seal holder about six inches up the fork leg, and tape it out of the way. Don't try and pull it off upwards, as the leg is tapered and you will stretch the seal.

The top bush retains the leg in the slider, since the bottom bush is bolted to the leg, and the top bush is retained by a circlip under the seal. Here's the circlip in place:


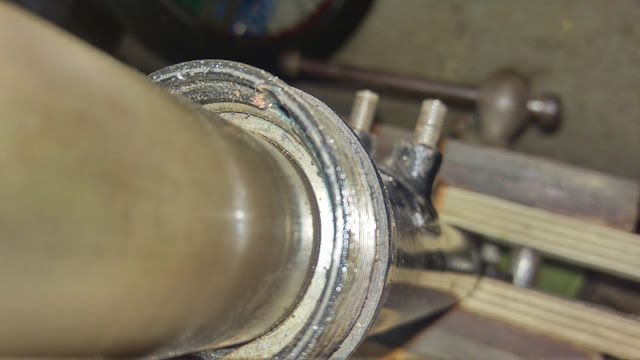
You can see, at just past 12 o'clock, a semicircular groove. This gives you access to the full diameter of the circlip. Get a small flat bladed screwdriver into the groove and push the circlip out. Find the end of the circlip and maneuver the screwdriver, still holding the circlip clear of the groove, towards the end of the circlip. When the end of the circlip is free of its groove, get a scriber or another small screwdriver under the end of the circlip and maneuver it upwards, moving back along the circlip as you winkle it out.

You can then pull the leg out of the slider:


These two pairs oil holes ( the others are behind the leg) show this is a post 1953 leg, which gives more progressive rebound damping than the earlier legs (which only have one pair of holes). The long top bushes which go with these later legs are shown in the picture above; earlier legs use a top bush of about half this length.


Here are the new bushes in place.They were both oversize on the outside diameter and required some 'easing'; The lower bush is retained by the stanchion bottom nut.


The next job is to lubricate the buses with some SAE 30 and place the stanchion back in the slider. You can then maneuver the circlip back into place by aligning one end in it's groove, and pushing the clip away from the retained end with a small screwdriver until it snaps into place. Next, put a little more oil around the top bush and screw the seal holder back down with the factory tool; fit the spring and you are done:


This is a new H18-48 stanchion top adapter, courtesy of Mr. John Budgen. The previous one succumbed to an unfortunate incident involving a copper mallet and a lack of forethought. You can see how it used to look in the previous picture - they are not very strong and cannot tolerate much abuse.


Once you have it all back together, you will need to fill the forks up with some SAE 30 engine oil. This is simply accomplished by removing the top bolt and, with a small funnel, pouring sufficient oil into the leg such that the level is 17-18 inches (43 cm) from the top of the yoke.

For reference, here is a sectioned drawing of the fork from Mr Charles Weller's book.

Sunday, 24 January 2016

Competition Bantam

Who needs one? Well, I'd certainly like one, but today proved that you can go slipping and sliding about on a road going Bantam quite happily, if you don't mind getting your boots and trouser muddy!

We went along this nice little track near to East Beckham in Norfolk today, on a round about trip back from the post office.


This is called Mill Lane, leading to Bennington's lane, and is about a mile & a half of potholed farm track. I last drove it about 10 years ago in the dry - today was wet & muddy and I almost lost the Bantam a couple of times. Road tyres!

Looks a bit muddy now! Glad I sprayed it with ACF50 before I set out.


Since I road this track, I have had another look at the Norfolk County Council definitive map - and realised that I completely mis-read the legend. I found that this track is not a BOAT (Byway Open to All Traffic) at all - it is in fact, like most others, a Restricted Byway - horses, bicycles and pedestrians only!

Best not do that again.

Thursday, 10 December 2015

Solex again

Time to start finishing stuff off. I have some new carburetter parts from David Jones from Sleaford, who specializes in the repair of the Solex carburetters fitted to the SQ4.

It's the bi-starter control and the air bell:


All in pieces


Assembled. This is the bi-starter in the off position - that knob is a little long I think.


I have an insulator that I will be fitting as well.


It's a 3 mm thick insulator and it is manufactured from Silicon Resin Bonded Fabric. It is impervious to Ethanol and it is 50% more heat resistant than a standard Tufnol insulator and 100% stronger than phenolic. In an ideal world this would reduce the heat going into the carburetter body and reduce the high-temperature misfire.

In the real world it causes the float bowl to foul the distributor cap and is completely useless. But I did discover that when you inevitably drop the carburetter flange washers and they fall behind the dynamo, you can see them sitting under the dynamo from the rear, if you look across the top of the gearbox. I'm sure if I drop enough down there they will start coming out.

Just like the 2p falls at the amusement arcade.

A post from Mark Walsh of the AOMCC shows me that if an insulator won't fit on my machine, there is something wrong: there is a lot of space on Mark's machine, which already has an insulator:

Mark Walsh's SQ4

Here's the Solex back in place:


You can see I have changed the brass tag that is used to mount the throttle return spring. It now has several spring positions so that I can vary the torque the spring exerts on the throttle spindle - I want the throttle to spring shut, but I want a light action. The second spring position is good for that!

Here's a close up of an earlier version:


Sunday, 6 December 2015

Front Brake again

As you all know I've been having trouble with my front brake on and off since my SQ4 went back on the road late last year. This year it has had a lot of attention, and is a lot more effective than it was.

Yet it still 'groans' particularly when reversing but also moving forward, which is probably down to the cable being a little tight and the shoes still bedding it in.

However, I wanted to check with members of the AOMCC forum if anybody's brake plates bend outward (in the direction of the arrow) by a few mm when the brake is applied. This is quite easy to see in the garage. I'm guessing that's not normal.


Something is maybe not as square as it should be. Maybe the brake shoes are able to move out of true, or the hub is slightly conical? Maybe there is some play that should not be available?

The brake shoe linings may have worn lopsided and when force applied the brake plate springs a bit. They are not actually that strong, and normally don't have to resist much force along the line of the axle axis. The shoes may have worn unevenly. The springs may be distorting the way they sit, or the plate may be too close to the wheel hub. Something wrong with the bearing installation.

So I stripped it down again. What I didn't expect was two cracked shoes...


Given that these shoes have a marginally smaller diameter than the drum, and have an adjuster at one end that allows the shoe to be brought into contact with the drum, it's easy to see how this would happen.

The story goes like this. If you do the adjuster up relatively tight, the slightest movement of the shoe brings the friction material into contact with the drum. If there is a gap between shoe and drum at the cam end of the shoe, but none at the other end operation of the cam will attempt to bring the cam end of the shoe into contact with the drum, bending the shoe about the contact point at the adjuster end; the resulting bending moment causes a tensile load on the inner diameter of the shoe, leading to brittle fracture due to the hardness in the casting.


While this brake design is used in every car drum brake I have ever seen, it is invariably with fabricated steel shoes which will be considerably tougher than this cast aluminium.

Splendid club the AOMCC. Not more than a few hours after posting the story of my plight on the forum, Paul Jameson had put these in the post!


Many thanks Paul. I also have this from Draganfly, in exchange for my previous, silver painted version:


So the next step is to fettle it all to fit and get her back on the road.

Saturday, 5 December 2015

Huntmaster - Missing parts appear

The Huntmaster was always going to be a long term project, partly out of time but also for want of space. It's lurking about in the garage and from time to time something pops up on eBay, or something else triggers the realisation that a part is missing.

Looking at the engine one idle evening I took the points cover off the end of the magneto only to find they were missing! These K2F points assemblies see to make a lot of money on eBay, so I had to wait a while before I could get one at a reasonable price. Here it is along with the fixing screw:


And here it is back at home in the magneto


And here's another one, this time from Adrie deGraff from Holland. Its the front section of the rear chaincase:


It needs a bit of welding, but this is what it should look like:


And this is the other side:


And what it should look like:


Thursday, 29 October 2015

Bulbs again

A few days later, we have a package from Paul Goff:

All now fitted.

Saturday, 24 October 2015

Happy Anniversary!

Well, its four years to the day since Amelia came to stay.

Here she is on the day she arrived:


And here's a recent picture:


Tool Bench

Another day, another bench... This time, for some power tools - a bandsaw and a pillar drill, and maybe a bench grinder. Oh, and a big ol' vice... and... and...


4" x 2" battens (roof joists, out of a skip) secured with 6 off 8 mm frame fixes...


Top added - two pieces of thick beech-edged MDF (salvaged from my dad's garage), screwed to the battens. Legs also added, 3" x 2" pine, salvaged from an old door. Nothing actually paid for yet!

For future reference, the new tool bench is 1500 mm x 500 mm.


The ladies waited outside.

Wednesday, 21 October 2015

Badges again

Today the new badges are dry, so we can put them on. Here they are against the old ones:


And now one on the machine:


Lovely!

Looks great doesn't it. Thanks for giving us a lovely bike Mr. Page!


New Badges

Amelia's original badges and the chrome flashes which live behind them have looked very tired since she arrived nearly four years ago, and I was lucky enough to find a better condition set, genuine Ariel parts still with the patina of age, but less of it... Here they are:


The paint is all missing, so we will need to do a little job on that. First clean them up with some Farecla G10 rubbing compound, then mask them up:


Now, trim the masking back:


Paint with some etch primer:


and some top coat:


remove the mask while the paint is still wet:


And leave it to dry.

Monday, 19 October 2015

Dusky Jaunt

Well, a little jaunt around North Norfolk yesterday evening left me thinking about my lights, as the nights are drawing ever inward.

The Lucas C35SD dynamo, in standard condition and running 6V into a modern V-Reg regulator rectifier charges the batteries at anything over idling. However, put the main beam on and you have to get to about 40 mph to get it to balance, and this is only running a 35W/35W BPF headlamp as it would have been in 1951, with a 5/21W stop tail - all old-fashioned tungsten bulbs.


In addition to this it has the 3W BA9 pilot light and the 2.4W BA9 light in the speedo.

I think some upgrades are in order. Here's my list:
  • 35W/35W QH BPF headlamp - B635BPFQH is the one I have in mind, from Paul Goff
  • LED tail lamp - I'll use the LD6RST 
  • LED pilot lamp - Paul's LDBA9DWneg is the one here, drawing 1.5W, or LDT10DWH6V depending on which is brighter
  • LED speedo lamp - again LDBA9DWneg is the one
as a minimum. And then maybe, because this is getting expensive, I will add:
  • LED indicators
  • LED indicator relay
I'm toying with the idea of replacing the cheapo repro Lucas 529 rear light, which I fitted as it is much larger and more visible than the original Lucas 480, with a better one from Paul Goff.

I have to make sure that the bike is (if I recall correctly) wired negative earth (which it is - I went and looked at the battery) - the regulator certainly is - because LEDs are polarity sensitive. I'll maybe look into the bright daytime running lights Paul sells as well, since I have two positions for pilot lights.

I also discovered, by the way, that you can ground the side stand on cornering!


Thursday, 15 October 2015

The Square Four in Racing

I can't quite believe that I have never come across Kees' site before, but I'm looking forward to reading about the various racing Square Fours that have been built. Here's the link:

http://keesknegt.doodlekit.com/home/index

Wednesday, 7 October 2015

Black bin bags

I just fitted a tyre to my MZ TS250, without tyre irons, using only a bin bag like this:


I did use my feet, since a modern 350-16 tyre is a lot stiffer than the tyre he is fitting but it is brilliant. I’m never going back to the old way.

Saturday, 3 October 2015

Norfolk Coast Bimble

A nice little run (after filling up with Super unleaded for the first time) to Overstrand this morning in milky sunlight found this rather splendid Commando special at a local garage:


I've been looking for a local MOT station to get the MZ TS250/1 on the road for the winter, and this is just the spot, with a very friendly and knowledgeable tester who owned also the Commando - which to me is recommendation in itself. All I have to do now is fit the tyres to the MZ and we'll be ready for it to become the hack!


Amelia seems very happy, in her element on these single carriageway, twisty relatively quiet open roads; but pulling away from the garage, noisily to show off to an interested pedestrian left me limping along beside the pavement wishing I'd turned the fuel tap on...

Returning to a more mundane setting (Homebase Cromer) shows her domestic side as well, running errands. A small oil leak has appeared which coats the frame rails, oil filter and sump. the chain oiler is open but the chain is dry; I have closed it now. We'll have to do a bit of investigation.


At least the rocker shafts are no longer leaking!