Thursday, 10 January 2019

FH Crankcases

I have two sets of crankcases for the Huntmaster - the original 1958 cases which are bare and clean (and match the buff log book), and a set from a complete 1955 engine. Pundits will know that the 1958 cases will take the later large big-end journal crank designed for the 1954 BSA Road Rocket and fitted to all the A10 range from 1958, including bikes with A10 derived engines such as the Huntmaster. Thus, the earlier Huntmaster engines (like my 1955 version) use the smaller big-end crankshaft from the Golden Flash.

I plan to use the later, original cases to recreate the bike as it was, and part of this job is to strip the 1955 cases for transfer into the 1958 cases when the time comes.

Here are the 1955 cases. One of the things missing from the 1958 cases is the oil pick up pipe:


Clean 1958 cases with the idler from the 1955 engine:


1955 cases - the drive side camshaft bush:


Timing side camshaft bush in the 1958 cases; timing side main is missing, as is the oil pick up pipe:


Oil pick up pipe and timing side main in the 1955 engine. The oil feed check valve (under the staked screw) is present and operational in both sets of cases:


Knocking out the oil pick up pipe with a piece of 3/16" rod:


Remaining items removed from the 1955 cases:


Monday, 7 January 2019

Charlie's Shed - Winding Springs

It's fun when new jobs come along, as each time you have to discover new techniques & tools to achieve the goal.

This one is about spring winding. Over the years we've had a few elderly bicycles (and of course the dear departed CycleMaster), often with rod brakes and it transpires that the return springs for the handlebar levers are not available - even our old-school cycle shop cannot find them anymore.

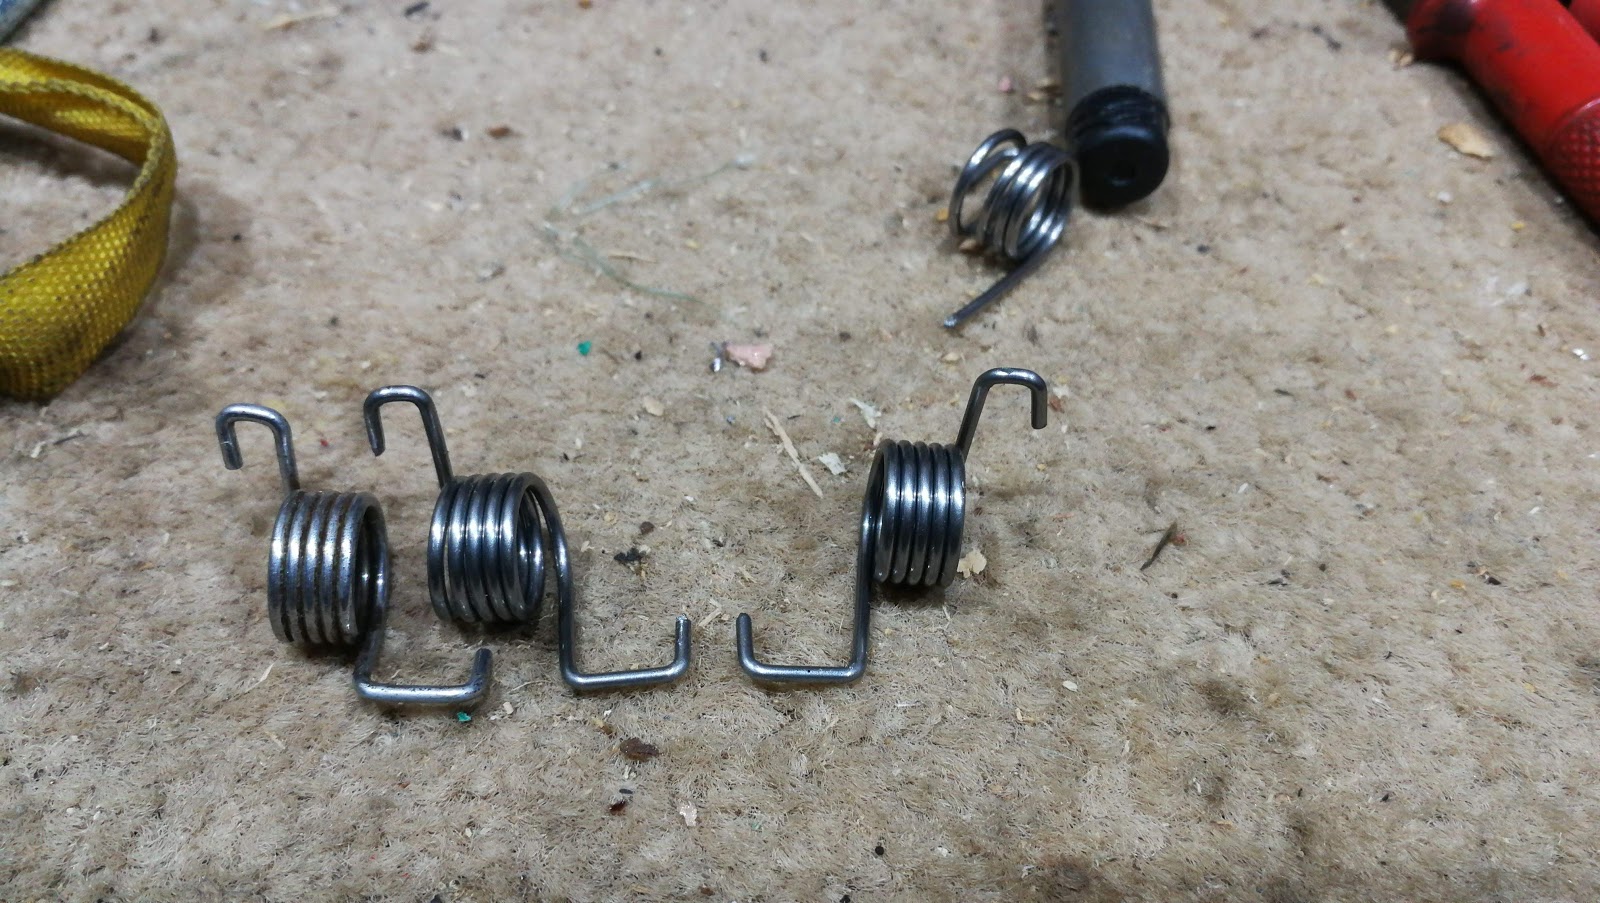
These levers use a special torsion spring wrapped around the lever, which hooks around the lever and bears on the handlebar. The springs are handed, and we have an example:


It's a torsion spring of about 5 turns, with a double bend at each end; I plan to wind a few of these springs, of both hands. I don't plan to plate them; I'll probably paint them black. The plan is to bend one of the right angles into one end, wind the spring and then make the other bends. Whether we can do that without heat remains to be seen, and the spring will need to be tempered to reduce the residual stresses left after the bending operation.

First though, I need to establish some dimensional parameters in order to make the tools to wind the springs. The micrometer shows us the wire is 0.060" diameter in it's plated condition; I was able to buy some 0.055" piano wire easily from eBay.


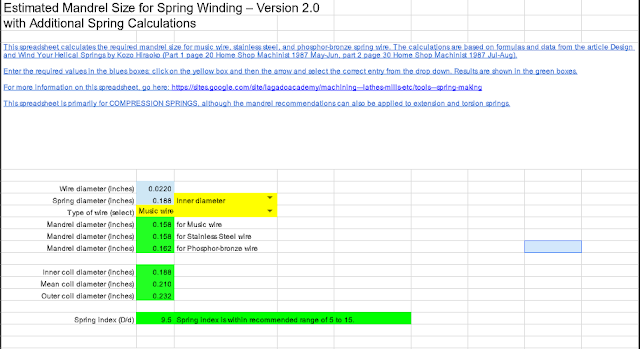
Click the picture to get a link to this calculator. Based upon the number of turns and the wire diameter, the calculator tells me that I need to have a mandrel of 0.344" diameter, which I will turn up on the lathe:


The mandrel will need a 'flag' to trap the first end of the spring, like this:


I've welded this in place:


The flag needs a notch to trap the first end of the spring


You can use the notch to form the first end:


Forming this way does not produce a neat square end like the original.

However, in the interest of learning I made a prototype in the lathe. I turned the lathe in gear, power off using a tommy bar in the chuck key slots. I formed the spring using hand tension only and produced this first spring. the second end was formed with pliers:


Not too shabby; I know that the mandrel is still too large as I planned to avoid taking the finishing cuts until I had welded it so it is no surprise that the spring is slightly too big - I am on the right track though.

In the next few pictures, I show my latest method. Not wishing to put too much time into tooling for two springs, I took short cuts until I could prove the method. If I can successfully and repetitively make these springs, I might make some better tooling.

I folded a bit of 1.5 mm sheet over the wire to make a tensioner. This is notched at the rear so the tension goes into the lathe tool post, and it has a 5 mm hole at the front, so the grub screw retains the tensioner in place without adding to the wire tension; the other three grub screws tension the wire. There is a piece of 6 mm square bar under the tensioner, packing it up. The mandrel is the correct size to the calculator.


From the top down, you can see that I've put a notch in the front of the tensioner. This is to to guide the wire onto the mandrel at the appropriate point.


Here you can see the wire going onto the mandrel:


I think I've cracked the method for bending the springs now. These are bits I've developed:


The first prototypes proved that I needed a better method of forming the bends, as the method of bending with pliers wasn't producing crisp bends. These two pictures show what I did:


So these are the two prototypes I've made, left hand and right hand:


Here's one in situ, showing that the wide end is way too long. It's supposed to fit around that pedestal the the bar is mounted on:



Top Nuts!

I saw these lovely fork top nuts on eBay recently, and had to have them. My SQ4 is not over-restored, it's a patinated working bike but my fork top nuts are very rusty:


These fit the bill beautifully:


I'll need to sort out the washers at some point but for now these look good:


Saturday, 5 January 2019

North Norfolk Jaunt

A few miles in the cold around Norfolk today - Weybourne, Cley and Salthouse on the W/NG:

Moody W/NG Picture

Old machines at Weybourne Beach

Monday, 26 November 2018

More timing gear

In a recent post, we looked at stripping the gear in the inner timing cover. This time, we are going to complete the strip in that area in preparation to splitting the crankcases.

As you will remember, I'd removed the dynamo sprocket after a bit of a struggle and went on to make a gudgeon pin puller so that I could lock the crankshaft, prior to removing the rest of the timing gear.

I locked the crank with a bit of 5/8" bar through the little end eyes, protecting the crankcase mouth with some strips of 3/8" MDF, then I knocked back the tab washers on the oil pump & camshaft nuts.

Both these nuts appear to have a 25/32" hexagon, close to 20mm - I used a 20 mm six sided socket. Fortunately neither nut was particularly tight and they came off with no drama.

The camshaft pinion is provided with two 1/4" BSC tapped holes, so its easy to pull the pinion off:


With the cam pinion out of the way, I could wind off the oil pump drive and remove the oil pump. It's a mazak pump - we'll think about replacing that at some point, but it probably won't be in the first phase of this rebuild. I also took the opportunity to remove the oil pressure relief valve while the cases were still in the engine stand - it's all present and correct, but its full of gunge.


The oil pump drive is damaged - it's old damage, not by me fortunately. We'll have to get it clean to see if it is usable:


I was concerned about pulling the crankshaft pinion off - or rather, I was concerned about spending more time making another puller. In the event, it moved with the slightest encouragement from a pair of screwdrivers.


So that's it for the moment - I just have to clean the parts up, inspect and store them before moving on to the crankcase and crankshaft.

I'll just have a sort through all this sludge...


Saturday, 24 November 2018

Cake Run

Overcast and chilly but dry, and recovering from a couple of days with the grandchildren, today came another opportunity to give the SQ4 another test run after the summer oil leaks and HT problems which were eventually traced to be the cause of a persistent and long term misfire. Although the cold weather might be masking a hot weather running problem, the bike is running better than it ever has.

Preparing for the trip, I noticed the oil level was lower than expected, though a few minutes idling had it a little closer to normal. I topped it up, and resolved to look at it again when I got back.


A 27 mile around North Norfolk had me grinning from ear to ear as usual, though I thought the handling was a little uncertain; the brakes appear to be bedding in, the chain needs adjusting and the lower chain guard is clanking as usual.


Back in the workshop (after collecting the pear & ginger cake from the excellent Picnic Fayre in Cley), I set about adjusting the chain and rear brake. Since I was adjusting the chain, I removed the wheel to take off the chainguard - more on that in another post. I moved the chain back half a turn and lubricated it; I adjusted the brake up 3/8 of a turn and put an 1/8 of a turn on the front as well. The primary chain looked OK, and the oil level was good. I checked and nipped up all the spokes on the rear wheel.

Turning my attention to the engine, I had a good look around underneath. There was quite a leak coming from somewhere judging by the clean oil 'trails', possibly:

  • the engine breather, which had a drip on the outlet pipe
  • the sump plate or plug
  • the front offside main bearing
  • the oil filter
  • the oil feed to the engine or to the top end
  • a combination of several things

Essentially, there were too many possibilities to narrow it down. I tightened the oil feeds, the sump plate and plug, the crankshaft bearing cover and the timing cover but essentially none of them needed attention.

The front main bearing cover has a peculiar copper/asbestos gasket which looks more like an exhaust ring gasket and I suspect is wrongly installed. It's not the gasket I would have chosen for that application.

More later.

Thursday, 22 November 2018

Gudgeon Pin Extractor

Gudgeon or wrist pins retain the piston to the connecting rod with varying degrees of clearance, transition or interference fit according to the predicted running temperature of the engine, and are retained by a circlip at each end in addition to any fit. This means that removal of the circlips will sometimes allow the pin to slide out, but more often than not you'll need to warm the piston such that it will release its grip on the pin. Obviously, belting the end of a tight pin will do your connecting rods no favours at all, so anything other than light tapping is a no-no.

A much better approach is to use a gudgeon pin extractor. These usually consist of a threaded rod passing through the pin, some means of holding the pin, a tube large enough to allow the pin to come out and a large washer to spread the load.

I made this extractor to deal with the FH gudgeon pins, which were quite tight. It is made of a bit of 1" tube, with a closed end turned from aluminium; that's M6 threaded rod in the middle. The tube is long enough to accommodate a 3" gudgeon pin.


A turned steel plug fits neatly into the gudgeon pin aperture in the piston and is reduced to just fit inside the pin such that it doesn't slop about. It's threaded M6 internally and is retained with a nut for the moment.


Here it is, set up and ready to extract the first pin:


Here's the extractor set up on the piston. The end of the tube is shaped to fit the piston, spreading the load over the piston wall:


A blast of heat on the piston crown and some steady winding are all that is necessary to draw the pin out of the piston, without placing any side load on the connecting rod. When you have done winding, the pin is neatly enclosed in the extractor:


Job done.

Thursday, 8 November 2018

FH - inner timing cover

In the last instalment, we removed the outer timing cover to gain access to the dynamo drive, the ATD and the oil pump. We removed the dynamo drive chain but then stopped with this old, lightweight Japanese puller distorting itself while attempting to remove the large dynamo pulley on the idler pinion.


Over a week later, with three trips away for work I can tell you that the old puller never managed it and I had to make a new one. The new one, backed by a piece of 1" x 3/16" angle, is considerably stiffer though it loses out by having a coarse thread - the centre thread on a puller should be a fine, hard thread. Anyhow, it worked well enough and the dynamo pulley is now off.


Here we are - I told you it was off. Nothing untoward here apart from damage around the ATD which suggests it has been whirling around and rubbing the timing case:


The next step was to remove the inner case, which is held in place with four screws. A quick dose of the traditional remedy - leather hammer and impact driver, though not necessarily in that order, had it free in a jiffy. A mysterious 'tink' followed and this little chap appeared in the drip tray:


I wonder what it is?

Now we can see the crankcase, which looks fine & dandy. The idler will have to go back in to release the crankshaft & cam shaft nuts.


Here's the crankcase side of the inner timing cover. You can see the damage the loose ATD has caused in the top right of the picture.


And close up:


The magneto shaft, whilst it will turn the points, is very wobbly. This is more than a bearing problem - I think the shaft is broken.


Here's the timing cover in the parts washer, almost clean.


It was about now that I discovered you are not supposed to put paraffin (kerosene) in these little parts washers...