Saturday 28 December 2013

Let's have a look...

A bit of spare time today, amidst fitting rings and general domestica. Time to drag Amelia out of her warm shed and have a look at her with the seat on:


One thing I have been a bit concerned about is the proximity of the rear tyre to the mudguard. You see a lot of these bikes with a huge gap here which looks wrong. Here's mine :

Looking good! 

Thursday 26 December 2013

Dynamo - recharged

Well here we are again, Christmas break and a bit more time. We've had Amelia for two years now, not long by Square Four restoration standards. Various diversions have come & gone, some are still here. I've had three months off work (diverted by a house renovation and a long hot summer, plus a daughter off to university), come back to a major project for Statoil, and I've been asked to write a book. A bike book!

But back to Amelia. Various thing are in the wings - we are working on the engine (long wait for piston rings; still not out of the woods)  sorting out the coil mounting, and finishing the dynamo. The dynamo is key because I understand that you cannot fit the end cover with the primary cases in place, and of course you need the dynamo to set up the valve timing, so I want to have it available before I finish the top end.

So, we had an old post on the dynamo, where we discovered it was intact electrically, but the bearings were shot and it was full of oil due to the failure of the oil seal. So the first job, which I did a few weeks ago, was to obtain the parts from Draganfly. After that, it was time to clear the bench and pull it apart again.

The bearing has to come out first:

Very easy with the heat gun and a large socket, though you have to bear on the inner race which is not ideal, but these are not a tight fit.

This is the drive end in pieces, with a replacement nut, oil seal and bearings from Draganfly. Those parts, looking like a shim and a gasket (because they are a shim and a gasket) are not original. They are (quite proficiently) home made and do not appear in the Lucas workshop instructions for the C35SD.
The bearing shoulder is very thin, and through in one place. So much for Lucas QC. Next stop, the commutator end - and as before the armature is a tight fit in the bearing. Lucas usefully provided a tapped hole, where you can use one of the long screws to push the armature out of the bearing:

So, commutator end in pieces. A proper clean ensues with white spirit to remove all the grease, plus wire brushes and wire wool to reveal a lovely plated surface on the body. Actually, there is no means of removing the commutator end bearing unless you have an expanding bearing extractor (which I don't), but luckily enough, with a bit of heat and some sharp taps on the vice, the old bearing dropped out.
New bearing in place:
Then, on to reassembly. Drive end in place with new bearing and seal:
Clean commutator (those deep scores won't do any harm) with its spring and thrust bearing. This is an early CS35D - later ones used on Mk2 SQ4s have a different arrangement here:
New brushes dropped in and springs hooked back over them:
Field coil reconnected to the terminal post:
And the end cap refitted with some grommets (plus a new O ring around the body, visible in the picture during brush fitting), new screws & fibre washers. By the way, this end cap is the original and was always black:
And here is the drive end:
Job done. I'll have to motor test it before it goes on, but I have a 1986 Ibanez PF400 to fix for my friend Simon.

Saturday 7 December 2013

Coil Mounting 2

Apologies for the time I've taken with this, but life (actually DIY) gets in the way sometimes.
 
This started life, as most of my fabricated parts do, as a piece of cardboard. It's cut from 16 swg cold rolled sheet, and will carry the coil vertically, mounted on the Lucas bracket in those two holes in the middle.
It mounts from the shouldered nut under the seat, and will fix to the gearbox top bolt.


Here it is again, after some redesign, with the bottom bracket tacked in place. I've tried to use 'styling' ideas from other Ariel components, to make it look as if it was designed in Birmingham in the 1940's:


And from behind. I will probably make those nuts captive, otherwise removing the coil will involve removing the bracket:


And various shots in situ. It now has a stiffened edge:


Looks tidy around the gearbox top bolt


Looks a little too close to the battery carrier. I will move that bottom bracket a little.


Painting next.


Sunday 20 October 2013

Fuel Tank

One thing (there may be others!) that has puzzled me is the absence of a crossover tube on Amelia's fuel tank. It seems to be a fairly well established fact that Solex-equipped Square Fours have one fuel tap, with built in reserve, on the left - because a tap on the right is in the way of the Bi-Starter knob and could drip fuel (they don't leak, do they?) on the distributor.

These first three pictures are all 1951 SQ4's, like Amelia:

Left hand tap (also note the brake lever stop! never seen one of those before) 

No right hand tap, no crossover loop. this bike has a drain point at the RH front of the tank, like mine


Obvious crossover loop
Amelia has two petrol taps, one drain point at the front, just like this 1952 KH

Left hand petrol tap, no crossover loop

Right hand petrol tap, no crossover loop
So... What do y'all think of that?

Saturday 19 October 2013

Battery Carrier

This is about the carrier I am using to mount my gel batteries. Here are the batteries:

Now these will happily fit in the box, indeed they were chosen to do so. But because they are so short they will be a pig to get out, and I want to hide a fuse box and maybe some other wizardry in there. So, I have come up with this:

It's a simple carrier made from 18 swg cold rolled sheet; the batteries enter from one side and it is lifted out of the battery box by the two handles on top. The top deck is to carry the fuse box. I plan for the cables to exit through a slot in the upper inboard edge of the battery box:


So, now I have identified where the cables are going, I can cut a slot in the box. A coping saw and a half round file does the job nicely:


So next, final wiring and painting. I have used closed cell neoprene foam to cushion the batteries; painted with U-POL etch primer and black gloss, and wired in accordance with the diagram on the wiring page.


All that remains is to put the lid back on and look at sealing the lid.

Coil Mounting

One thing I'm puzzled by, and other restorers of Square Fours if the AOMCC forum is anything to go by, is where the coil is mounted.

There's no definitive answer here at the moment, but this post is here to record what I have observed over the last couple of years research.

The most telling pictures are from bikes that have been dragged from barns, unrestored. Unfortunately none of the pictures clearly show the coil mounting on early bikes, only hinting at where the coil is. This post is also worth a look, as is this one.

Here we go.
Restored 1951 bike with coil on bracket behind battery


Restored 1952 bike with no evidence of bracket behind battery - I've no picture of the under seat area on this bike

Restored 1952 bike with coil on mudguard

Unrestored 1949 machine with coil on mudguard. Unknown bracket behind battery. 
Unrestored 1951 bike with coil on bracket behind battery & hitherto unknown regulator shield & brake pedal stop

Saturday 28 September 2013

Batteries

As I've mentioned before, I have a very nice GRP battery box from Draganfly, made to look like a Lucas GU11E battery. Here it is:


Now, the original GU11E apparently has a 20 Ah capacity, which is the peculiar way in which our industry has chosen to illustrate the energy capacity of a battery - it means it is capable of delivering a current of 20 Amps for an hour, or 40 Amps for half an hour, or 10 amps for 2 hours - you get the idea.

Now an Ampere, or Amp for short, is a unit of current, and current is the rate of flow of electrical charge - measured in coulombs. So an Amp is a way of describing coulombs per unit of time - 1 amp represents 1 coulomb per second of flowing charge. So, if you multiply Amps by time (As in Amp x hour = Ah) , you get back to charge again - and units of charge are what is stored in our batteries.

So, in order to get my bike to run for a reasonable period of time without being charged (for when I choose to ride at 10 mph in a traffic queue on the M25 (when did you last see a Square Four do that?)) I need a battery of sufficient capacity to deliver sufficient current for the time I am riding so slowly that the battery is not charging, without running flat and bring the bike to an undignified halt.

You see, according to this chart I draw from the data in the C35SD dynamo instructions combined with some details of the Square Four's performance (and assuming the C35SD runs at engine speed, which it does, more or less) the dynamo does not start charging until you are moving at about 20 mph. So, go slower than this and the battery is draining.


But how much current do I use? Let's work it out:
  • my headlamp will use up to 55W, which at 6V needs just under 10 Amps to deliver the power (Power, W = Potential Difference V x Current A)
  • my tail lamp will use 5W, which needs another Amp
  • Lets assume the ignition coil will need 20 W, or about 3 Amps
Which gives us around 15 Amps, allowing for infrequent use of the stop light and horn. A 20 Ah battery will be flat in 1.334 hours, or 1 hour and 20 minutes. Reasonable? Lets hope so.

So we know what we are aiming at - a 6 Volt battery with capacity of around 20 Ah that will fit in my neat little fibre glass box. Since a year or so into having the Bantam, Beattie has been using a sealed lead-acid battery - the electrolyte is treated to form a gel, so it can't flow out, and the chemistry is altered somehow (I'm not that clever) so that when the battery is charged and would normally produce free oxygen & hydrogen, the gases recombine as water, replacing the lost liquid in the cell. This is really neat for a motorcycle, because it means you can fit them wherever you want (they are really small), they don't drop nasty acid all over your bike (how many rusty battery carriers have you seen?) and because they are made for things like burglar alarms, they are really cheap.

The downside is you cannot abuse them as you can a traditional wet battery - if you overcharge them and lose the electrolyte, you can't replace it.

The thing is, I came to use one of these things the first time because I realised the rudimentary (putting it kindly) charge control system on the Bantam was boiling the original wet battery - so I added a modern solid state regulator/rectifier (from the marvellous Rex Caunt Racing) and was able to use a gel battery. The one on the Bantam is tiny - about 3.4 Ah I think, at 12 V, and has coped perfectly for several years. It even remains charged through the winter, something the old wet battery could never do.

Friday 23 August 2013

Amelia wakes from slumber

Well, she's not running yet, but she is rolling again. I'm posting today because I'm thrilled with how she is coming on...

See for yourselves:

Here's the first picture I have of her in a garden:


Here's the first picture I took of her in our garden:


And here she is today:


and the drive side:


And today I have received a very nice seat from Drags!

Friday 16 August 2013

Wheels again...

Work on the engine has stalled for a moment whilst we wait for FW Thornton to see if they can help out with a ring problem. The bench is now clear, so we can start on one of those other 'waiting in the wings' jobs that we use to fill in when the main workface stops for some reason. Bike building is like that - there is always something else you can do to fill in when waiting for parts.

And so to building the wheels. The 'jig' I use is just a piece of 19 mm ply that used to be part of a desk. The cutaway sections make it really easy to get to the nipples. It has a hole on the middle for the wheel spindle, which is a piece of 1/2" round bar. Using the spindle as a centre, I mark the outer diameter of the rim on the board. Using the offset measurements I made from the wheel earlier (before I stripped it) I make up four wooden blocks to lift the rim off the board to the correct offset. The brake drum, which I use as the datum, is placed face down on the board.
And that is it. There is a much more sophisticated version of this idea in Frank Farrington's excellent book 'The Vintage Motorcyclists Workshop' which includes blocks to control the concentricity of rim & hub - I don't go this far, since when rebuilding a wheel from an intact but rusty version I can buy spokes to exactly the right length and I find that I get very good concentricity by virtue of that spoke length.
So here we go. Set the hub up on the jig:


Add the blocks to establish the rim at the correct offset:


Start adding spokes according to your lacing pattern. You did photograph these wheels before you cut them apart didn't you? It helps if you lift the hub above the jig at this stage, so that you can insert the spokes from both sides. As you add the spokes, try to lay them out according to the lacing pattern. Start with half of the spokes on the lower flange, placing them in alternate holes, pointing in the anticlockwise direction (in the Ariel's case, these spokes have the nipples on the outside of the hub). Then, add the other spokes on the lower flange, pointing them clockwise and crossing the anticlockwise spokes according to the lacing pattern (in Amelia's case, these spokes are threaded from the inside out, have the heads on the inside of the hub, and cross under the anticlockwise spokes).


Then you move on to the spokes in the upper flange, again starting with the anticlockwise spokes. When you have finished, you will have this nice little nest of wire:


Next, lower the hub back on to the jig and lay the rim over the top. Look carefully at your reference photographs, paying close attention to the location of the holes in the dimples in the rim, and make sure you get the rim the right way up. You can easily assemble the whole wheel with the rim upside down, and not notice until you are snugging down the last of the nipples. I know - I have done it!


Now, again we must be careful and work to a pattern, but a slightly different pattern this time. We don't want to scratch that shiny new paint! Starting again with the spokes in the lower flange, and your handy lacing pattern, locate the dimple nearest the valve hole that corresponds with an anticlockwise spoke on the lower flange. Insert one of those spokes in that hole and screw a nipple on a couple of turns. Then, moving clockwise round the rim, insert all the anticlockwise spokes in the lower flange. Then, start on the anticlockwise spokes on the upper flange and continue until you have a nipple on all the upper & lower anticlockwise spokes.
The reason for doing it this way is twofold:
  1. Working on spokes that point in the same direction means that the wheel is very flexible, and you can rotate the rim to get the spokes in the holes without endangering the paint.
  2. Working on the upper and lower spokes in the same direction means that you cannot 'trap' the unfitted clockwise spokes whilst you fit the anticlockwise spokes. Because the clockwise spoke crossings are inside the anticlockwise spokes, they can't get stuck behind spokes that are already fitted.
Keep the nipples really loose to maintain flexibility - you are only trying to establish the lacing pattern and get the spokes in the right holes at the moment.
Next, fit the spokes pointing clockwise. Start at the from the valve hole, and fit the first spoke from the lower flange, followed by the first spoke from the upper flange. Moving clockwise around the rim, fit the spokes in turn - lower, upper, lower, upper - until you have all the nipples fitted.
Now, take the wheel off the jig and have a good look at it. Give it a shake. Make sure all those spokes are entering those holes easily - there should be no tension anywhere at this point. If you are happy, put the wheel on the jig and wind the nipples in until there are 3 threads showing, and repeat the look/shake process. You will probably need to use a screwdriver now, as the wheel will stiffen up.
Now, with the wheel back on the jig, wind the nipples in until there is no thread showing. As you do, make sure the spoke heads are seating properly in their countersinks. Look & shake again. Next step, run all the nipples down until the end of the spoke is level with the bottom of the screwdriver slot in the nipple; then go around again until the end of each spoke is level with the very end of the nipple - you will need a spanner or a spoke key this time. Off the jig again, you should find you have a very stiff wheel. If one or two of the spokes are still loose, snug them down now, as evenly as possible.
This gentle step by step approach to spoke fitting ensures that the wheel comes off the jig needing very little trueing up.
So next, trueing up.
Hopefully, having built the wheels on the jig, we will have very little truing to do. However, there is usually some runout, but the offset is probably good. By the way, the offset I measure from Amelia's original wheels was:
  • Rear 9/16" on the brake side
  • Front 1 1/4" on the brake side

Now, what is runout? There are two types of runout - lateral runout and radial runout, as illustrated by this handy picture I made:
Radial run out is, pretty obviously, an eccentricity of the rim relative to the hub. Lateral runout is when the axis of the rim is not parallel to the axis of the hub. Easier to explain with the pictures!

So, how to fix it? Well, you can do miracles with a spoke key, but first you have to figure out what is wrong. To establish this, you need to set the wheels up in a jig, like this:


This is made from two pieces of timber, glued and screwed to a cross member, held in the vice. There is a V-notch in each piece for the wheel spindle to rest in. At the bottom, adjacent to the rim, are two pins:


One is set up so it almost touches the side of the rim; the other so it almost touches the outermost edge of the rim. Spin the wheel in the jig, and you will be probably be able to see both lateral and radial runout. Move the wheel slowly, and you will be able to quantify the run out in both directions - it is essential to mark the rim where the runout is worst.

You'll want to get the runout down to 1 mm, or 1/32", in both radial & lateral directions. You've probably got about 3 mm or 1/8" now, right?

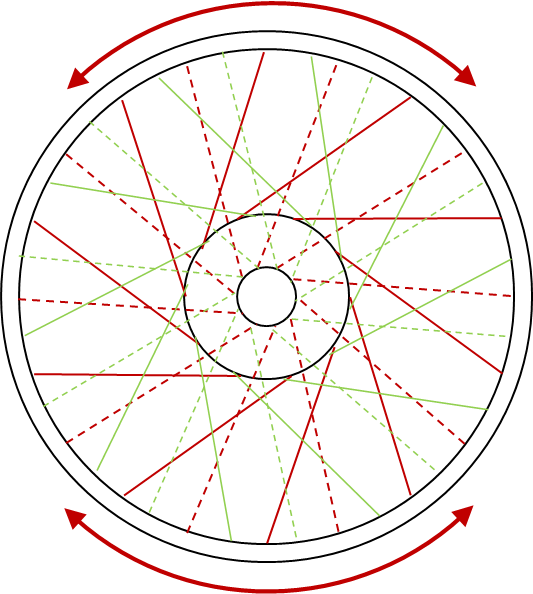
So the key to tackling runout is the proper adjustment of the spokes. Here's another of Simes' handy diagrams:

Ain't that pretty! A few words about it:
  • The dotted lines show the spokes on the non-brake side
  • The solid lines show spokes on the brake side
  • The 'upper half' and 'lower half' relate to positions on the wheel relative to a mark you will make on the rim during the truing process
  • The green spokes go ant-clockwise
  • The red spokes go clockwise
Tackle the radial runout first. Roll the wheel in the jig again, and  relative to your pointer, mark the rim where it has most runout, i.e. where it is lowest against the pointer, where the distance from the outside of the rim to the centre of the axle is greatest.

Roll the rim until that marked point is at the bottom, and now you will have  spokes in the lower half and spokes in the upper half. Because we have the worst runout at the bottom, the spokes in the lower half need to be shorter, and the spokes in the upper half need to be longer, to reduce the runout and make the rim concentric with the hub.

So, you must appreciate that the spokes which are more or less horizontal, and radiate from the extreme left and right of the hub don't have any effect on the runout. Conversely, those running vertically are controlling the runout and it is these that will be adjusted most. Those that run diagonally from the hub have more or less effect depending upon how vertical or horizontal they are.

So, using this diagram:


We can see that the spokes within the red arrows have more effect on the runout than those that are outside the arrows. To correct the runout, hold the wheel in the same position (with your mark at the bottom) and loosen the spokes within the red arrow at the top by, say, 1/4 turn. Loosen ALL the spokes within the arrow - the red, green, dotted and solid ones. Then tighten the ones at the bottom, within the arrow, by the same amounts.
When you have finished, measure the runout again. It should have reduced a little. Now  repeat the process until you are satisfied that you have minimised the runout.
Correcting lateral runout is a little more complicated. Remember:
So again, locate the point where the runout is worst, and mark it. In this case, 'worst' means the point where the BOTTOM of the rim is furthest to the RIGHT, like the diagram above.

To tackle this lateral runout, adjust the spokes in this sequence:
  1. Loosen the SOLID spokes in the lower half of the wheel by 1/4 turn
  2. Loosen the DOTTED spokes in the upper half of the wheel by 1/4 turn
  3. Tighten the DOTTED spokes in the lower half of the wheel by 1/4 turn
  4. Tighten the SOLID spokes in the upper half of the wheel by 1/4 turn
Here is the diagram again to remind you:


When you have finished, measure the runout again. It should have reduced a little. Now  repeat the process until you are satisfied that you have minimised the runout.

And that, ladies and gentlemen, is that. All that remains is to file off the protruding spoke heads:


File them flush with the nipple, so there is no danger of them popping a neat hole in your inner tube. Fit a nice new rim tape, put the tyre on and go and have a beer in the garden.