
Bearings and seals - do they frighten and you and have you running for the Honda parts specialist? Are you scared off, because these things look like important bits of the engine and their failure will have you taking it all apart again? This is true of course, but usually these are just standard proprietary items that the original manufacturer of your engine bought from a specialist supplier.
You can do the same, in many cases.
You need to have a look at the shafts and journals that you want the bearing or seal to go in. In the case of the QR50, I had some old bits knocking about in the big bucket of parts which I could measure. It's useful to cross-reference the old bearing and seal dimensions with the dimensions of the crankcase openings and the shaft journals to check your selected sizes:


While you wait for your parts, make sure the cases are scrupulously clean:

Before you start, assemble the parts you received and look for some suitable drifts to put them in with. You will obviously only push the bearings on the outer race, wont you! Ball type rolling bearings are NOT designed to take substantial axial loads.

Check that they sent you the right ones...

Sit the bearing in the case. You will probably see that it doesn't slide straight in - it shouldn't. If it does, you will need some Loctite Bearing Fit (641, for example) to retain a loose bearing in a casing.

Usually though, if it hasn't been bodged, you will need to heat the casing up such that it expands sufficiently to allow the bearing to drop, or be lightly driven into place. Whilst I've used the oven to heat cases in the past, recently I have been using my heat gun without incurring any problems. This is a 1600 W gun, sold for stripping paint, and I heat the case until 'spit bounces off' as they say.

You can put the bearing in the freezer over night if you have to, and can get it into the 'heating workspace' without warming it up - and it will give you a bit of extra clearance. The thermal expansion coefficient of the aluminium casing is something like twice that of the steel bearing, meaning that you win twice as much clearance in heating the aluminium as you do in freezing the steel; then think that you will raise the aluminium temperature by something like 80°C (from 20°C ambient to 100°C). Reducing the bearing temperature in a domestic freezer could take it from your 20°C ambient to -18°C in the freezer, which might be -5°C by the time you transport it to the bench, so you gain something by doing that.
After that process, the bearing just drops into place:

You'll notice that it is proud of the inner surface of the crankcase. You'll realise that this bearing dictates the endfloat in the crankshaft, so you must be sure that the width of the selected bearing must allow the endfloat to be realised as the designer intended. This should be easy if you have the old bearing (and know that the engine was working with that bearing) but may require some measurement and calculation.
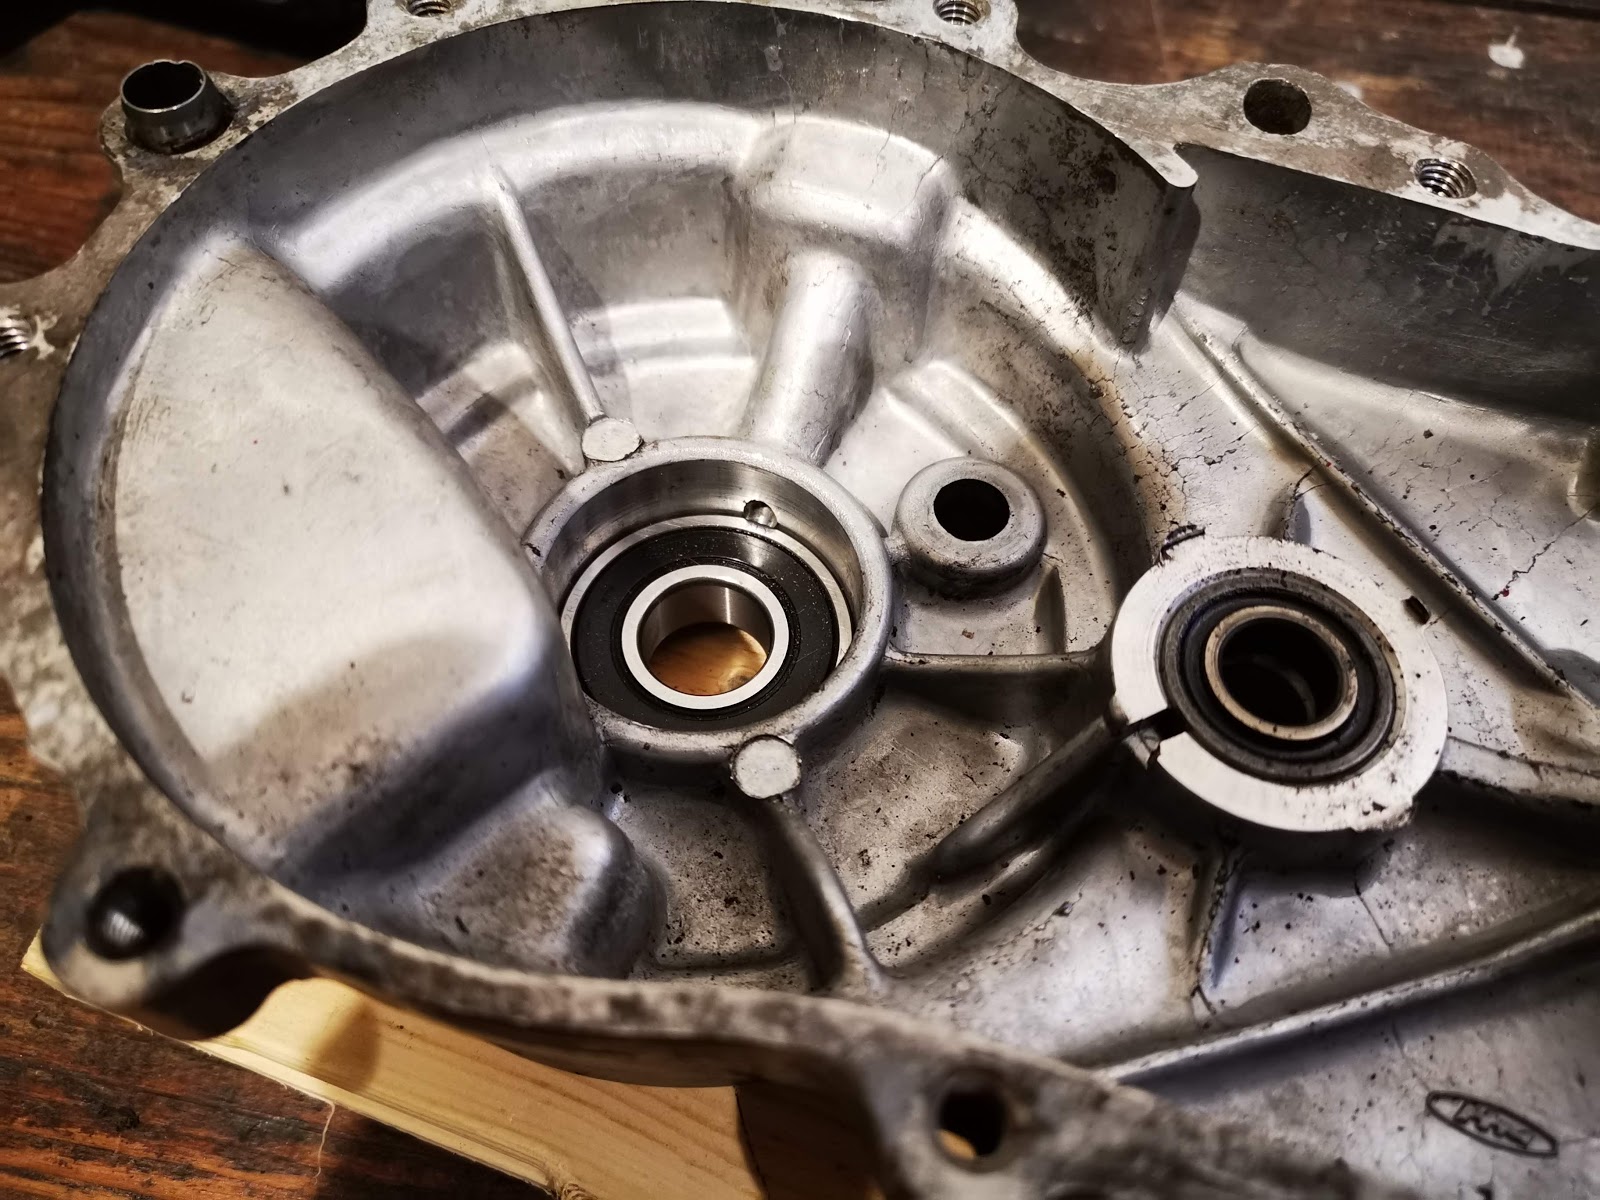
You'll note that the main bearings shown have no seals - you can see the balls. This is as the designer required, since this is a two-stroke engine lubricated by oil mist. This next bearing is the main output shaft from the transmission, the stub axle which carries the back wheel. It's fitted with rubber seals on both sides, since this bearing seals the transmission fluids from the brake drum. There is a third seal between this bearing and the transmission, with a drain hole between the seal and the bearing which you can see in the picture below:

With the main bearings in place, we can trial fit the crankshaft:

Here's the engine assembled. Unfortunately I don't have the casing screws at the moment so cannot finally close the engine up:

You can do the same, in many cases.
You need to have a look at the shafts and journals that you want the bearing or seal to go in. In the case of the QR50, I had some old bits knocking about in the big bucket of parts which I could measure. It's useful to cross-reference the old bearing and seal dimensions with the dimensions of the crankcase openings and the shaft journals to check your selected sizes:

I use Simply Bearings for bearing and seal supplies, because they are reliable, offer a wide range of parts to suit your budget and they deliver quickly. They are at https://simplybearings.co.uk and if you select 'Deep Groove Ball Bearings' you will see this handy product finder which allows you to select bearings by ID, width, OD, fit, seal type, and manufacturer:

While you wait for your parts, make sure the cases are scrupulously clean:

Before you start, assemble the parts you received and look for some suitable drifts to put them in with. You will obviously only push the bearings on the outer race, wont you! Ball type rolling bearings are NOT designed to take substantial axial loads.

Check that they sent you the right ones...

Sit the bearing in the case. You will probably see that it doesn't slide straight in - it shouldn't. If it does, you will need some Loctite Bearing Fit (641, for example) to retain a loose bearing in a casing.

Usually though, if it hasn't been bodged, you will need to heat the casing up such that it expands sufficiently to allow the bearing to drop, or be lightly driven into place. Whilst I've used the oven to heat cases in the past, recently I have been using my heat gun without incurring any problems. This is a 1600 W gun, sold for stripping paint, and I heat the case until 'spit bounces off' as they say.

You can put the bearing in the freezer over night if you have to, and can get it into the 'heating workspace' without warming it up - and it will give you a bit of extra clearance. The thermal expansion coefficient of the aluminium casing is something like twice that of the steel bearing, meaning that you win twice as much clearance in heating the aluminium as you do in freezing the steel; then think that you will raise the aluminium temperature by something like 80°C (from 20°C ambient to 100°C). Reducing the bearing temperature in a domestic freezer could take it from your 20°C ambient to -18°C in the freezer, which might be -5°C by the time you transport it to the bench, so you gain something by doing that.
After that process, the bearing just drops into place:

You'll notice that it is proud of the inner surface of the crankcase. You'll realise that this bearing dictates the endfloat in the crankshaft, so you must be sure that the width of the selected bearing must allow the endfloat to be realised as the designer intended. This should be easy if you have the old bearing (and know that the engine was working with that bearing) but may require some measurement and calculation.
You'll note that the main bearings shown have no seals - you can see the balls. This is as the designer required, since this is a two-stroke engine lubricated by oil mist. This next bearing is the main output shaft from the transmission, the stub axle which carries the back wheel. It's fitted with rubber seals on both sides, since this bearing seals the transmission fluids from the brake drum. There is a third seal between this bearing and the transmission, with a drain hole between the seal and the bearing which you can see in the picture below:
With the main bearings in place, we can trial fit the crankshaft:

Here's the engine assembled. Unfortunately I don't have the casing screws at the moment so cannot finally close the engine up:

No comments:
Post a Comment