Sunday, 19 January 2020

QR50 Assessment - Missing & Broken

Today I had a chance to look at the boxes of QR50 bits. My oldest grandson is 5 in a few weeks and I need to get this bike together before he misses out. Lets see:

Frame

As I've shown in previous posts, the frame is in good shape. I need to finish the footrests, but that is in hand and will be completed when all of the other problems find solutions. As you can see, I have left the stubs (to which the folding footrests will be mounted) long enough to carry the footrest rubbers for the time being.


The centre stand and it's bracket are all there, though the pivot hole in it's bracket is pretty worn. It will weld up OK.

Forks

I've assembled the forks today. The fasteners are all there and the yokes and spindle are in good shape; the bushes are completely shot; I suspect the snubbers and rebound springs are missing; one of the main springs is missing and there is no wheel spindle, though this is just a long plain bolt that I can make easily.


There are no gaiters or shrouds for the top of the sliders either. The drawings suggest that the plastic bushes are held in by circlips in the normal way - I will machine some new bushes on the lathe.

Rear Suspension

The main concern here is the metalastik bush lugs on the crankcases - one of them is cracked. I will probably let that one go for a bit, to see if it becomes a problem.

There rear suspension strut is there and will just need painting.


Wheels

The wheels are both there and just need new tyres, painting and possibly new bearings.

Brakes

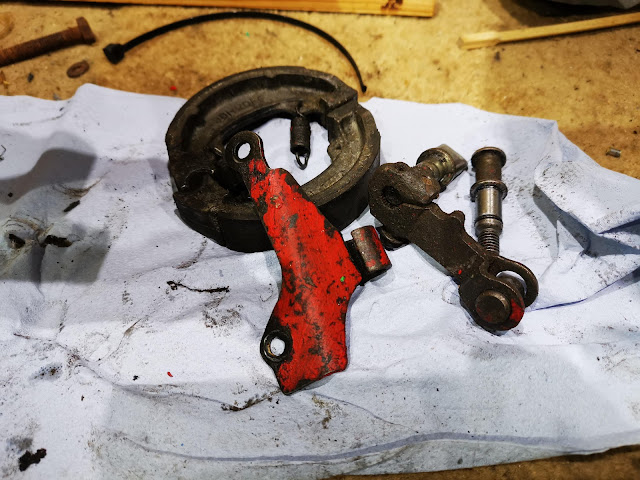
Brake plates and components are all there and will just need a clean up


Engine

The engine is in a bit of a state, though nothing really serious:

  • The crankshaft has the usual mushroomed thread 
  • There are several (about 6) cylinder head fins broken off. I'm hoping to use the AC MIG set on this and learn to weld aluminium...
  • One of the barrel fins is broken, which is not really a problem.
  • One of the oil pump castings is broken. Unfortunately it looks like this is special to the QR50, so we will have to get inventive... Perhaps I can machine a replacement from a slice of aluminium bar stock?
  • One of the crankcase lugs, used to mount the exhaust, is broken out.
  • The ignition sensor is toast. I may need to buy a complete new stator unless I can rewind the sensor coil.
  • The generator coil appears to have no leads
  • The generator cover is missing. Old saucepan anyone?
This is the broken part of the 2-stroke injection pump. I guess that what is missing here is a facility to operate the pump from the throttle cable, to vary the injection rate - I may elect to run the bike on premix initially.


This is the crankshaft. I'll set this up in the lathe with the fixed steady and machine it true. hopefully there will be enough length for the nut to fit?


Transmission

The transmission looks like it is all there, though the rear drive shaft bearings are missing.

Despite the empty cases in the picture, I have all of the transmission components and have had them assembled.


The kick start quadrant splines are, as usual, completely knackered. Fortunately we have an NC50 transmission with a good one.

Electrics & Controls

The coil is there and in good shape; the small main harness is also there with the CDI unit. The handlebar switches are all missing - I have the left hand lever but not the right one. There's a lot of this sort of thing available very cheaply on eBay though, so that's easily sorted.

The handlebars are a puzzle in that they have conventional clamps and conventional clamp on levers - i.e. the bars are plain. All the parts list illustrations I have seen show bars with a welded lug for the left hand lever and a welded lug for mounting the bars to the top yoke.


Given that these bars look a bit high and wide for the bike - the originals appear much lower to the yoke in some pictures. I may cut, slug and weld them up:


Or this:


I might also make a welded bracket to attach them to the yoke, per the originals:


Then again, it might be an optical illusion. The cables are all there.

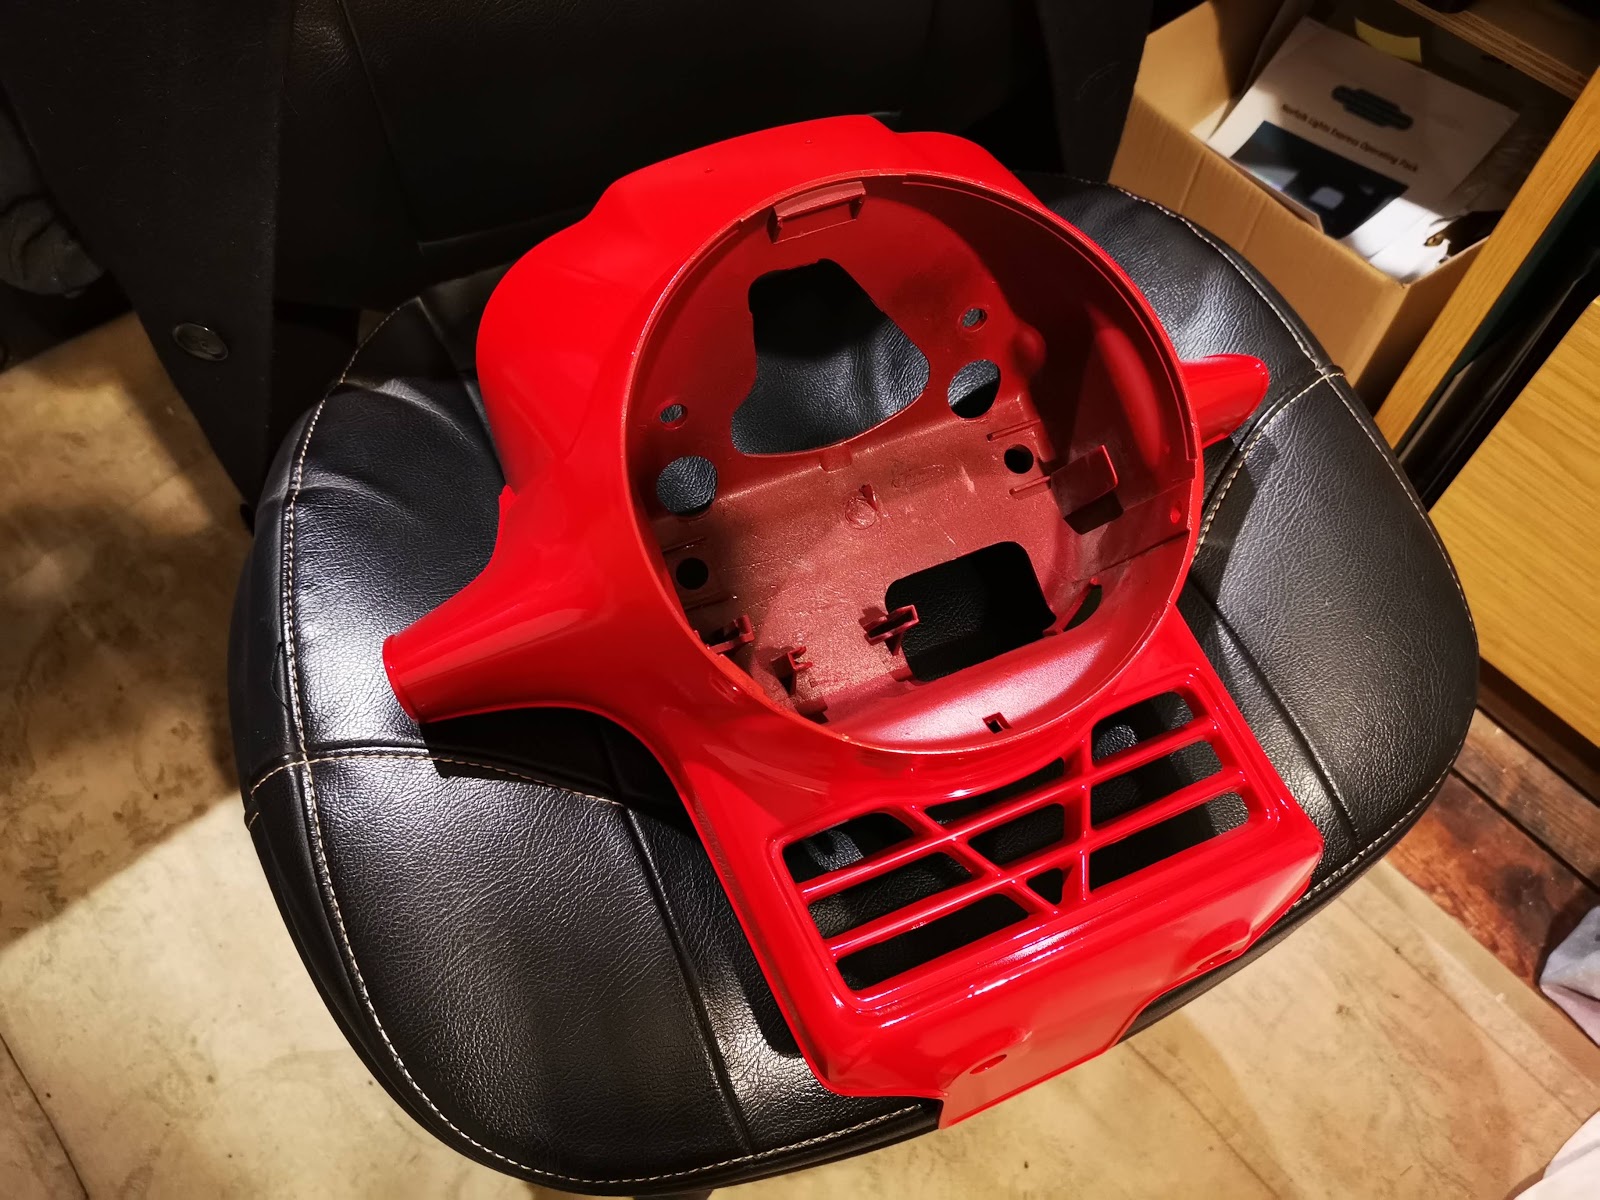
Mudguards & Bodywork

The front mudguard is there and in good shape - it's bolts are also present. The rear mudguard/seat unit is holed (looks like a heavy rider wore through the mudguard with a tyre) and the seat will need a new cover.

The number plate is probably damaged beyond repair.

Fuel and Exhaust

The fuel tank is as yet unseen. The exhaust pipe is there but the silencer is missing; the carburetter is there and looks OK.

The air filter is missing, but I can easily find a pod filter.

Summing Up

This is quite challenging. The little bike is financially not worth a lot - you see them for sale at £500-600 or so. Parts are available but very expensive, so this will be a labour of love for a grandparent wishing to extend his restoration skills - this might be a 1982 bike but the skills I will learn could be used on a 1920's bike.

In order of importance:
  1. I need the crankshaft thread fixed in order to assemble the engine
  2. I need the missing bearings to assemble the transmission
  3. I need the forks fixed in order to get the bike to roll around, and I need at least one tyre
  4. I need the generator stator in order for the engine to run
  5. I need some handlebar controls to be able to stop the engine and to be able to brake
  6. I need an exhaust
Everything else I can get around - the engine will run with a shortage of head and barrel fins; it will run on premix with no oil pump (and I don't have to find all the oil lines); one tyre is probably OK since this is not a road bike; I can find an air filter from eBay; the bike will be fine with fixed footrests for a while.

Badge Repair

Motorcycle badges are often held in place with clips over posts, plastic, die cast zinc or otherwise and they are often quite weak. Removing the clips with a Dremel often helps but sometimes you find the badges already broken.

This badge from the front of the CX500 is a typical example. This time, I chose to glue two M3 screws to the back of the badge and retain them in place with nuts and Loctite 243. The badge is fixed to the screws with Araldite 5 minute Metal adhesive.


I prepared the badge by drilling out the broken posts with a 6 mm twist drill.


The screws were held during setting with this simple wooden jig, drilled with 3 mm holes at the proper pitch for the badge. This guaranteed the screws would be parallel to each other and perpendicular to the badge:


I modified the screw heads using the lathe to match the 118 degree included angle of the 6 mm drill, to maximise the contact with the badge:


The CX is back together now and starting to look a bit more presentable:


Monday, 13 January 2020

CX500 - Fixing wiring...

There have been a few posts on the CX500 recently, and hardly anything on my Ariels. The W/NG is on holiday with my son; the FH is waiting time and the SQ4 is running around Norfolk as the daily rider since I fixed it's clutch.

After it's test run, where we found a starting problem and non-functioning tail lights it has been back in the workshop for this mess to be fixed:


Most of this is damage to several splices in the main harness, visible as black dots in the wiring diagram:


To get access to this, I have removed the tank and the headlamp cowl. This has let me strip the harness covering back to get good access to the damage:


Stripping the conductor insulation, the copper is too corroded for soldering so the splices will have to be crimped. This is why I always build a new harness for my ground-up restorations:


Repairing the splices is not a huge problem - just crimps and heat shrink sleeving:


I've re-covered the harness with split sleeving for the movement, which is easy to re-open if there are more faults that are going to emerge. We shall see.

Since I have the front end apart I have had the chance to align the cable and harness routing with the drawings in the manual:


Honda manuals are excellent for this. This diagram shows the brake hoses and other cables:


This one shows the engine and battery wiring:


Secondly, I have repainted the headlamp cowl using RS Paints Honda Helios red:


This isn't cheap, but it is excellent paint.


I've also repainted some of the black components in the area:


I masked up the idiot lights - they are glued in place at the factory:

QR50 - Aluminium Welding

A brief look at the crankcases for the QR50 mini-moto reveals that we are either going to be buying some new cases or learning to weld aluminium:

One example of the generator side case has a mounting missing:


The other has damage around one of the casing screws:


Fortunately this has the missing mount present, so there may be some cutting and welding on the cards:


This appears to be part of the exhaust mount:


Wednesday, 8 January 2020

Out & about on the CX

I'm happy to say that the 1978 Honda CX500 is out and about again after I sorted out the front brake and replaced the fork oil. It's been off the road for a while after some tyres, refurbishment, camshaft / rev counter investigation and the repair of the broken caliper bleed nipples.

It rides really nicely on its new Avon Roadrider tyres and it positively flies compared to my SQ4 - but it is also very tall and the riding position feels cramped due to the way it makes you bend your ankles.

Cley, North Norfolk

It's got a couple of problems - the tail lights don't work though I have brake lights and indicators, and the starter circuit has a wiring fault. The system demands the clutch is disengaged, even if the bike is in neutral.

Both faults are a feature of this mess:


I've stripped the tape off the harness here - looks like a previous owner let it chafe through and then bodged it together...

More when I fix it.

Saturday, 7 December 2019

Multigrade Oil

Old instruction books frequently tell you which oil to use in the summer and which oil to use in the winter, so that when our engines are hot, we can still retain sufficient viscosity in summer heat, and that when the weather is cold we can still get the oil moving quickly enough to avoid engine or ankle damage from reluctant kickstarters from oil that refuses to flow. Summer weight oils are of a higher viscosity grade than winter weight oils, for a given engine, and yo change the when the weather starts to get cold.

This is obviously not ideal, and in 1948 an American called Bob Lancaster looked to improve the performance of oils in the Ariel Square Four raced by Gus Johnson. 


Gus Johnson

Bob took a polymer from a company called Enjay Chemical, and blended it with SAE 20 oil to boost the viscosity when hot to near that of SAE 50, while retaining the SAE 20 properties when cold. It was so successful that Bob started a company to manufacture and market the oil, and Torco is still trading today.

So we know that the temperature range the oil is exposed to in many vehicles can be wide and that the difference in viscosities for most single-grade oil is too large between the extremes of temperature to provide the lubrication performance we need. To bring the difference in viscosities closer together, as Bob Lancaster showed us, special polymer additives called viscosity index improvers (VIIs) are added to the oil.

These additives are used to make the base oil a multi-grade motor oil. The idea is to cause the multi-grade oil to have the viscosity of the base grade when cold and the viscosity of the second grade when hot, enabling one type of oil to be used all year. The viscosity of a multi-grade oil varies logarithmically with temperature as does a straight oil, but the slope representing the change is less steep. This slope representing the change with temperature depends on the nature and amount of the additives to the base oil.


The SAE designation for multi-grade oils includes two viscosity grades; for example, 10W-30 designates multi-grade oil. The first number '10W' is the viscosity of the oil at cold temperature and the second number is the viscosity at 100 °C. The two numbers used are individually defined by SAE J300 for single-grade oils. Therefore, an oil labelled as 10W-30 must pass the SAE J300 viscosity grade requirement for both 10W and 30, and all limitations placed on the viscosity grades.

Breakdown of VIIs is a concern in modern motorcycle applications, where the transmission may share lubricating oil with the motor - though obviously that doesn't concern those of us with separate gearboxes. For this reason, synthetic oil or motorcycle-specific oil is sometimes recommended.

Additives

In addition to the viscosity index improvers, oil manufacturers include other additives such as detergents and dispersants to help keep the engine clean by minimizing sludge build-up, corrosion inhibitors, anti-wear additives and alkaline additives to neutralize acidic oxidation products of the oil. Today, we are very concerned with old Square Four engines that have not had their sludge traps properly cleaned - we don't want modern detergents loosening particles and blocking oilways, so we clean them out on rebuild and use a detergent oil with a filter, to keep the sludge in suspension and trap it in the filter..

It is these additives which start to make owners of classic motorcycles think carefully about their oil. For example, most oils produced today are for modern vehicles and have a minimal amount of zinc dialkyldithiophosphate (called ZDDP, so you don’t have try and pronounce dialkyldithiophosphate) which is an anti-wear additive designed to protect metal surfaces with zinc should they come into contact, which is obviously desirable for our camshafts and followers and you might think that you want a lot of zinc in you oil. The problem is, engineering is full of compromises and one is that the quantity of ZDDP is limited because it damages catalytic converters; other extreme pressure additives can limit the performance of wet clutches (clutches running in engine oil) so we have ‘classic’ oils, manufactured to older specifications which contain the additives we need and reflect that not many classic motorcycles have catalytic converters – but a lot of us, Bantam owners included, have wet clutches. Another win for Ariel separate clutches though!

Other EP additives, like calcium sulfonates, are available for additional protection under extreme-pressure conditions or in heavy duty performance situations. Calcium sulfonate additives are also added to protect motor oil from oxidative breakdown and to prevent the formation of sludge and varnish deposits.

Some additives contain molybdenum disulfide which reduces friction, bond to metal, or have anti-wear properties. MoS2 particles can adhere to steel surfaces and some Trabant engine liners were even treated with MoS2 coatings during manufacture to reduce friction.

Standards 

Now you might be thinking this is all a bit bewildering. OK, I understand viscosity, but how do I know which additives are good and which are bad, and how do I know whether the supermarket 20w/50 I just bought has them in?

Engineers to the rescue!

The American Petroleum Institute (API) governs most of the activity in the industry which has paid my wages for the last 25 years. In addition to the SAE classifications for viscosity, we have API specifications for oil performance

The API standard includes alphabetical ‘service classes’ for lubricants, which really refer to the ability of the oil to perform a given task (like lubricating a sliding tappet against a camshaft, for example). These have two general classifications: S for "spark ignition" and C for "commercial/compression ignition" (diesel engines to you and me). Engine oil which has been tested and meets the API standards may display the API Service Symbol (also known as the "Donut") with the service designation on containers sold to oil users.

This started in the 1930’s with the SA classification; today we are up to the ‘SN’ standard. The SN standard refers to a group of laboratory and engine tests, including the latest series for control of high-temperature deposits. Current API service categories include SN, SM, SL and SJ for petrol engines. All previous service designations are obsolete, although motorcycle oils commonly still use the SF/SG standard reflecting the need to control EP additives to protect our clutches and our camshafts.


Since the SG standard, all categories for petrol engine lubricants have placed limitations on the ZDDP content due to the effect ZDDP has on catalytic converters. In API SG rated oils, this was at the 1200-1300 ppm level for zinc and phosphorus, where the current SM is under 600 ppm. This reduction in anti-wear chemicals in oil has caused premature failures of camshafts and other high pressure bearings in many older automobiles and has been blamed for pre-mature failure of the oil pump drive/cam position sensor gear that is meshed with camshaft gear in some modern engines.

Synthetic oils


Synthetic lubricants were first synthesized, or man-made, in significant quantities as replacements for mineral lubricants (and fuels) by German scientists in the late 1930s and early 1940s because of their lack of sufficient quantities of crude for their (primarily military) needs. A significant factor in its gain in popularity was the ability of synthetic-based lubricants to remain fluid in the sub-zero temperatures of the Eastern front in wintertime, temperatures which caused petroleum-based lubricants to solidify owing to their higher wax content. The use of synthetic lubricants widened through the 1950s and 1960s owing to a property at the other end of the temperature spectrum, the ability to lubricate aviation engines at temperatures that caused mineral-based lubricants to break down. In the mid-1970s, synthetic motor oils were formulated and commercially applied for the first time in automotive applications. The same SAE system for designating motor oil viscosity also applies to synthetic oils.

Higher purity and therefore better property control theoretically means synthetic oil has better mechanical properties at extremes of high and low temperatures. The molecules are made large and "soft" enough to retain good viscosity at higher temperatures, yet branched molecular structures interfere with solidification and therefore allow flow at lower temperatures. Thus, although the viscosity still decreases as temperature increases, these synthetic motor oils have a higher viscosity index over the traditional petroleum base. They're specially designed properties allow a wider temperature range at higher and lower temperatures and often include a lower pour point. With their improved viscosity index, synthetic oils need lower levels of viscosity index improvers, which are the oil components most vulnerable to thermal and mechanical degradation as the oil ages, and thus they do not degrade as quickly as traditional motor oils. However, they still fill up with particulate matter, although the matter better suspends within the oil and the oil filter still fills and clogs up over time. So, periodic oil and filter changes should still be done with synthetic oil; but some synthetic oil suppliers suggest that the intervals between oil changes can be longer, sometimes as long as 16,000-24,000 km (10,000–15,000 mi) primarily due to reduced degradation by oxidation.

Friday, 6 December 2019

What's that ominous noise?

Last weekend, my Sunday morning jaunt ended after 1.5 miles with a screech/rattle (strange sound in between the two) that has appeared while accelerating up a hill. I think it's transmission - out of gear the engine appears to be fine. Turning the rear wheel by hand with the clutch out and the bike in gear sounds rattly - I think I will have to take a look at the clutch. The noise changes with clutch operation, less harsh perhaps and appears to be related more to road speed than engine speed.

Of course, as I write this I sound like I have a misplaced confidence that no Square Four owner has any right to - you are always worrying that it is going to lift it's skirts above it's knees and show you a connecting rod when you were least expecting it. This time, I arrived home with the engine ticking over sweetly and it continued to do so when I parked up. 

Running it on the stand, I couldn't replicate the sound, but I did notice the rear wheel is a lot more wobbly than it was when I built it.

A week or so later, after some busy time at work and contemplating that I might get the CX500 on the road, I found a bit of time to pull it apart. It's worth remembering that older bikes are often easier to fix than newer ones - my Square is a lot less complex than the Honda and it's much easier to work on.

All I need is this handy kit that I found in the bike's toolbox:


Or - not. Falling at the first fence, I found that I did not have a 3/8" AF box spanner in the tool roll. This odd ball size fits not only the clutch centre screws but crucially the exhaust pipe clamps - so I couldn't even start the job. I made a note to buy one for the tool roll.

With the pipe off, I slackened off the brake pedal and disconnected the brake light - that lets you remove the clutch dome. I might see if I can get a better shine on that patina:


With the right tools, the clutch plate came off perfectly:


And it revealed a loose clutch centre nut, just as had been predicted by the AOMCC forum panel of experts. The nut was loose but still in place, but it probably wouldn't have come loose at all if I had been a bit more thorough with the tab washer:


Watch:


The clutch plates are getting thin, but I have no wish to re-cork them right now, nor any cork; they need pulling out with this bit of hooked wire I keep in the tool box:


Slightly sticky. That's grease from the centre bearing:


Here it is again - we will have to be sparing with it on reassembly. The splines are no worse than when they went in back in 2014:


And again. Those screws are in place but very loose:


As can be seen in this video:


Thankfully, all looks well under the primary chain cover:


The shock absorber nut is exactly as it was when I fitted it back in 2014:


Sprocket looks fine:


Having removed the chainwheel and carefully removed its bearing (with the twelve needle rollers) I set about removing the rear half of the chaincase. When it wouldn't come free, I remembered that the rear upper chainguard is bolted to the chaincase and that the bolt lives under the battery. This has not been off for ages as it has been no trouble at all:


Here's the bolt I'm talking about. You have to remove the coil as well:


Once behind there all looked fine & dandy:


Oil filter head looks OK:


At close of play, the rear chaincase was back in place, sealed with Threebond 1215:


The next day I tensioned the primary and put the chainguard and the coil back in place, and the following day I put the primary case back together:


Next came the clutch rebuild. This time I paid much closer attention to assembling clutch basket to the sprocket, and the centre to the mainshaft retaining both with Loctite 243.


The mini-lathe is a useful beast. Here I'm turning up a new spacer to fit between the primary chaincase inner half and the frame in stainless steel. It's 1/2" long, 11/32" ID for clearance on a 5/16" bolt and 3/4" OD:


This is the truly awful side stand. I never use this, as it is far too short and consequently precarious. The tie wrap is there to make sure the spring cannot become disengaged from the lug on the leg, which would leave the leg flopping about:


Assembling the battery carrier and it's spacers:


And all back together.