Friday, 21 July 2023

FH - Petrol tank dent repair

 I know I know I know... this bike build has been going on far too long, but in my defence I do have a lot of stuff on. Recently, apart from the puncture I have been faffing about with a press stud on the W/NG panniers, had the carburetter float bowl apart (I must fit a finer fuel filter, the bowl is full of debris and it's stopping the float valve seating), welded up an MZ tank etc. etc...

After several weeks of trying to pull a massive dent out with stick-on dent pullers - I event tried soft soldering one on - I decided the only way I was going to get the dent out was to cut it out, bend the material back to shape and weld it back in. Buoyed with confidence from the MZ TS125 tank, which came out with only two pinholes I decided to go forth with the little Dremel discs:


These discs are one of the best things Dremel make, and the panel was soon out:


Using a variety of tools, including home-made bending irons, adjustable spanners and hammers I adjusted the body of the tank and the panel I had cut out to match a template I hade made from the good side:


I've bought a variety of strong magnets over the years and held the panel in place for tacking:


The plan was to minimise distortion by making short 1/2" welds and letting them cool before moving to a different area, building up the full peripheral weld in short, cool bursts. I started with six-seven tacks:

And ended up with a fully welded panel:

This was dressed back with the Clarke power-file - a 1/2" belt sander, which is proving to be a very useful tool. Next, I closed off the filler neck with duct tape and attached a cycle pump to the fuel tap:

Result! Two small pinholes, fixed in seconds:


Next, Slosh sealant - to ensure an expensive paint job isn't going to be ruined with a fuel leak.

Thursday, 22 June 2023

W/NG - a puncture

Another unexpected event this week - a puncture. Strange, because air suddenly started hissing out of the tyre after I'd been standing in the workshop for an hour - the bike hadn't been out for days. 

I had a spare tube and resolved to fix it with the tools I had on board, just to prove that I could. 

The wheel came out easily, even with the panniers in place, though one of the top hat washers on the drive side (the repro one) was very stiff in the slot. I skimmed it in the lathe. 

Proving that tyre changing is all about technique, the cover came off easily. 

Unusual puncture - the tube has fretted against an unused security bolt hole in the rim:


It's gone through the rim tape too. 


Nothing much here, but I pulled off this old canvas tape, wire brushed the whole rim and laid a piece of the old tube over the hole to reinforce it. 


Having inspected the brake, which was showing nice even wear, I replaced the tube. 


The cover went on without any drama, though initially I forgot you have to start opposite the valve to avoid nipping the tube. 

Job done - almost. The connector hose on the pump was completely knackered. Luck was on my side, because although I inflated the tyre with my workshop pump I found I had a genuine Apex pump with its long connector in stock!


Thursday, 15 June 2023

W/NG - An unexpected event

A few weeks ago I was cracking on home on the W/NG, doing 55-60 up the North Walsham by-pass (the old Midland & Great Northern alignment to Honing) when she suddenly cut out. After finishing the ignition checks I kicked it over to find apparently no compression. I popped the exhaust valve cap off for a look, found nothing and a few minutes later she started OK and carried me home apparently fine.

Stuck valve perhaps? She was pretty hot...

At home, I put the endoscope down the bore for a look and it was clear there had been a partial seizure at some point. Thinking about it, there had been a squeak from the rear tyre and a little shimmy at the back end, and I'd had the clutch in very quickly.

Pulling the head off you  could see the scuff in the bore very clearly:


The rings were OK, apart from the fact that the second ring was tight in it's groove. Hardly surprising really:


Rightly or wrongly, I polished this out. Doubtless someone will tell me I should have replaced the piston.

I built this tool to hold the barrel while I honed it - it's just a couple of bits of plywood:


You can mount it in the vice either way, but this is the most convenient for honing. I mounted it vertically to grind the cylinder head to barrel joint.


I used a cylinder hone to clean up the bore. Hopefully these honing marks will retain a bit more oil...


I also replaced the inlet valve guide which was very loose - the new one had an interference fit in the head but was a smaller bore size - too small for my valve stem. I bored it on the lathe to change the diameter from 5/16" to 3/8", but writing this post I've realised I probably have an exhaust valve in the inlet position... 

Anyhow, it's all gone back together and is running beautifully, apart from a pesky leak from the decompressor. I've reverted to fibre rocker box gaskets (I can't get the aluminium ones to seal) but I've still got a weep from the decompressor, which has a very worn stem. 

It'll take a bit of work to fix that as I want to re-engineer the sealing arrangement, but that will have to wait. It's been OK for the last 70 years. 

Mini-lathe - Another little accessory

A tool height guage! This handy little accessory is made from a bit of 1/2" square bar, polished on the bottom face where it stands on the bed ways. The vertical bit is a piece of strip welded to the base, with a notch at centre height. 

It's used to set up the tool height so it's in the desired position relative to the spindle axis. 


Wednesday, 7 June 2023

Mini-Lathe - A couple of modifications

It's been a while since I wrote anything about the workshop but recently I made a couple of small modifications to the mini-lathe that I'd like to record in this post. 

First up, a new chip guard made from a 2 mm sheet of perspex, mounted on a steel arm with a strong magnet to sit on top of the lathe:

Secondly, I have modified the sleeve nuts used to retain the splash back - these now comprise a 20 mm spacer and a shorter sleeve nut; the splashback now sits 20 mm further back and is no longer fixed directly to the bed. This means that:

  • chips can be pushed into the tray from the splashback and removed from the front
  • the cross slide goes to the end of it's travel without hitting the splashback first.


Monday, 8 May 2023

W/NG - Dealing with leaks

 Long fast club runs tend to reveals failings in your bike, especially when 'given the beans' by other riders. You know who you are! The oil leaks that have plagued the W/NG really made themselves felt on the 87 mile run around Norfolk that the VMCC Blakeney Run entailed. It was clear that the oil was coming from the top end, but I wasn't sure if it was the decompressor, the rocker box gaskets or the cylinder head bolts.

Having spent some resealing the decompressor recently, I removed the rocker boxes to take a look revealing that the existing aluminium gaskets did not fit at all well:


 I resolved to make some new gaskets.


I made these from Flexitallic pink gasket sheet, which I think is rated to 350°C. I made the gasket a bit wider than the aluminium one, to make sure it covered the whole joint. I sealed it in place with Threebond 1215.

Preliminary testing suggests this has sorted most of the problem, but the decompressor is still weeping a bit. I'll have to add some more shims.

Charlie's Shed - Speedometer Cable

For some bizarre reason the speedometer cable on the W/NG broke the other day. It's been there for a couple of thousand miles, but wasn't particularly well lubricated so perhaps that was the reason. I'd not considered repairing a speedo cable before, but there wasn't a replacement available commercially and I needed it for the VMCC run to Blakeney the following weekend, so I decided to attempt a repair.


The first attempt was to use the wonderous TIG set to weld a short length of 4 mm round bar to the end. I filed it square and it looked fine:


I made a little collar out of a bit of 8 mm aluminium round bar and used Araldite to hold it in place:

It lasted 27 miles before it broke in the same place.

Looking at the brand new cable in the Huntmaster, I found that the square drive end of the cable was made in aluminium and crimped to the cable end. I made up a similar fitting in the lathe:

Glued in place, with JB Weld this time, I fitted it to the bike.

I'd also bought a cheap Garmin GPS cycle speedometer, thinking that I'd need one if I ever used the Model A on a club run, which I certainly will do at some point. I'm currently testing the new cable against the Garmin, which reveals that the Chronometric on the W/NG reads about 5% high.

Friday, 28 April 2023

SQ4 Clutch Investigation

 After the Blakeney run, Tom reported that the SQ4 clutch was slipping when he got home - he couldn't get it to go over 50 mph without the clutch slipping. 

We rebuilt it using the new plates from the W/NG, which got it's old Ferodo plates back; middle grandson Felix helped with the job:


We made a little pointer to show the pressure plate was lifting squarely:

Oddly, it wouldn't function with the old pushrod - We had to add 1/8" to the pushrod length, having found the original 12 3/4" wasn't long enough but 13" was too long. We settled on 12 7/8".

A month later, we had the opposite problem where it wouldn't disengage - Tom took it apart again and adjusted it, and all was well. Sticky new plates, or some intermittent fault?

Wednesday, 26 April 2023

VMCC Blakeney Run

 Sunday brings the first VMCC run of the year, the first of many I hope. The W/NG is at son Tom's house with a dead speedo, so the first trip of the day is to go down there, meet up and replace the speedo cable.

That done, it's off to the start point at Spooner Row just outside Wymondham via a petrol stop.


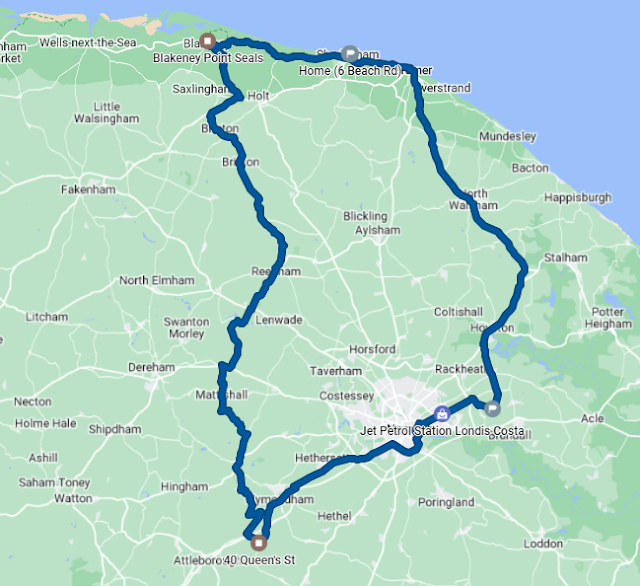
We arrive on time (for the first time!) and sign on, grab a cup of coffee and are welcomed by the crowd falling easily into chatting about our bikes and where we have come from. One or two remember us from Letheringsett 2022 and from a Blue Sky run I did on my own a few years back. At 11, we set off for Blakeney, a 40 mile trip through the Norfolk countryside. Tom leads, as both bikes have route rollers now:


Tom leads that is until his speedo cable snaps again at 7 miles into the run, 27 miles into the day. Tulip sheet navigation is tough with no speedo! I take over, and we arrive safe and sound at Blakeney Quay, for coffee and a burger from Birdys Bakehouse, and very nice it was too.


Tom shares my enthusiasm for Scott motorcycles:


We are joined by one of their owners, who gives us a guided tour of their eccentricities:

There are some more pictures here, on the Norwich Section VMCC website.

Tom and I part on the way home - he's riding the SQ4, as there is a lot of oil coming from the rear of the top end of the W/NG and the speedo needs fixing again. That's 85 miles - hardly fault free but neither of us stopped unexpectedly.

Bring on the next one!

Wednesday, 12 April 2023

W/NG - kickstart repair

 There's always something. There I am, minding my own business and riding the W/NG to my current house renovation project and thinking I've done most of the work on it, when the kickstart fails. It sometimes jams, failing to move the engine and feeling very solid. This is why:

See the first tooth on the quadrant? It's jammed against the pinion. The second tooth will do this too and the way to remedy it is to put the bike in gear, move it a fraction (to move the mainshaft pinion) and kick again, when it will work.

Trouble was, this time I wasn't paying attention and gave it a mighty kick, breaking the quadrant. Damn thing is only 80 years old:

Ariel owners are blessed with the splendid AOMCC, one of the most friendly clubs I have come across and with a superb spares scheme. I had a new quadrant in two days, and given that I had asked the gearbox spares man to find me a new one on Easter Monday (I'm writing this on Wednesday) I think that is pretty impressive.

It's all fixed now.

Friday, 7 April 2023

MZ TS125 - Petrol tank rust repair

This is going to be a bit of a leap of faith - my first fuel tank repair. This is an MZ TS125/150 tank from son Thomas and has fortunately been empty for many years, having been stored in the open in someone’s garden - no wonder it’s rusty.

It’s made from two deep pressings, with a third to form the arch over the frame top tube. There appears to have been a butt weld between the two halves, which has corroded to holes. My plan is to take out the whole weld, all the way around, along with a 1/2” strip either side and then let in a 1” strip of 0.9 mm sheet. I make no apologies for mixing units - anarchy is alive and well here in the workshop.

Using the little Dremel discs to cut out the strip makes the job easy. It’s ideal if you can keep the sides parallel, since then you can make a filler with parallel sides and have a minimal gap which will require minimal filler material. 


I held the sections in with magnets while tacking up:


The first section went in OK - I welded in short sections to avoid overheating the material and causing distortion:


It’s quite a slow job, but if you make sure you have a good position as you weld it’s not too difficult.


I used the little belt sander to clean the welds back:


Not a bad result, though it will need a skim of filler:


Pressure testing revealed two pin holes in my welding which were easily fixed. More worrying is a further pin hole behind one of the brackets, which is completely inaccessible and looks like it might turn into a bigger hole:


I’m going to use a tank sealant to fix that. More later.

Saturday, 1 April 2023

W/NG - Horn Repair

 Well it's been a week of cracking through little bike jobs, alongside welding up rust holes in the fuel tank of yet another Eastern Bloc two-stroke, this time an MZ TS125 - but more of that later.

For some while the W/NG horn has been a little touchy, because the horn adjuster doesn't work very well due to a stripped brass lock nut, though I improved it a lot in the middle of last summer by squashing the nut slightly. It has an odd thread, 0.209" x 36 tpi which I found by luck on eBay - it's a bicycle tyre valve core thread!

The adjuster lives behind the tone ring nut:

The one that was fitted had a 10 mm hexagon and was a half nut - it may have been 0 BA at one time and forced on, but I suspect it was the original as it was cadmium plated, or perhaps faded nickel over brass. I made a new one out of 0.445" EN1 hexagon bar, turned with a significant chamfer on one side to clear the inside of the domed tone ring nut:


It works beautifully.


That's it for a bit on W/NG repairs. I still have the bum pad to make and the dynamo bearing felt to put in, and I have to monitor the new seal in the decompressor. The jury is still out on the field stand springs - they still have a safety chain on, though it hasn't made another bid for freedom since I tightened and retempered the bottom spring.